Since my previous sharing on Why Should I integrate Nintex Workflow Cloud?, I’ve been thinking to invest more time in giving additional example(s) on how I have used NWC API to integrate the workflow into the project I have been helping out for a partner. As the project is still in stealth mode, I thought maybe I can still share pieces of concepts or works we have done bringing over the NWC tasks to a custom portal built on Node JS.
Nintex Workflow Cloud has been a great platform for us to automate business processes, due to it’s focus not as an end user portal to host business data. Integration scenarios always brought to attention on how to leverage the NWC workflows in a custom portal.
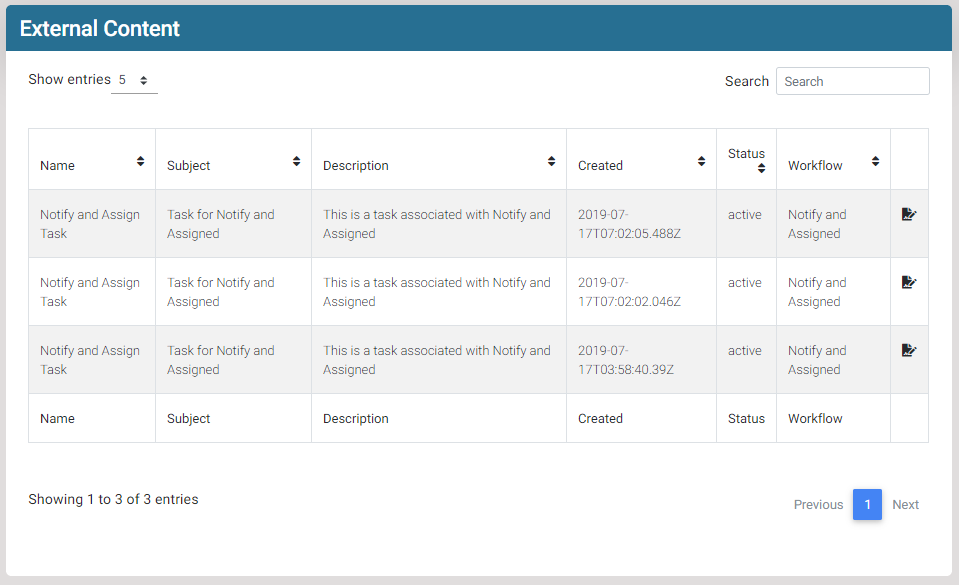
In this article, I am trying to share an actual example on one of the projects using Node JS. The portal’s events of adding or modifying it’s content triggering the NWC workflow to run, as all the users are with the custom portal instead of NWC portal, we have brought over the NWC task into the custom portal for users’ to action on their task(s). The outcome of this is the “Tasks List ” page showing a list of active/pending task of the user shown in the below capture.
Task View Page
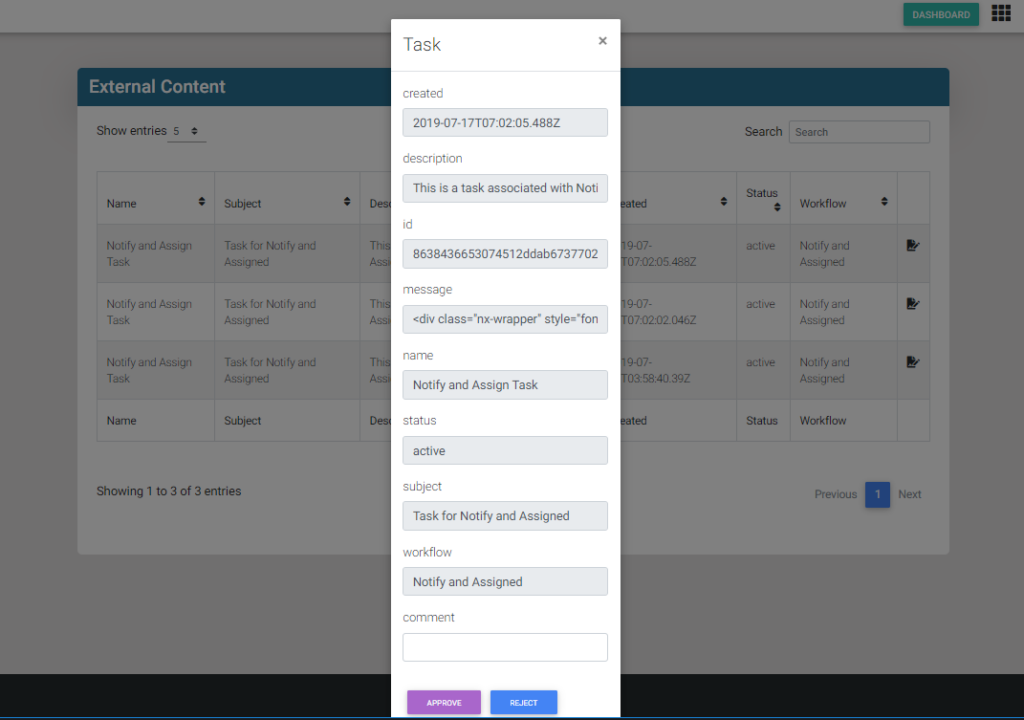
The task View Page is filtered with active Task(s) belonging to the current user. User can click on the action icon to show the task detail on a custom form, to either Approve or Reject a task, this is shown in below capture
Task Approval
The above scenario is presented using React JS, which is supported by the two routes setup on the Node JS on the server side. I am not sharin the client side React JS modules, assumming if you are using Vue, Angular or other on the client side, the two routes we have setup on the Node’s routing will be the same on helping to get the list of tasks or updating of tasks to NWC. The routes are simple as to “get a list of task(s) filter by status, date, and user”, and “update of a single task” using the NWC provided end points.
const request = require('request')
const URL = require('url')

module.exports = (app) => {

  app.get('/api/external-content',authenticate(), (req, res) => {
    const authorization = {
      authorization: 'Bearer here-is-the-personal-access-token-u-can-get-from-nwc-settings'
    }

    request('https://us.nintex.io/workflows/v1/tasks?from=2018-11-01', { headers: authorization }, (error, response, body) => {
      if (error) console.error(error)
      if (response.statusCode === 200) {

        var res_data = JSON.parse(body)
        if(res_data && res_data.tasks.length!=0){
        res.send({ data: res_data})
      }
    })
  })

  app.patch('/api/external-content',authenticate(), (req, res) => {
    const url = URL.parse(req.url, true)
    const taskId = url.query.task_id
    const headers = {
      authorization: 'Bearer here-is-the-personal-access-token-u-can-get-from-nwc-settings'
    }

    const requestOptions = {
      method: 'PATCH',
      uri: `https://us.nintex.io/workflows/v1/tasks/${taskId}`,
      body: JSON.stringify(req.body),
      headers
    }

    request(requestOptions, (error, response, body) => {
        if (error) console.error(error)
        if (response.statusCode === 200) {
          let result
          try {
            result = JSON.parse(body)
          } catch (err) {
            if (err) result = body
          }

          res.send({ result })
        } else {
          res.send({ result: 'request is not valid'})
        }
      }
    )
  })
}
The above code was easy as NWC’s API documentation at get-tasks, and update-a-task have given us very good code samples not just for Node, but also cURL, C#, JavaScript, Ruby, and Python.
I was asked recently to explain how Microsoft Flow could be integrated with Nintex Workflow Cloud. The point of the question was that Workflow Cloud provides enterprise level workflow capability, so it supports custom workflow connectors via the OpenAPI/Swagger definitions.
In this article I’ll explain how we can integrate Nintex Workflow Cloud and Microsoft Flow, leveraging the Nintex Workflow Cloud’s Xtension framework to sync Microsoft Outlook calendar with Google Calendar.
Calling Nintex Workflow Cloud from Microsoft Flow
1. To call Nintex Workflow Cloud from Microsoft Flow, I have created a Nintex Workflow Cloud workflow with an external start event as shown here. I have also included parameters I want to bring over from Outlook Event to sync with Google Calendar Event (in this example, Event Title, location, ID, Start date-time and End date-time).
2. Once the workflow is published, it gives us details on how the workflow could be triggered from external system(s). What we need from this published workflow is the URL as shown below:
3. I have created a blank Microsoft Flow with only two steps added. The first is the trigger “when a new event is created (v1)” of Outlook Event. The second is the HTTP + Swagger as shown below.
4. Paste the URL from the published Nintex Workflow Cloud from step 2 above to the “SWAGGER ENDPOINT URL” as shown below:
5. The “HTTP + Swagger” action will be refreshed with the required parameters as we have defined in Nintex Workflow Cloud. We can now supply the values to pass from Outlook Calendar event to Nintex Workflow Cloud as shown in the diagram below.
Extend Nintex Workflow Cloud with Google Calendar connectors
Nintex Workflow Cloud does not by default provide Google Calendar connectors. However, using the Nintex Xtensions Framework, we can create any connectors we need, as long as they comply with the OpenAPI/Swagger standard.
To do this, here are the steps I followed.
1. Identify Google Calendar APIs.
Google provides rich APIs to its applications/services, including Google Calendar APIs. The reference to the Google Calendar API provides all the details we need, such as end point URL, HTTP Request, and Parameters for the call.
2. The Swagger file we are creating requires us to specify the API scope, which is provided in the reference document and shown in the diagram below.
3. Prepare the Swagger file and save it with a json extension for importing to Nintex Workflow Cloud Xtensions.
{
"swagger": "2.0",
"info": {
"version": "1.0.0",
"title": "Google Calendar API",
"description": "Google Calendar API"
},
"host": "www.googleapis.com",
"basePath": "/calendar/v3",
"schemes": [
"https"
],
"produces": [
"application/json"
],
"paths": {
"/calendars/{calendarId}/events": {
"post": {
"tags": [
"Insert new event"
],
"summary": "Insert Event",
"description": "Insert a new event",
"operationId": "insert",
"parameters": [
{
"in": "body",
"name": "body",
"schema": {
"$ref": "#/definitions/Event"
}
},
{
"name": "calendarId",
"type": "string",
"in": "path",
"description": "Google Calendar ID",
"required": true
}
],
"responses": {
"200": {
"description": "OK",
"schema": {
"$ref": "#/definitions/Event"
}
}
},
"security": [
{
"Oauth2": [
"https://www.googleapis.com/auth/calendar"
]
}
]
}
}
},
"definitions": {
"Event": {
"type": "object",
"properties": {
"start": {
"description": "The (inclusive) start time of the event. For a recurring event, this is the start time of the first instance.",
"type": "object",
"properties": {
"date": {
"type": "string",
"format": "date"
},
"datetime": {
"type": "string",
"format": "date-time"
},
"timezone": {
"type": "string"
}
}
},
"end": {
"description": "The (inclusive) end time of the event. For a recurring event, this is the end time of the first instance.",
"type": "object",
"properties": {
"date": {
"type": "string",
"format": "date"
},
"datetime": {
"type": "string",
"format": "date-time"
},
"timezone": {
"type": "string"
}
}
},
"location": {
"description": "location of event. Optional.",
"type": "string"
},
"summary": {
"description": "Event title",
"type": "string"
},
"description": {
"description": "Description of the event. Optional.",
"type": "string"
}
}
}
},
"securityDefinitions": {
"Oauth2": {
"authorizationUrl": "https://accounts.google.com/o/oauth2/auth",
"description": "Oauth 2.0 authentication",
"flow": "implicit",
"scopes": {
"https://www.googleapis.com/auth/calendar": "Read and Write access to Calendars",
"https://www.googleapis.com/auth/calendar.readonly": "Read access to Calendars"
},
"type": "oauth2"
}
}
}
4. Once we have the required Swagger file, we can add it to the Xtensions from the Xtensions page of the Nintex Workflow Cloud dashboard as shown here.
5. As the Swagger file includes the Security Definitions to use OAuth, we will need to provide the required Security details as shown in the diagram below. Note that in our example here, we will select “Google” for the Security value from this page. I shared how to get the Client ID and Client Secret in the “Obtain OAuth 2.0 credentials from the Google API Console” section of my previous blog post Using OAuth 2.0 to access other cloud services from NWC.
6. Once we enter the required values of Security,Client ID, and Client Secret, click Next to continue, where we will specify an Icon, Name,and Description for the Connector. I have used Google Calendar and Google Calendar API for the Name and Description values in my example.
7. The new Xtension will be added as shown below
8. We may now edit the Nintex Workflow Cloud workflow to include the new connector to add an event to Google Calendar. Note that we need to add a connection and grant Nintex Workflow Cloud access to the Google Calendar for the purpose. This is required because we need to specify a connection to be used in the connector actions.
With the same approach, we may include all the required Google Calendar API end-points to the Nintex Workflow Cloud.
I am going to demonstrate a Production Planning process that is powered by Nintex Workflow in this blog post. Before we get further into the production planning process, let us recap what we have gone through together in my previous sharing in Part 1 of GKK Compressor Industry (i.e. RFQ to Quotation process). In the Sales and Marketing division, Product Catalog is being used to create RFQ, which in turn generates quotations issued to customers. Every quotation issued to customer updates the Sales Forecast with the increased number of compressor model to be delivered.
Being a Lean Manufacturing, Production Planning is crucial to GKK Compressor Industry, the critical success factor is produced only what is needed to be delivered on time. It keeps no unnecessary inventory to minimize the waste of inventory space. Tentative Production Plan is always three months ahead of current month, helps the Procurement to keep the Material Management efficient, knowing what material and quantity of material to order with advance knowledge of the requirement from the production.
Key techniques in the production planning to be shared:
Nintex Form Web Part embedded to the “Draft Production Plan” list/page
“Loop” action alternative for immediate execution
Formatting a monthly calendar with CSR
The Production Plan
The Production Plan is a plan used in the production division with details on what models and quantity of compressor to be produced for a particular month. A production line has its daily production capacity that is dependent on machine and human resource capacity. If a production line can go up to 60 pieces of compressor per calendar day with full capacity running three work shifts, two work shifts will give capacity of 40 pieces.
To get the Actual Production Plan, we draft a production plan from monthly sales forecast with details on what models and quantities to be delivered. The diagram below demonstrates how it’s being created powered by Nintex Workflow. The sample plan shows how the quantity of each model to be produced spread over different days with daily capacity of 30 pieces per day for October 2017.
To produce a total of 71 pieces of compressor for the first model (i.e. SVT125-35), the work has to be spread into three days, with the third day producing the remaining 11 pieces required to make it 71, since on the third day we produced only 11 pieces for the model, it has the remaining capacity of 19 to produce the next model in line (i.e. SHT277NA in the example).
1. Nintex Form Web Part embedded to the “Draft Production Plan” list/page
I find Nintex Form Web Part very useful especially when I need to make Sharepoint page interactive, but it wasn’t discussed a lot. The Draft Production Plan is just one of the solutions I make use of Nintex Form Web Part to get user to specify or collect Production Plan parameters (i.e. Month, Year, Capacity, and to or not to include week ends as working days for the production plan we are drafting). To include that, I simple embed the “Create Production Plan” workflow’s start form to the “Draft Production Plan” view/page as shown below. Once the form is submitted (i.e. with the Start button in the example), the “Create Production Plan” site workflow will be triggered, and the Draft Production Plan list will be refreshed with the production plan that was drafted by the site workflow.
2. “Loop” action alternative for immediate execution
The algorithm I used for drafting a production plan is summarized as below. I have then realized, it took hours for the workflow to complete a “Production Plan”, reason being the “Loop” action will be executed every 5 minutes by default as it is executed by the Sharepoint Timer Job, even If I configured the Timer Job to run every 1 minute (i.e. minimum interval by Sharepoint), it still take a long time for the workflow to be completed.
Prepare an empty "Draft Production Plan" view (delete all the existing list items) Query the "Sales Forecast" for models to be produced for the specified month For-each models in the list Create a list item for the model to be produced Split the total quantity for the model into the number of days required Loop through each calendar day of the production month Update the daily quantity for the model to the list item (i.e. exclude/include week end) End Loop End For-each
We have no choice but to consider to use the “For Each” iteration. Even if you use the State Machine, it is still depending on the Timer Job interval constraint. In order to do that, we will need to calculate the number of loop required, and create a collection of the required number to use the For-each iteration. So, if the quantity to be produced is 71, 71 divide by daily capacity of 30 equals to 2.3667. We get the whole number of 2 leaving behind the fraction, as 2 will be used as collection index of 2 for three iteration (i.e. index starts at 0). This is true if we always start a day with the new daily capacity (e.g. 30), but we will need to consider what if capacity for the day is not always starts from the beginning. In the sample production plan above, the quantity of 22 for model SNT207V is taking 2 days to produce, because the capacity of the day it starts the production was 1 (i.e. 30-29=1) as 29 was used to produce the model prior to it. To get the right count of iteration required, we will need to add the remaining quantity of the last model before we divide the quantity with the capacity, the two calculation actions shown below give the right formula to get the required number of iteration.
3. Formatting a monthly calendar with CSR
From the above Draft Production Plan example, I have customized the “Draft Production Plan” custom list into a calendar look and feel, by coloring the columns representing “week end” into grey. The Custom Side Rendering (i.e. CSR) is a feature by Sharepoint is being used to get the calendar view.
SP.SOD.executeFunc("clienttemplates.js", "SPClientTemplates", function() {
     SPClientTemplates.TemplateManager.RegisterTemplateOverrides({
          OnPostRender: function(ctx) {
               var rows = ctx.ListData.Row;
               var month = rows[0]["Month"];
               var year = rows[0]["Year"];
               var weekends = [];
               var date = new Date(year, month, 0);
               var lastDay = date.getDate();
               for (var d=1;d<=lastDay;d++)
               {
                    date.setDate(d);
                    if (date.getDay()==0 || date.getDay()==6){
                         weekends.push(d);
                    }
               };
               for (var i=0;i<rows.length;i++)
                    {
                         var rowElementId = GenerateIIDForListItem(ctx, rows[i]);
                         var tr = document.getElementById(rowElementId);
                         for (var j=0, len=weekends.length; j<len;j++){
                              var td=tr.cells[weekends[j]+2];
                              td.style.backgroundColor = "#eeeeee";
                         }
                    }
               }
     });
});
We all know we are here because we work on something that is related to Nintex Workflow or Forms, and the reason we use Nintex Workflow or Forms is because it makes our life easier. Things have changed a lot these days, trending towards the cloud, hybrid environment becoming very common that most of us are working on both on premise platform and at the same time on the cloud. Regardless of which platform you use, you will find Nintex helps.
Part 1 of GKK Compressor Industry blog series, I am going to share exactly how I use my hybrid environment to save the efforts for my recent investment – GKK Compressor Industry. GKK Compressor Industry is “Lean Manufacturing” produces world class compressors. Moving towards a Six Sigma company, Simplifying Processes and Reduced Errors falls in its Lean Six Sigma project mission to turn the company into highly effective and efficient company.
RFQ (i.e. Request for Quotation) is one of the key Sales and Marketing processes involving its customers. The figure of RFQ to Quotation shown above, demonstrates how Nintex Forms is use allowing customers or internal sales to fill up an RFQ form powered by Nintex Forms. The output of RFQs are Sales Forecast (i.e. use for Production Planning) and Quotations (i.e. issued to customers). The process is simplified at GKK Compressor Industry, Nintex Workflows automates the RFQ process by getting the unit price for the requested compressor models to provide the prices, and it auto generates an Quotation in Excel Format, and finally it updates the Sales Forecast with the quoted Compressor models. The RFQ process not just simplifies the process with reduced steps, it also eliminates potential human errors by auto generating the required quotations.
The quotation generation is done by simply calling a Nintex Workflow Cloud workflow from its RFQ process powered in its Sharepoint environment. It’s worth taking a trip to Nintex Workflow Cloud for a quote generation, as we realized it supports OpenApi (i.e. Swagger) by its Xtensions framework. We make use of the Xtensions to include the Microsoft Graph API connectors in Nintex Workflow Cloud helping us to create quotation based on our pre-designed Excel Quotation template, as we only need some functions to create Excel quotation, we brought in only few Excel related end-points of the Microsoft Graph API.
Based on the connectors defined and shown under the Microsoft Graph API – Excel action group, you will notice there is no connector to create or copy excel file, this is because I have made use of Nintex Workflow Cloud’s default Sharepoint conector to copy a Excel Quotation Template to a new quotation with the name I provided. The Sharepoint “Copy a file” connector’s configuration is shown below.
Once the new file is created/copied from a pre-designed template, what I will need is basically
“Add table rows” for quotation items
“Delete table rows” for unwanted rows in the excel table
“Update a nameditem” for its value
And so on…
I have attached my swagger file for the Microsoft Graph API – Excel connectors. Few notes to take if you want to implement the Graph API for Excel using the swagger file shared in this blog:
Excel related operation of Microsoft Graph API seems to work only with its “beta” version (i.e. not the “1.0” version) for files resides on Sharepoint library (i.e. I am not sure why and if this is correct, but I only managed to get it work with the “beta” version).
There are two ways to create the Azure Active Directory app, one via the new Azure Portal, the other using the old portal (i.e. I only got it works with Active Directory app created by the old Azure portal)
For those of us who tried or in the process of evaluating integrating Nintex Workflow Cloud into your solution(s), eventually you will get to the question “Why should I integrate Nintex Workflow Cloud?” especially if you code your solution from scratch using platform such as .NET or Java, writing code will be the default way to support any business logic or process(es) of the solution you are building with such platform. Here is my two cents worth for that question.
Before we get into discussing why, let us get few more examples here. Take another solution platform for the same question – Sharepoint, which is considered as COTS (i.e. commercial out of the box solution) for intranet/collaboration portal. We do not expect lot of coding or customization, by default Sharepoint supports document management with its content type of Document Library, supports creating of custom records using Custom List, when come to automating a document or record created in Sharepoint, it is not going to be easy especially we expected it to be COTS, Nintex Workflow is just the right fit to complement the weaknesses making process automation possible on Sharepoint.
So now the question is when you create your solution from scratch using platform such as .NET or Java, by default you will code everything yourself and it would be much flexible and powerful to you when come to coding. Similar to if you are using Mendix for instance for your solution, it has what it called Micro-flow to support logic behind defined objects, events, etc. in Mendix solutions, why would I consider to integrate Nintex Workflow Cloud since the platform itself supports business logic?
Reasons to integrate Nintex Workflow Cloud to your solution(s)
Take Nintex Workflow Cloud to replace some of the building block of your .NET or Java solution, helps your saving efforts on reinventing the wheels. The building blocks of a custom built solution usually consists of different modules/blocks to handle different function groups, for examples there will be modules such as:
e.g: Solution Architecture Diagram of a custom developed solution
1. Workflow Module
In a solution architecture of a custom developed application/solution, we often modularized it into different module/design blocks. Some of the benefits of modular design is that modules could be reused in another solution, some of the modules could be puzzled with ready to go solution(s). The above example of a solution architecture diagram illustrates a need to include a Workflow engine, which should be handled by a ready to go solution such as Nintex Workflow Cloud, which makes a lot more sense than having to develop all the workflow functionality and management from scratch.
2. Document Generation
The above scenario tells us that we will need to build all these modules, of course if you have done one before you could re-use it, if not you will need to spend tremendous effort to write one. Nintex Workflow Cloud comes with some niche and unique features such as Document Generation. Automated document processes are common in today’s business processes, majority of the solution requires the creation of document manually using a word template for instance, these processes could be improved by Document Generation features of Nintex Workflow Cloud. If document creation to be automated, one will find it challenging as there ain’t many options of API to do that. It become more challenging if one will need to keep the solution up to date with never ending evolving technology of document API. This is a good scenario and good opportunity to pass the job to Nintex Workflow Cloud. The automation of document generation could be passed to Nintex Workflow Cloud, once it’s done, it saves the generated document to a specified shared drive where the initiation program could pick that up from there.
3. System Integration
One of the strength by Nintex Workflow Cloud is the capability and rich set of connectors and actions supporting integration with other systems. Further more, with the compliance to the Swagger standard, it is easy to extend to include connectors to other system that was not already included as part of the default connectors. Capability to integrate with external system is always one of the huge area in a solution, and it usually requires huge effort to build and manage, leveraging that as part of the Nintex Workflow Cloud not just saves the effort to build one, but also provides the flexibility when come to extending of connectors to other systems.
Again, these are just my two cents worth for the question by providing just few examples here. I believe there are many more reasons to explore, such as Public Web Form? if your solution is an Intranet based deployment, most of the time you are not going to expose your so called Intranet solution to the public facing internet, leveraging the Nintex Workflow Cloud’s Anonymous web form could a a quick solution to the requirements.
The concept of modular design with integration of Nintex Workflow Cloud as the required Workflow module is not just saving you the effort to creating one from scratch, it helps when you left the solution to a customer after you done the development project, clears off hassles for your customers to maintain or troubleshoot the workflow module. IT platforms are being patched and updated at a fast pace today, patches and updates introduces huge bandwidth of maintenance. Getting Nintex Workflow Cloud to handle some of these functionality minimizes the risk and needs to continue maintaining the code.
Here is a question for you: “How complex a business process can be solved by Nintex Workflow Cloud?“, well I think I do have an interesting answer for that, it solves business processes that is as complicated as the famous Farmer-Wolf-Goat-Cabbage cross a river puzzle.
There are many programming languages out there, everyone will have its own strengths and focuses. You might find it easy to solve the old classic puzzle such as the “Farmer-Wolf-Goat-Cabbage cross a river” with much lesser code in Prolog or Lisp that is associated with Artificial Intelligence than a Java program. It will be interesting to find out solving the same puzzle without even writing a piece of code with Nintex Workflow Cloud.
For those who have not came across the “Farmer-Wolf-Goat-Cabbage cross a river” puzzle, you could simply do a search on the web to find enough article and solution for it. This is just a perfect puzzle trying to understand a real world business process is, it has:
Objective:
To move all the objects (Wolf, Goat, and Cabbage) across a river
Rules:
Wolf and Goat are not to be left alone
Goat and Cabbage are not to be left alone
Only farmer roars the boat
Farmer can only bring one object at a time
Let us define the required terminology or object(s) we can apply to our workflow design,
Terminology
Description
fromBank
The river bank where all the objects of Farmer, Wolf, Goat, and Cabbage are
toBank
The destination river bank where all the objects to be moved to
F, W, G, C
The acronyms representing Farmer, Wolf, Goat, and Cabbage
fromBank=[“F”,”W”,”G”,”C”]
The initial state represents all the objects are at the fromBank river bank
riskState=[“WGC”,”GC”,”CG”,”WG”,”GW”]
Sets of states both fromBank and toBank is at risk
toBank=[]
The initial state represents none of the objects are on the toBank river bank
Embarkation, Disembarkation, ReturnTrip
Represent three movement stages of forward movement from fromBank to toBank, disembarking of object to the toBank, and return trip with object to be brought back to the fromBank.
Algorithm:
Initialize objects for:
fromBank=[F,W,G,C],
toBank=[],
embark farmer to boat (i.e. fromBank=[W,G,C]),
riskState,
etc.
Start a loop until toBank=[F,W,G,C],
Embarkation Branch (i.e. always assuming to start with embarking an object to the boat)
Check if we suppose to embark an object or return an object, if return object, change to ReturnTrip Branch. else continue
try to embark the first Item from fromBank collection
Verify if fromBank is “at risk” state by checking against the riskState collection
If “at Risk” is true, revert the embarked item back to the fromBank collection’s back of the queue, exit branch
if “at Risk” is false, remove the Item from the fromBank, switch to Disembarkation branch
Disembarkation Branch (i.e. this stage is always followed from Embarkation branch)
Try to disembark the object to toBank
If toBank items count is equal to the total object, the goal has achieved
if toBank items count is less than 2, toBank is at Safe state, farmer go back alone to Embarkation stage (i.e. set variable returnTrip=false)
if toBank is “at Risk” state, farmer need to go back bringing one item to avoid “at Risk” state of toBank (i.e. set variable returnTrip=True)
ReturnTrip Branch
Disembarkation was always done at the Disembarkation Branch by disembarking item to the back of the toBank collection queue
We will try to return the first item from the toBank, and verify if the remaining left alone safe?
Loop through to get an item to be returned avoiding the conflicts at toBank
Exit of loop (i.e. mission completed), sending the log of the movement result.
You may see the demo by submitting the Public Form at the following URL FWGC Cross the river puzzle form , which you will need to supply an email to receive the result, and the object sequence in the format of e.g. “F,W,G,C”, “W,F,C,G”, etc. to get different movement results. Here is the example of the form:
Note: Nintex Workflow Cloud do not currently support validation of the public form, you will need to fill in a valid email to receive the response, and right syntax for the FWGC Sequence field.
Here is a sample email content you will be getting from the submission of the above form:
This exercise helps me with list of Asks on features and enhancements that I am looking forward to, I have most of them logged to the uservoice, here are some of them:
1. There is currently no way to construct a rich text variable with formatting I want, so I could compose the “Send email” action’s body by inserting a formatted string/rich text variable at the final stage. (i.e. the email content in the above example will be more readable if I could insert a formatted text of the below example:
2. Import / Export of workflow design. I will be able to share my workflow design once the feature is available for me to export my workflow and attach it to this blog for sharing..
3. Print workflow design, and Save as.. to export workflow design as JPG, PNG, etc.
4. As I am using a lot of Collection operation for the exercise, there is a long list of collection operations I am looking for that is missing for the time being, the challenge results a workflow with additional actions to solve simple issue, here are some of the features that I think is missing:
Copy a collection from one to the other
Store Item for “Remove Item from Collection” action
Compare if two collections are equivalent
Dictionary variable
Concatenate collection items into string
5. Other features such as Log history action, Workflow constant, Go-to node action, sub workflow and/or grouping of actions.
Until my workflow could be exported for sharing, the best I could do for the time being is the captured design of the workflow solving the Farmer-Wolf-Goat-Cabbage puzzle.
Stronger Together – Nintex Workflow Cloud and Nintex Workflow for Office 365. Many of us have been asking for feature such as scheduled workflow in Sharepoint for Office 365, that has not made available by Nintex Workflow for Office 365 today. Well, a scheduled workflow is pretty straight forward and easy to setup in Nintex Workflow Cloud, we can create a scheduled workflow in Nintex Workflow Cloud to trigger a workflow in Sharepoint for Office 365. That gives us the solution of scheduling a workflow in Sharepoint for Office 365.
To demonstrate how that works,
Nintex Workflow for Office 365 – Site Workflow
1. I have created a Site Workflow in Sharepoint for Office 365 environment. Here is how “MySiteWorkflow” looks like in Nintex workflow for Office 365 environment:
2. The “MySiteWorkflow” takes one Initiation Variable as defined below, when the workflow started manually, it will prompt users with the initiation form for users to provide input for the “listname” initiation variable.
3. I have made the Site Workflow as simple as possible, with only only one “Log to History List” action. When triggered, it will simply write the provided “listname” variable value to the workflow history.
Nintex Workflow Cloud
While waiting for the Sharepoint Connectors to be released in Nintex Workflow Cloud, I have workaround with Azure AD App for Nintex Workflow Cloud to access the Sharepoint for Office 365 environment via the OAuth 2.0 authentication. For those who have not followed my blog on that, here is the link you could refer to on Add Azure AD App from Azure Portal section of the blog post. (Please take note that, instead of using https%3A%2F%2Fgraph.microsoft.com%2F as the value for the resource parameter, I have this time to use <site_host>@<site_reaml instead, as such my example i was using resource=https%3A%2F%2Fntxte07.sharepoint.com@<site_rearm> instead.)
1. Instead of creating a Scheduled Workflow, let us try to call the Sharepoint site workflow from Nintex Workflow Cloud using a Public Web Form start event to start the workflow in Nintex Workflow Cloud, the start event is configured as below to capture the input to be used as “listname”.
2. Before we proceed to define other actions, lets look at the list of workflow variable we will need to create for the workflow to work.
3. Using “Set a variable value” action to assign the Access Token we obtained to the “accessToken” variable as shown below.
4. With the “accessToken” assigned, we going to add a “Branch by Stage” with two branches, one being the normal path to follow, the other to handle if the Access Token is expired, to renew the Access Token. I have named it as “Branch 1” and “Branch 2” as shown below
5. We set the branch to always start from “Branch 1” assuming the token is valid, by calling a “Call a web service” action to call Sharepoint online’s REST API. To start a workflow in Sharepoint online, we will need to, first, get the workflow’s subscription ID, followed by initiate the workflow to start. Define the “Call a web service” with the following values:
[Workflow Template ID] = e.g. {9CE443B7-3583-46C2-AA07-415F5E00C25B}, could be found from the site workflow start page’s workflow link as shown
6. Verify if the “Call a web service” is successful by using the “Branch by condition” to check the “resCode” equals to 401, if yes we will change the stage to “Branch 2” for getting new Access Token with the “Refresh Token” obtained during the steps setting up the “Azure AD App”. We will follow the “No” path if the resCode returns status code other than 401 (i.e. with the assumption the call to get the workflow subscription is successful).
7. The “Query JSON” followed by the “No” path is basically to get the returned the “_ObjectIdentity_” value with XPath search of “$.._ObjectIdentity_” from the resContent JSON object. The “_ObjectIdentity_” to be used in the following “Call a web service” action.
8. “Call a web service” with the following details to initiate the site workflow
My “Request content” example: (I would advise to use fiddler to capture a manual trigger of your site workflow in Sharepoint online, and capture the two HTTP POST to https://<your site host>/_vti_bin/client.svc/ProcessQuery for the XML request body to be used as your Request content here).<Request xmlns=”http://schemas.microsoft.com/sharepoint/clientquery/2009” SchemaVersion=”15.0.0.0″ LibraryVersion=”16.0.0.0″ ApplicationName=”Javascript Library”><Actions><Method Name=”GetExternalVariable” Id=”12″ ObjectPathId=”8″><Parameters><Parameter Type=”String”>listname</Parameter></Parameters></Method> <ObjectPath Id=”14″ ObjectPathId=”13″ /> <Method Name=”StartWorkflow” Id=”15″ ObjectPathId=”13″><Parameters><Parameter ObjectPathId=”8″ /> <Parameter Type=”Dictionary”><Property Name=”listname” Type=”String”>List Name</Property> <Property Name=”Microsoft.SharePoint.ExternalVariable.listname” Type=”String”>List Name</Property></Parameter></Parameters></Method></Actions> <ObjectPaths><Identity Id=”8″ Name=”subscriptionID” /> <Method Id=”13″ ParentId=”4″ Name=”GetWorkflowInstanceService” /> <Constructor Id=”4″ TypeId=”{4ccc7f0e-bf7e-4477-999c-6458a73d0039}”><Parameters><Parameter ObjectPathId=”2″ /></Parameters></Constructor> <Property Id=”2″ ParentId=”0″ Name=”Web” /> <StaticProperty Id=”0″ TypeId=”{3747adcd-a3c3-41b9-bfab-4a64dd2f1e0a}” Name=”Current” /></ObjectPaths></Request>
Response content
resContent
Response headers
resHeader
Response status code
resCode
That shows the second web service call to trigger the site workflow to start.
9. Continued from step 4 above branching to “Branch 2” is the same steps in my blog post on the “Azure AD App” setup on how to refresh the access token by calling the REST end point at “https://login.microsoftonline.com/common/oauth2/token” as shown below.
10. The “Query JSON” is to use XPath to search to the access token from the resContent returned from the above action call, and assign the new access token to the accessToken workflow variable.
The above steps demonstrate both the site workflow in Sharepoint for office 365 and the Nintex Workflow Cloud to manually trigger the site workflow in Office 365 to run. With that testing successful, we know we could now schedule a site workflow in Sharepoint for Office 365. To do that, we just need to schedule the Nintex Workflow Cloud using the Nintex connector with start Event of “Scheduled Start” as shown in the screen captured below as an example.
ECB Menu in Sharepoint List or Document Library allows one to manually trigger an action, and this could be an action to start a workflow from Nintex Workflow Cloud. We would love to have the option to manually trigger a workflow to start.
Here is the story line, looking at a document library in Sharepoint, based on the use case we discussed in my previous blog post, a Marketing Coordinator uploads the Excel Attendant List to a Sharepoint folder in Marketing Site’s Document Library, in this case, not all the documents in the library are leads to be generated in Salesforce, only this particular excel file is, and we want to manually trigger a Nintex Workflow Cloud workflow to help collect and upload leads from this file to SalesForce. To do that, we can simply add a custom ECB Menu to the Document Library (i.e. same applies to Custom List in Sharepoint). Diagram below illustrates what you will get:
Before we get into how to add the ECB menu in Sharepoint Document Library, let us take a look at how to start a workflow in Nintex Workflow Cloud. We going to use the “Public web form” Start event option in this exercise, the configuration of a sample workflow Start Event is shown in the diagram below:
This configuration will give us a web form URL with the format of https://{your-tenant}.workflowcloud.com/forms/{workflow-id}. Using Fiddler to trace the form submission, you will find the form is being submitted with the following HTTP POST request.
POST https://{your-tenant}.workflowcloud.com/api/v1/anonymous-workflow/{workflow-id} HTTP/1.1
With the HTTP POST request details we learned, we will be able to include a HTTP POST request in our ECB menu action. Again, there are different ways to achieve that – Sharepoint-Hosted Add-ins, Provider-Hosted Add-ins, and simply the way we going to get that without the need to create an add-in using Visual Studio is the Display Template client side JavaScript.
1. Edit the Document Library page by selecting the Edit Page from the page menu as shown.
2. Insert a Content Editor web part to the page,
3. With the cursor in the Content Editor’s content area, click Edit Source to edit the source of the content
4. Here is the JavaScript code to be included in the Content Editor’s source
<script language="”javascript”" type="text/javascript">

function Custom_AddDocLibMenuItems(m, ctx)
{
  var strDisplayText = 'Upload to SalesForce';
  var strImagePath = '';
  var strAction = 'send2NWC()';

  // Add our new menu item
  CAMOpt(m, strDisplayText, strAction, strImagePath);

  // add a separator to the menu
  CAMSep(m);

  // false means that the standard menu items should also be rendered
  return false;
}

function CAMOpt(p,wzText,wzAct,wzISrc,wzIAlt,wzISeq,wzDesc)
{
     var mo=CMOpt(wzText,wzAct,wzISrc,wzIAlt,wzISeq,wzDesc);
     if(!mo)return null;
     if(wzText != "Delete Item") AChld(p,mo);
     return mo;
}

function send2NWC()
{
    var url = "https://{your-tenant}.workflowcloud.com/api/v1/anonymous-workflow/{workflow-id}";
    var method = "POST";
    //depending on the value you passing to the workflow, I am using selected item's Url here
    var postData = '{"se_file_name1":"' + currentItemFileUrl + '"}';
    var async = true;

    var request = new XMLHttpRequest();

    request.onload = function () {

          var status = request.status; // HTTP response status, e.g., 200 for "200 OK"
          var data = request.responseText; // Returned data, e.g., an HTML document.
     }

     request.open(method, url, async);

     request.setRequestHeader("Content-Type", "application/json;charset=UTF-8");

     // Sends the request to the server.
     request.send(postData);
     alert('Leads uploaded');
}
</script>
Tip: Few quick references getting values from Sharepoint Display Template:
currentItemFileUrl (i.e. selected item’s URL)
currentItemID (i.e. selected item’s ID in the list)
It’s easy we get into perception that a workflow always start from a form submission, and we’ve been telling the story of that. But in reality it’s not always the case, take Attendance List for instance, event coordinator taking attendance list with Excel at the reception of the event, is something very common and practical. the Attendance List will then be used to create Leadsin CRM system for Account Management to follow up. This is just the right scenario we could easily automate in Nintex Workflow Cloud platform, I am going to share how the scenario could be automated in Workflow Cloud, the attendance of an event was taken using the Excel spreadsheet, and saved in OneDrive to trigger a workflow reading the attendance list to create leads in SalesForce.
Instead of explaining every single workflow action, I am just going to explain the key actions used to achieve our objectives here. Later part of this writing, I will share the pictorial flowchart of the workflow that I have created to give the overall view of the workflow design.
1. Microsoft Graph API to read the Excel range of records.
I am using the Excel Range Operations to get the range of cells from the excel file, for more details on the Graph API for Excel, you may refer to Microsoft Graph – Documentation – Excel , here is how the Get request forms:
GET /{version}/me/drive/items/{item-id}/workbook/worksheets(<id|name>)/range(address='<address>’) authorization: Bearer {access-token} workbook-session-id: {session-id}
Example of my URL to get excel range from the excel file in a Group’s drive:
Here is the example on how you configure it in Workflow Cloud:
The Response content of this action is saved to the resContent variable as shown. We will be interested to look at the “Values” of the returned JSON content.
2. Extract “values” from the returned JSON content
We use the “Query JSON” action to extract the “values” from the returned JSON content that was saved to resContent variable. The “Query JSON” action gives us row variable with value of [ [“Alice”, “Kho”, “Licek@mail.com“, “Abc o.” ], [ “Jason “, “Smith”, “Jason.smith@ntxte07.com“, “Ntxte07” ], [ “”, “”, “”, “” ] ] as shown below.
3. Convert “values” string to Collection
“Apply a regular expression” to convert that single string of text (i.e. row variable) into array/collection of string and save it to rows collection variable, The Extract operation of the Regular Expression using the Pattern of (?<=\[)[^\[\]].*?(?=\])+ gives us the outcome of rows collection with three items as shown.
4. Get fields of each row of attendance records
“Start a loop” logic action to loop through the rows collection to “get item from collection” to get each of the item in the rows collection and save it to row variable. The following regular expression with pattern = (?<=\”)[^\,].*?(?=\”)+ extracts each of the field from the row and saved it to fields collection variable.
That shows us how we get the attendance list row by row from the Excel file that was saved in a Group drive.
5. Create leads in SalesForce
We can simply use the SalesForce “Create a record” action to create leads in SalesForce. here is how it’s configured in Workflow Cloud using the “fields” collected from excel.
The diagram below illustrates the complete workflow design in Nintex Workflow Cloud
Following my previous post on Using OAuth 2.0 to access other cloud services from NWC, we are going to use the same principal but apply to Microsoft Graph API. Microsoft Graph exposes multiple APIs from Office 365 and other Microsoft cloud services through a single endpoint: https://graph.microsoft.com. That means we will be able to integrate to Office 365 Sharepoint, OneDrive, and other Azure and Office 365 related services from NWC with single Microsoft Graph API.
As you may be aware for now, the key challenge to connect to other cloud services will be more on the setup and getting the Access Token, which I have provided a sample on getting that up with Google OAuth 2.0 API, I will provide the steps to setup access to Microsoft Graph API later in this post.
Let us first take a look from the NWC end, a workflow we going to automate from Nintex Mobile submitting a new user request, the request gets submitted to NWC and triggers the call to Azure Active Directory API via the Microsoft Graph API, to create a new user in Azure Active Directory. From here, that should help us the understanding on all the possible scenarios we might have,
Getting user details from Azure Active Directory or User profile from Sharepoint Online for CRM record update,
A new user onboarding request handle by NWC to call Microsoft Graph API creating user(s) in Azure AD or assigning user the Office 365 licenses,
Marketing event coordinator submits the attendant list in Excel file to OneDrive shared folder, it triggers the NWC workflow to read the metadata of the OneDrive file, determine if it is a file with new leads to be collected, it sends email to get the manager to review the file and for approval, once approve, the NWC workflow continues to read the excel file content and generate leads in CRM such as SalesForce or Microsoft Dynamic CRM, and so on.
Diagram below demonstrates the NWC Request for New Userworkflow I have created to show how that works, explanation of the actions provided in the table followed.
Action No.
Action
Description
Configuration
10
Start Event – Nintex Mobile
This action defines the workflow to be triggered by a Nintex Mobile Form submission.For the demo, I have created four fields for the purpose: First Name, Last Name, Department, and Usage Location
Which adds a Nintex Mobile Form as shown:
20
Set a variable value
Assign the obtained “Access Token” to the accessToken variable.Note: Please refer to the later section of this write up on how to obtain the access token.
30
Branch by stage
A two branches of workflow to handle a normal state with initial Access Token, and the second branch to get a new Access Token in case it expired.We’ve select for the workflow to start with Branch 1.
40
Call a web service
We use the “Call a web service” action to make a Microsoft Graph API call. The configuration as shown pretty much explains itself.
50
Query JSON
This is just the action to parse the returned content JSON for the error message if there is, and save the message to the errorCode variable
60
Branch by condition
I am using the Branch by condition action again to check if the errorCode variable equals to the suspected text of “Access token has expired.”
70
Change stage
If the answer is no, will set the next stage to exit the branch,
80
Change stage
or else, we will set the stage to Branch 2 to execute refresh access token
90
Call a web service
This is the action to call the microsoftonline login service to obtain a new/refreshed Access Token.
100
Change stage
Once we got the new Access Token, the Change stage is set to run the Branch 1 to continue the Microsoft Graph API call for creating the new user in Azure Active Directory.
Note: All the unnumbered actions are used for logging and troubleshooting purpose, you may ignore them.
Add Azure Active Directory App from Azure Portal
As of now, we understand that the OAuth 2.0 involves steps to obtain Credentials, and obtaining of the Access Token to be used in the API calls. In this section of write up, we will look at how to setup a service or daemon app in Azure portal. Unlike client apps, NWC workflows involves workflow actions without user intervention, the service or daemon app will be used to implement the OAuth 2.0 Client Credentials Grant Flow with its own credentials, its client ID and an application key, to authenticate when calling the Microsoft Graph instead of impersonating a user.
1. Login to Azure Portal and navigate to App Registration to add/register a new application in Azure.
2. Fill up the application details, example as shown
3. Take note of the Application ID, which is the Client ID of the application. Select the Key link to create a key in the following step.
4. Create a key for the application by filling the Key Description, select a duration of the key. Take note of the Key’s value (i.e. will be generated after you clicked to Save) which will be used as the Client Secret for obtaining the Access Token.
Here is the screen shows the key with value after you hit the Save
5. The application is setup, we will need to grant it Required permissions to services we going to access via the application. Click the Add button to add Required permissions to the app.
6. Select services/applications you want to give the permissions to the application, or search for other applications with Service Principal name from the search box. I have selected Microsoft Graph as I am going to use Microsoft Graph API to query or update user object in the Azure Active Directory.
Depending on what API you will need for the Azure AD App to access, in my other example below, I have selected “Office 365 SharePoint Online (Microsoft.SharePoint)” for my test to trigger Nintex Workflow in Sharepoint Online.
Take note of the next screen as shown below, on the “Application permissions” selection, some of the application permissions “REQUIRES ADMIN” right, to which you will need to make sure using the right login for granting access to the resources at the later stage
With the above steps, we have got the Client ID, Client Secret, and we have granted permissions to the newly registered app access to Microsoft Graph API for actions we going to perform. We may proceed to obtain the Access Token to be used for the Microsoft Graph API calls.
1. Authorizing an app by submitting an HTTPS GET request using the following URL. I was doing this with an New Incognito Window of Chrome Browser, I find it quite safe to do it over the Incognito browser or you might not get the login and prompt to authorize app, this is due to my normal browser has all the login or cookies cached.
2. You should be getting Microsoft Online login page as shown. Once you login, you will need to accept the request to grant permission to the app. Please take note on what login you are going to use here, if the access to resources require an Admin rights, you will need to make sure you sign in with a user with Admin rights.
You will get below example after you have login, take note of my example here which says “You’re signed in as: kkg@ntxte07.com (admin)” – tells I have admin right to my SharePoint online.
3. Extract the code parameter value from the response URL, we will need to use it to acquire the initial OAuth 2.0 access and refresh tokens in the following steps. Take note to take the code=… portion only as the URL is ended with the session_state=…)
4. Obtain the access token using the following POST request:
POST https://login.microsoftonline.com/common/oauth2/token HTTP/1.1content-type : application/x-www-form-urlencoded content-length : 144
This request requires a URL-encoded payload of the following format:
I was using the Advanced REST Client chrome extension for the purpose, you may use your own preferences for the purpose.
Take note for the above example, which is using the “&resource=https%3A%2F%2Fgraph.microsoft.com%2F” for the “Raw Payload“, you will need to specify different string for the &resource=<resource> depending what resource the app is meant to access. If the resource is Sharepoint Online, the example of the &resource=<resource> will be (e.g. &resource=https%3A%2F%2Fntxte07.sharepoint.com@225f091c-3a64-4a82-96be-2cced10088d4) the text after the @ mark is the Site Realm, you can find it by this URL to your sharepoint site https://<tenant>.sharepoint.com/_layouts/15/appprincipals.aspx, it is shown as e.g. i:0i.t|ms.sp.int|ba179145-f946-42c6-8aeb-90d6957af1fe@225f091c-3a64-4a82-96be-2cced10088d4 under the “App Identifier” column).
5. You should get a 200 OK response with response body containing the Access Token, Refresh Token, and others. We will need to supply the Access Token to any ensuing HTTP requests to access Microsoft Graph resources, or the Refresh Token for obtaining new Access Token when it expired.
Here is the example of the response screen of the “Advanced REST Client” with 200 response code, you will need to scroll down to see the JSON content which consists of the “Access Token” and “Refresh Token”