With Microsoft Power Virtual Agents, you can create a bot without writing code. However, if you would like to add the bot to Azure Bot Service channels, you will need to create a Relay Bot that acts as a bridge, and this task requires extensive programming knowledge.
This article demonstrates how to create a Relay Bot in C# to connect a bot built with Power Virtual Agents to Twilio Messaging for SMS or WhatsApp. This exercise assumes that you already have a Power Virtual Agents bot created, and would like to bridge the bot with a WhatsApp channel.
There are four sections in this article:
- Collect required parameters from Power Virtual Agent
- Create a Relay Bot with ASP.NET Core Web API
- Run and test the Relay Bot
- Configure Twilio Whatsapp Sandbox with Relay Bot
Prerequisites
To complete this tutorial, you’ll need an account with Twilio, a Power Virtual Agents subscription, a Power Virtual Agents bot created, and Ngrok installed and authenticated. If you have not done so already:
- Sign up for a free Twilio account
- Sign up for a Power Virtual Agents trial
- Create a Power Virtual Agents bot (i.e. please refer to Quickstart – Create and deploy a chatbot on how to create a Power Virtual Agents bot, if you have not done so already)
- Download, install and authenticate ngrok
Collect required parameters from Power Virtual Agents
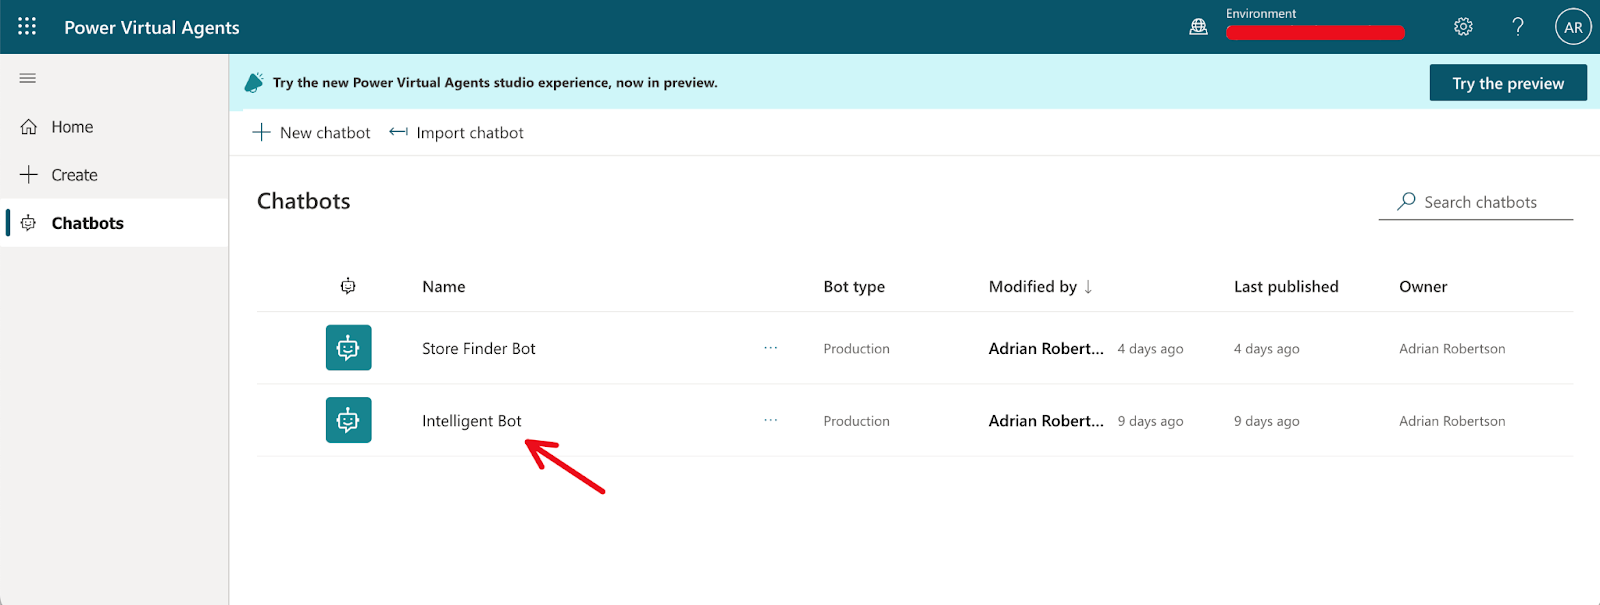
Log in to your Power Virtual Agents dashboard.
Select the Power Virtual Agents bot you would like to add a WhatsApp channel to.
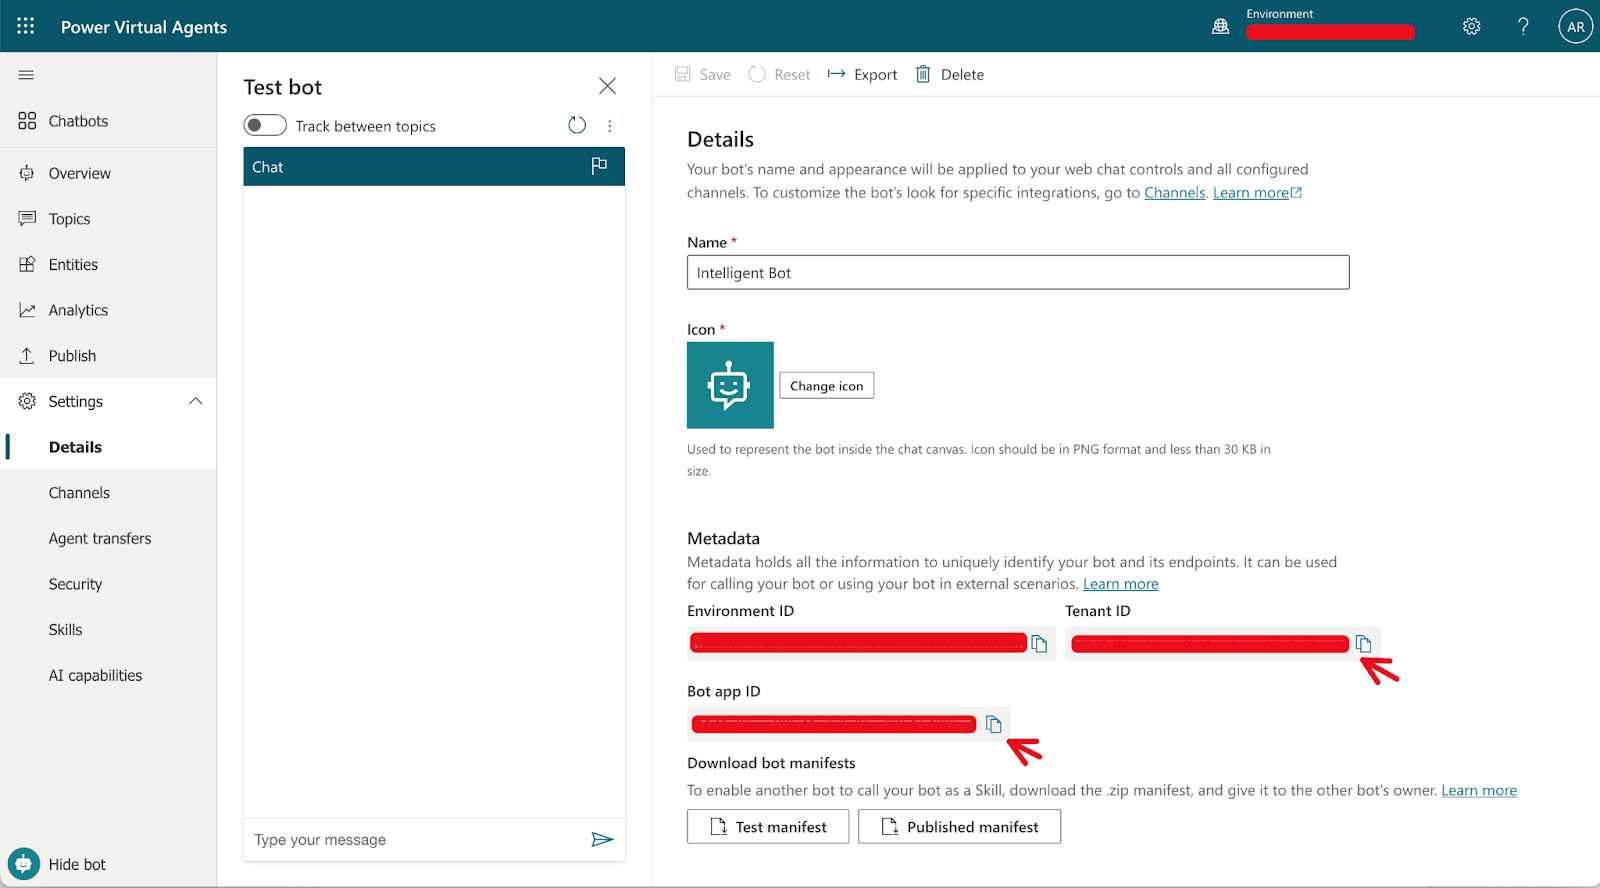
Select Details from the Settings menu of the selected bot. Then, copy the Tenant ID and Bot app ID from the bot details page as highlighted in the screenshot below. Save the values for later use.
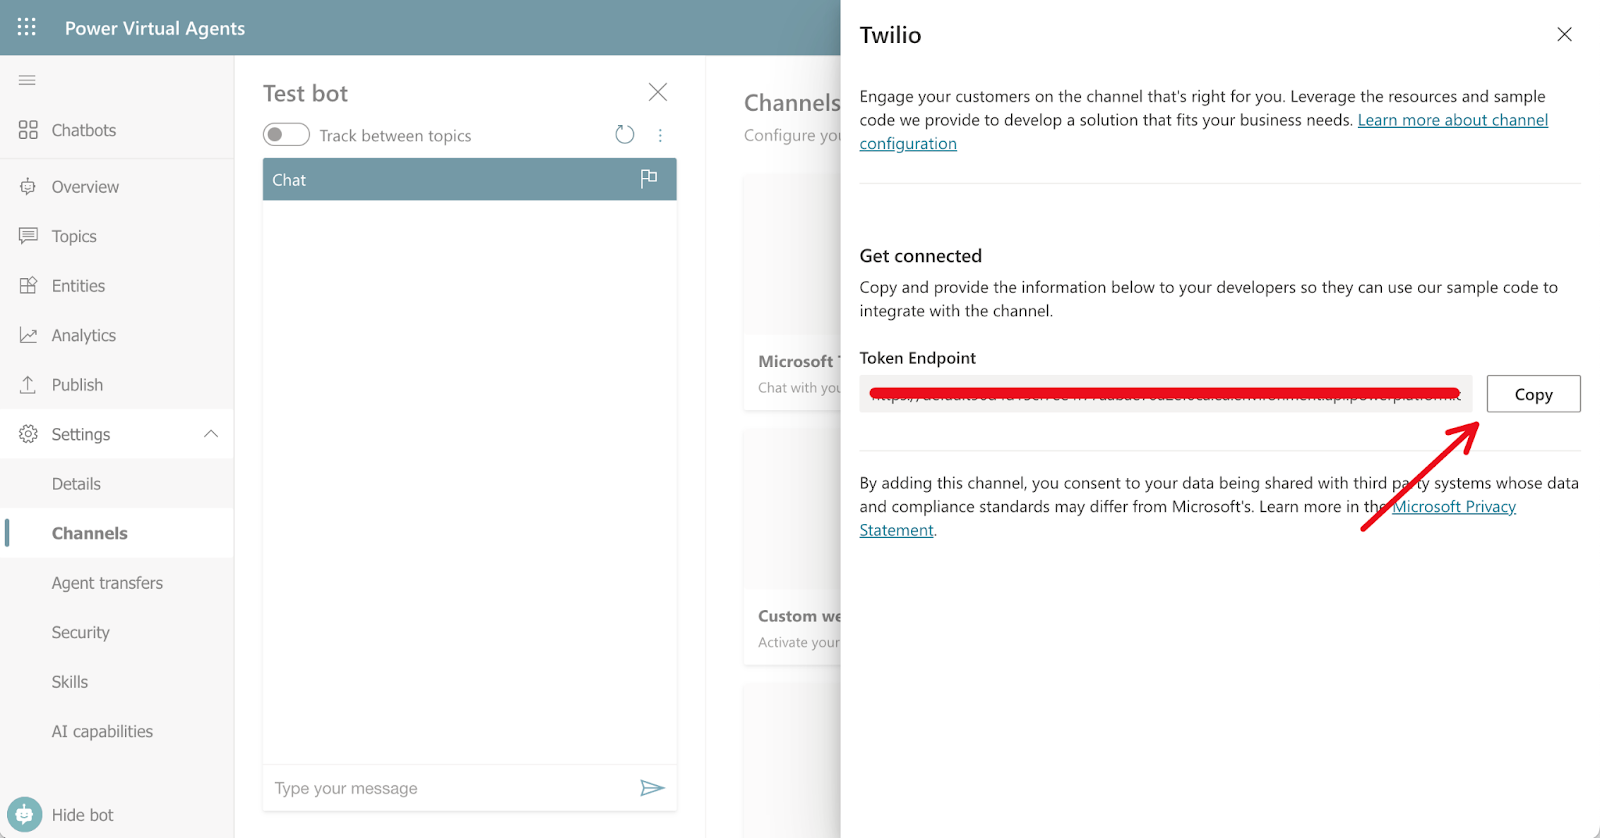
Go to the Channels section of the bot’s settings and select Twilio, as shown below.

Copy and save the Token Endpoint value shown for the Twilio channel for later use.
Create a Relay Bot with ASP.NET Core Web API
This section will guide you through creating a Relay Bot with ASP.NET Core in C#. The following prerequisites are needed:
The project and code that we are going to create in the following steps can be found in the BotConnectorAPI GitHub repository.
If you do not want to create the project from scratch, you can clone the repository, set the required bot parameters that you collected from the previous section in the project’s appsettings.json file, and run the project directly.
If you choose to clone the project, you may skip this section and jump straight to the next section to Run and test a Relay Bot project.
If you prefer to create the project from scratch, the following instructions will guide you step by step on how to do so.
It is important to ensure that you have the right version of .NET. Verify the .NET SDK and version with the dotnet –list-sdks and dotnet –version commands. The sample output from these commands is shown below.Bash
(base) kogan@WV4F9DM7Q0 azure % dotnet --list-sdks
2.1.818 [/usr/local/share/dotnet/sdk]
6.0.400 [/usr/local/share/dotnet/sdk]
6.0.402 [/usr/local/share/dotnet/sdk]
7.0.102 [/usr/local/share/dotnet/sdk]
(base) kogan@WV4F9DM7Q0 azure %
(base) kogan@WV4F9DM7Q0 azure % dotnet --version
7.0.102
Use the command dotnet new webapi -o myBotConnector to create a new .NET Core Web API project.Bash
(base) kogan@WV4F9DM7Q0 azure % dotnet new webapi -o myBotConnector
The template "ASP.NET Core Web API" was created successfully.

Processing post-creation actions...
Restoring /Users/kogan/git/azure/myBotConnector/myBotConnector.csproj:
  Determining projects to restore...
  Restored /Users/kogan/git/azure/myBotConnector/myBotConnector.csproj (in 145 ms).
Restore succeeded.
Once completed, change into the project folder and open the folder with Visual Studio Code.Bash
(base) kogan@WV4F9DM7Q0 azure % cd myBot*
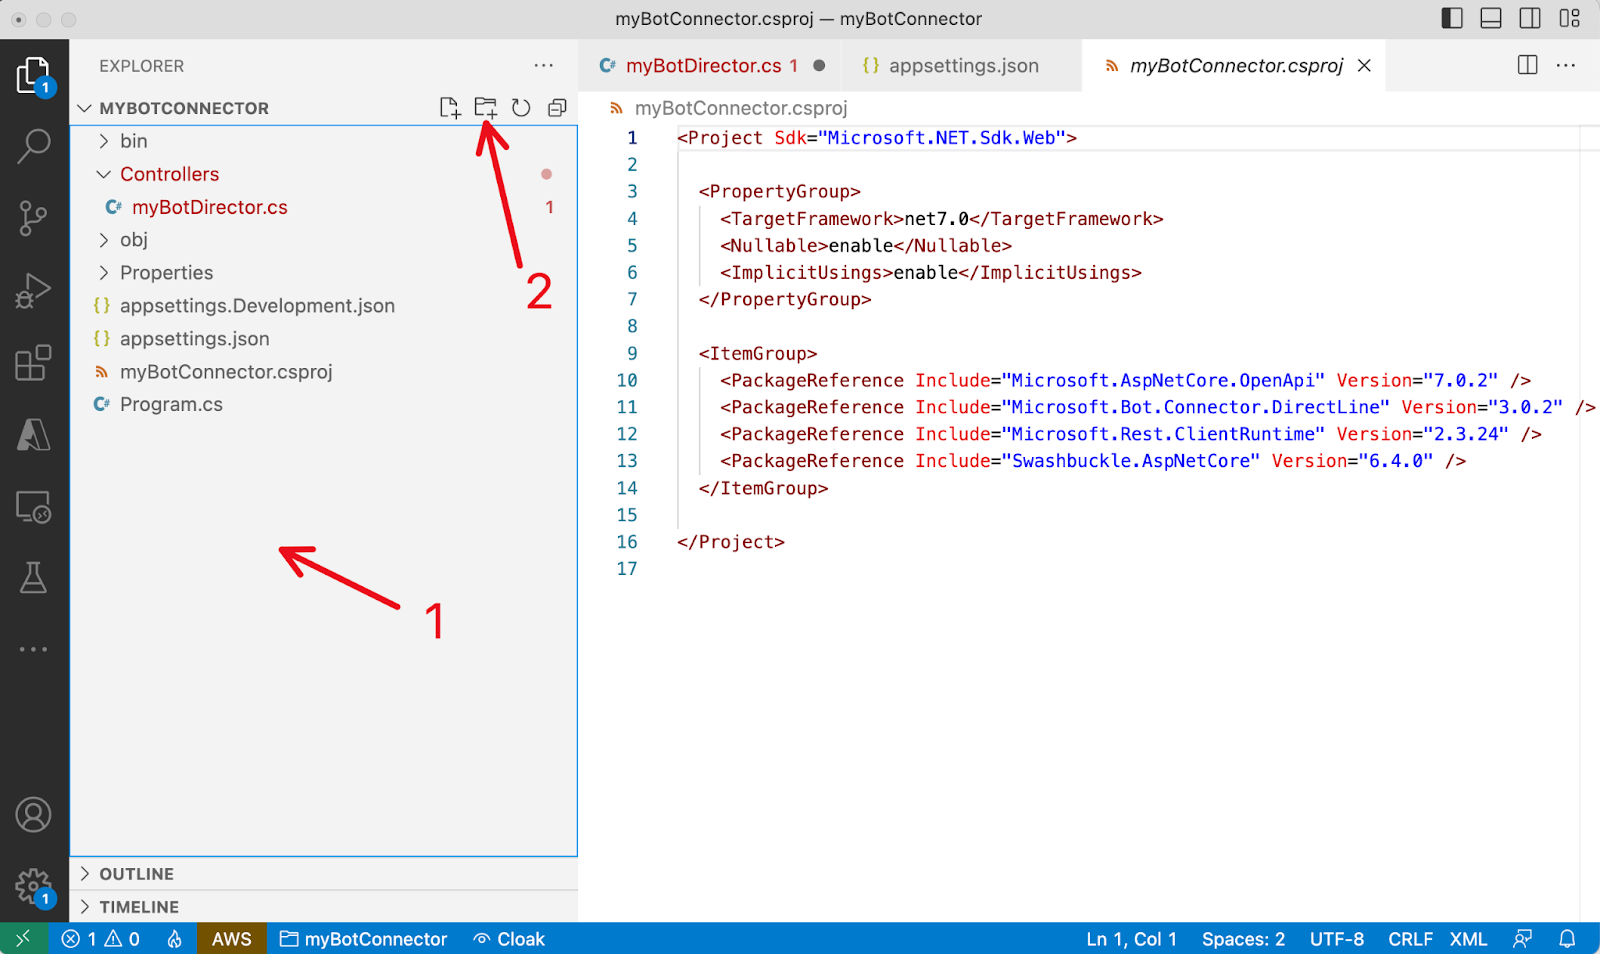
(base) kogan@WV4F9DM7Q0 myBotConnector % code .Visual Studio Code will open the project with the folder where the code . command was executed. The screenshot below shows how the project folder structure will look.
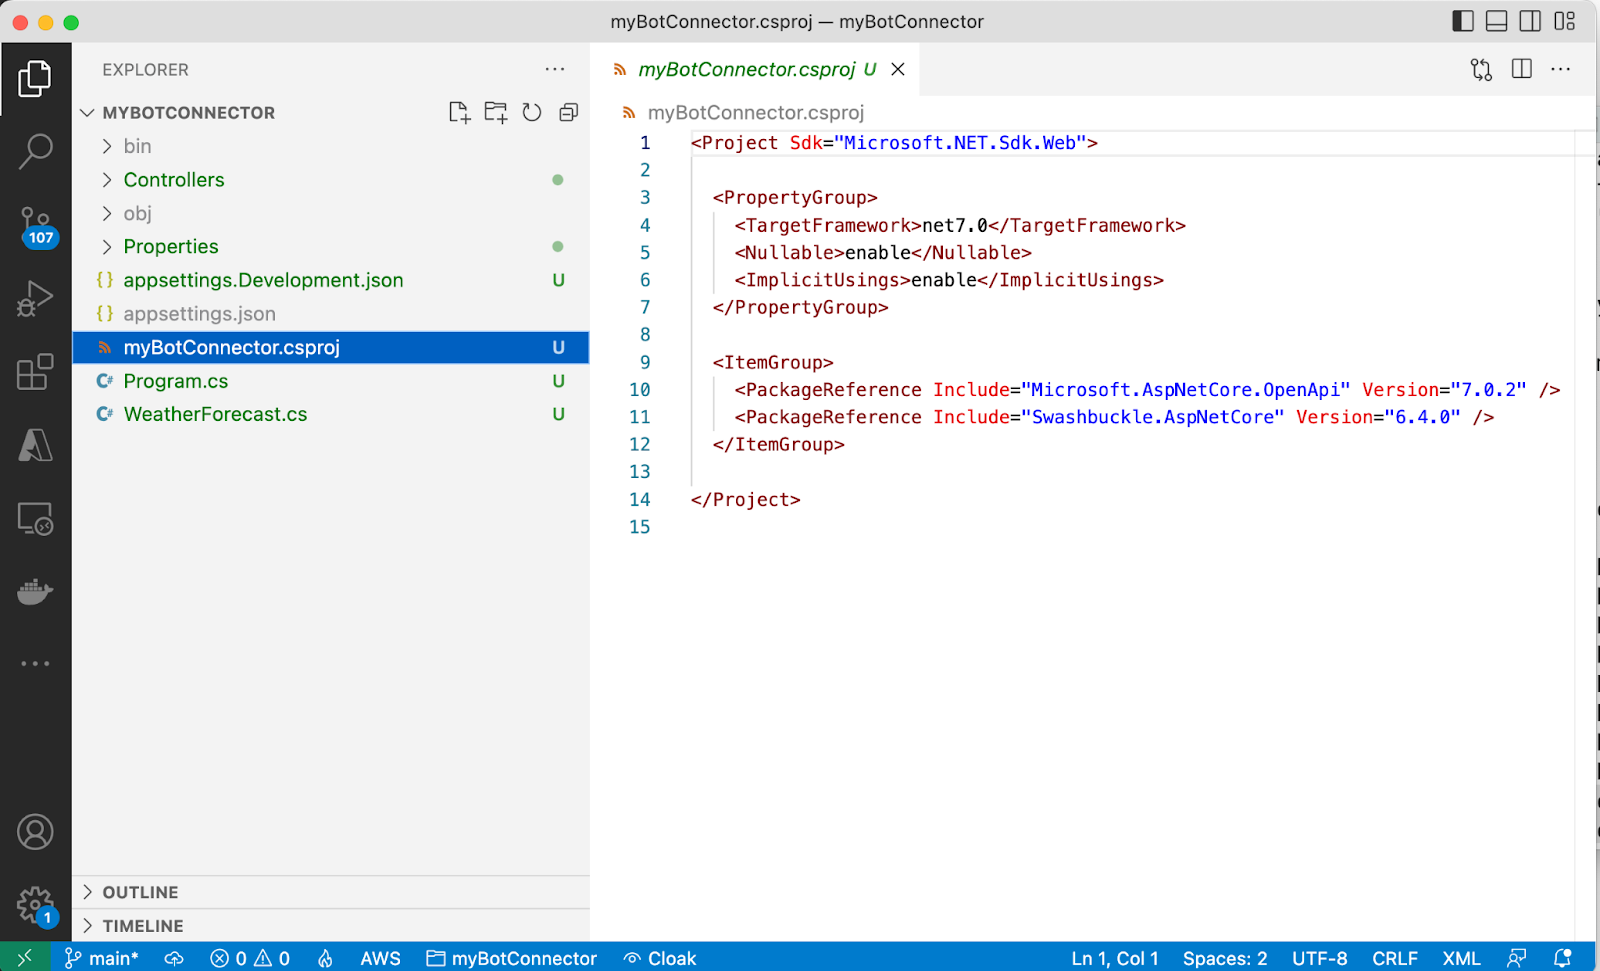
Open the myBotConnector.csproj file , and you will notice that two packages have been installed by default:XML
<ItemGroup>
<PackageReference Include="Microsoft.AspNetCore.OpenApi" Version="7.0.2" />
<PackageReference Include="Swashbuckle.AspNetCore" Version="6.4.0" />
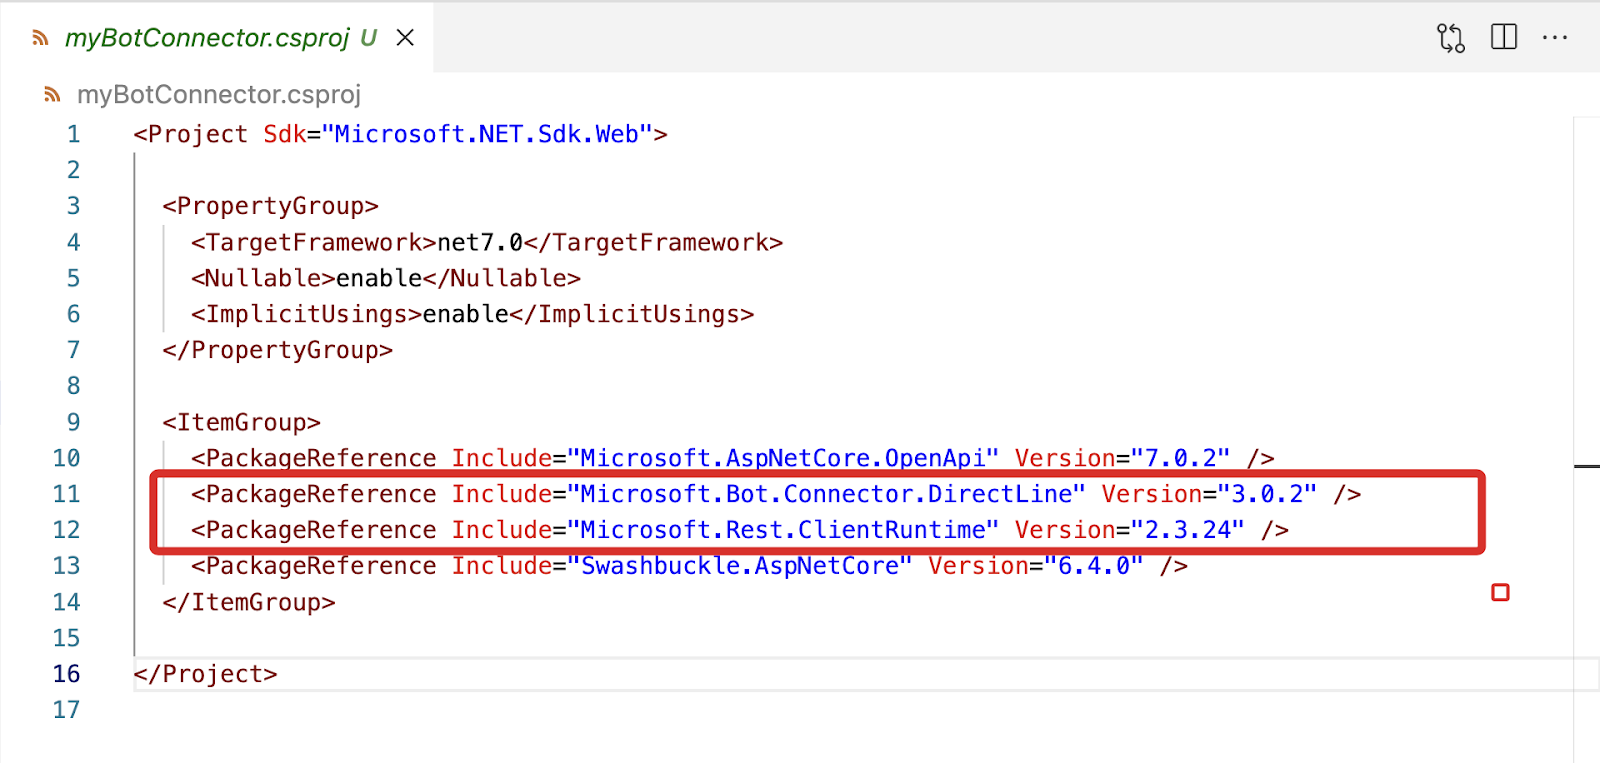
</ItemGroup>We now need to install the Microsoft.Rest.ClientRuntime and Microsoft.Bot.Connector.DirectLine packages manually. Run the dotnet commands below from your terminal to install these packages:Bash
dotnet add package Microsoft.Rest.ClientRuntime –version 2.3.24
dotnet add package Microsoft.Bot.Connector.DirectLine
You can verify that the packages were added to our project file as shown below.
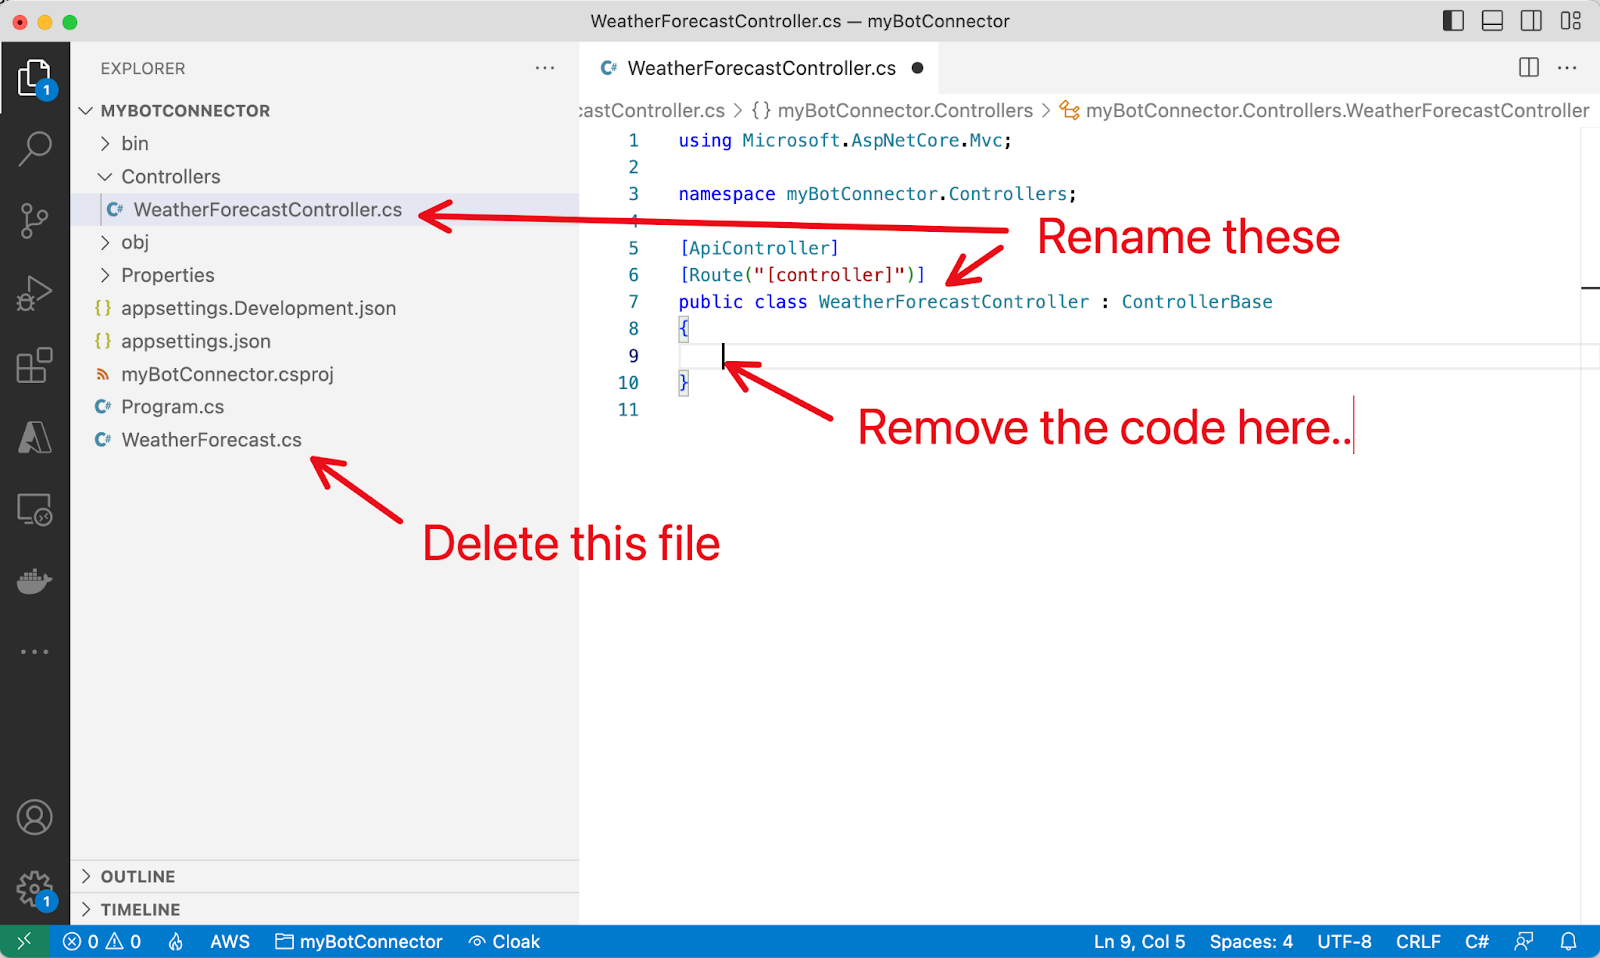
The dotnet new webapi -o myBotConnector command created our project with default WeatherForecast.cs and Controllers\WeatherForecastController.cs files.
I would recommend we delete the unwanted WeatherForecast.cs file, clean up the unwanted code inside the WeatherForecastController.cs and rename the WeatherForecastController.cs to myBotConnector.cs as shown below.
Your project folder should look like the below screenshot.
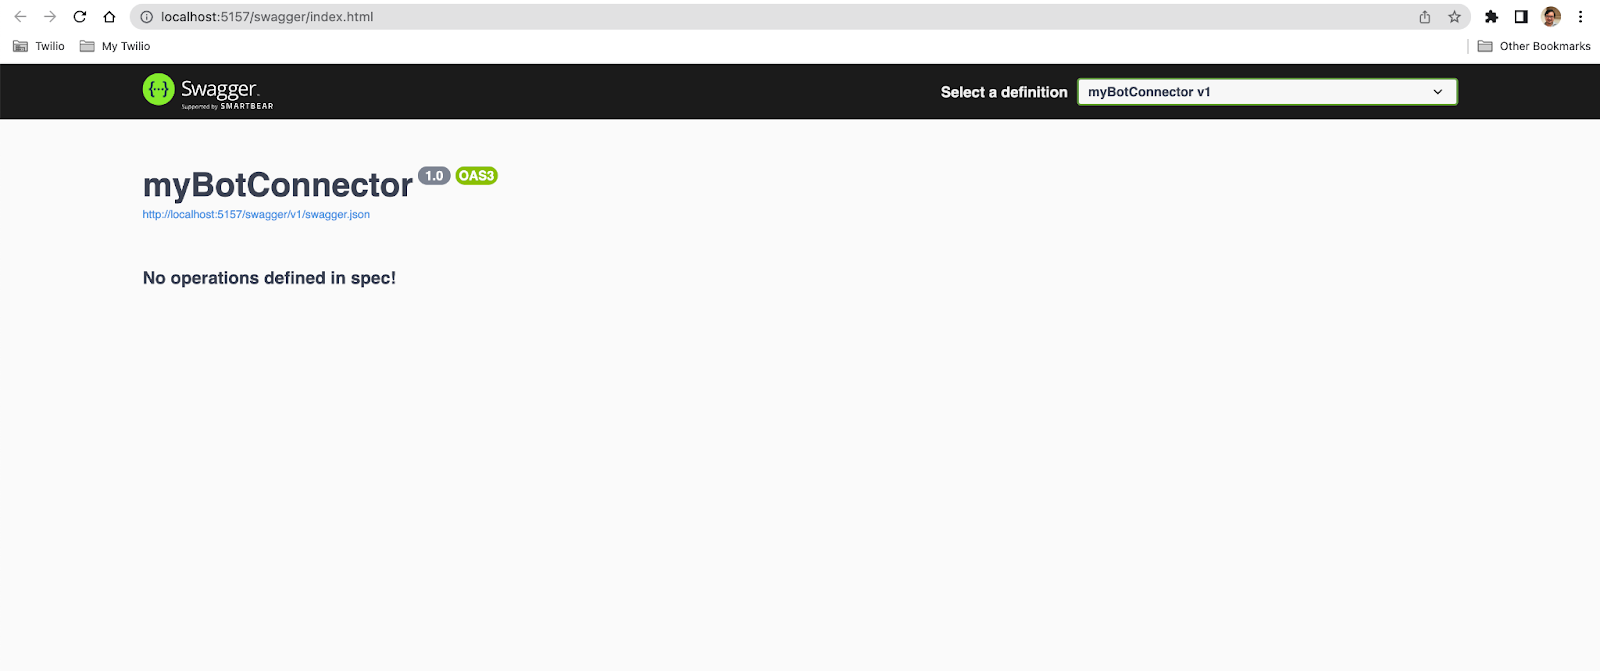
Run the project with the dotnet watch run command. The documentation page should open, stating that “No operations defined in spec!”, as shown below.
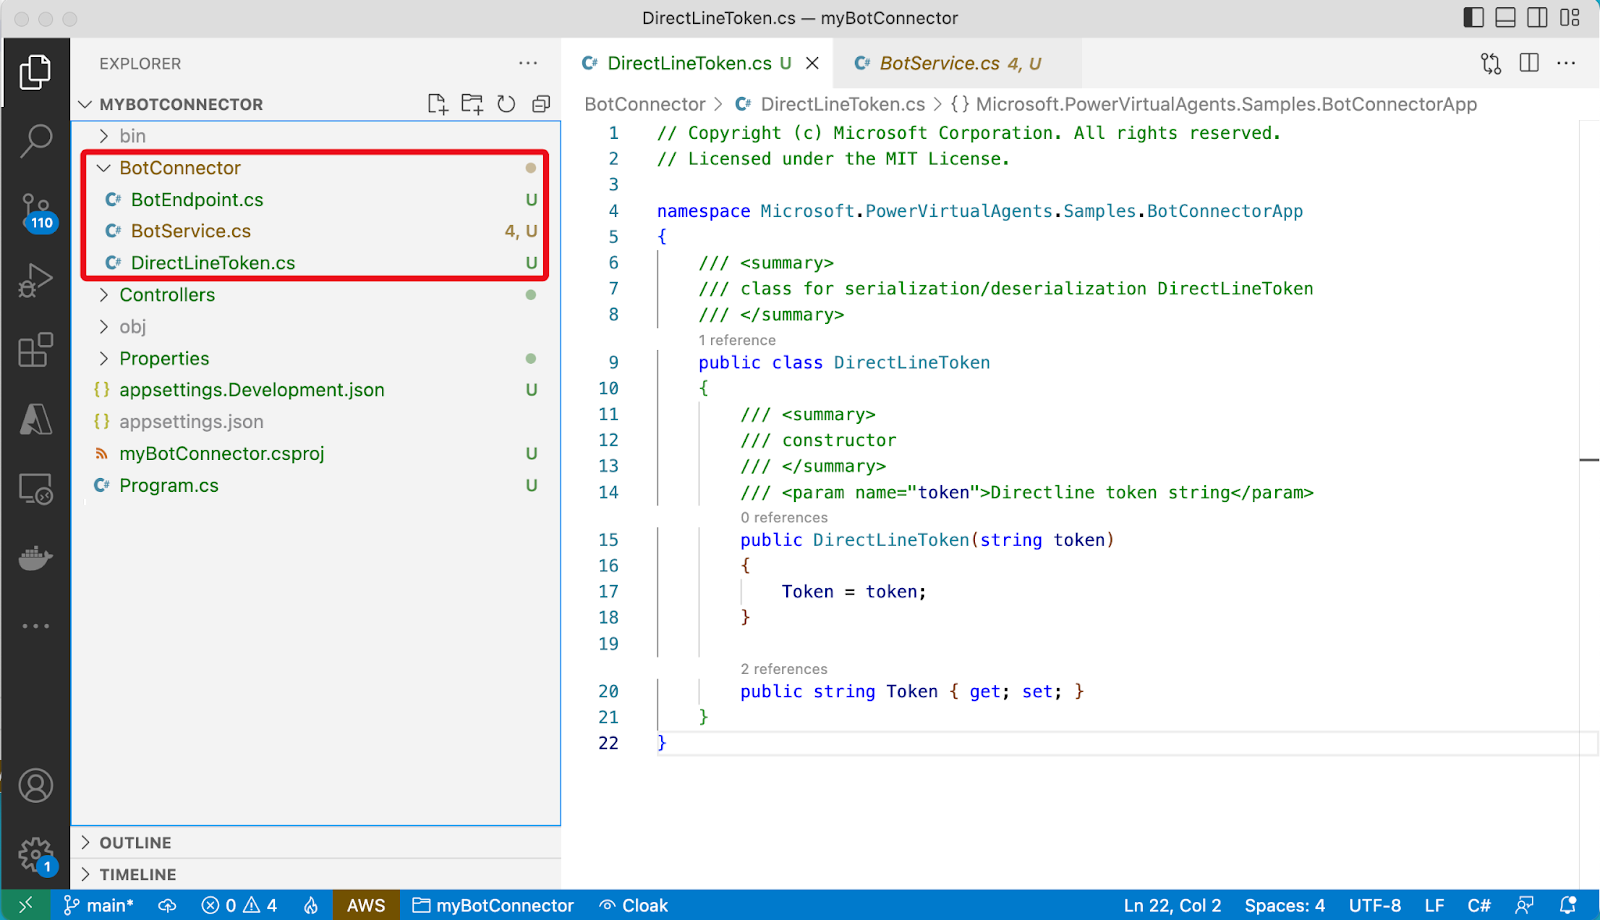
Back on Visual Studio Code, click the Explorer pane and select “New Folder” to create a new folder. Call the folder BotConnector.
Add the following three files for the classes under the new BotConnector folder:
1. BotEndpoint.csC#
// Copyright (c) Microsoft Corporation. All rights reserved.
// Licensed under the MIT License.

using System;

namespace Microsoft.PowerVirtualAgents.Samples.BotConnectorApp
{
   /// <summary>
   /// class with bot info
   /// </summary>
   public class BotEndpoint
   {
       /// <summary>
       /// constructor
       /// </summary>
       /// <param name="botId">Bot Id GUID</param>
       /// <param name="tenantId">Bot tenant GUID</param>
       /// <param name="tokenEndPoint">REST API endpoint to retreive directline token</param>
       public BotEndpoint(string botId, string tenantId, string tokenEndPoint)
       {
           BotId = botId;
           TenantId = tenantId;
           UriBuilder uriBuilder = new UriBuilder(tokenEndPoint);
           uriBuilder.Query = $"botId={BotId}&tenantId={TenantId}";
           TokenUrl = uriBuilder.Uri;
       }

       public string BotId { get; }

       public string TenantId { get; }

       public Uri TokenUrl { get; }
   }
}
2. BotService.csC#
// Copyright (c) Microsoft Corporation. All rights reserved.
// Licensed under the MIT License.

using Microsoft.Rest.Serialization;
using System;
using System.Net.Http;
using System.Threading.Tasks;

namespace Microsoft.PowerVirtualAgents.Samples.BotConnectorApp
{
   /// <summary>
   /// Bot Service class to interact with bot
   /// </summary>
   public class BotService
   {
       private static readonly HttpClient s_httpClient = new HttpClient();

       public string BotName { get; set; }

       public string BotId { get; set; }

       public string TenantId { get; set; }

       public string TokenEndPoint { get; set; }

       /// <summary>
       /// Get directline token for connecting bot
       /// </summary>
       /// <returns>directline token as string</returns>
       public async Task<string> GetTokenAsync()
       {
           string token;
           using (var httpRequest = new HttpRequestMessage())
           {
               httpRequest.Method = HttpMethod.Get;
               UriBuilder uriBuilder = new UriBuilder(TokenEndPoint);
               uriBuilder.Query = $"api-version=2022-03-01-preview&botId={BotId}&tenantId={TenantId}";
               httpRequest.RequestUri = uriBuilder.Uri;
               using (var response = await s_httpClient.SendAsync(httpRequest))
               {
                   var responseString = await response.Content.ReadAsStringAsync();
                   token = SafeJsonConvert.DeserializeObject<DirectLineToken>(responseString).Token;
               }
           }

           return token;
       }
   }
}
3. DirectLineToken.csC#
// Copyright (c) Microsoft Corporation. All rights reserved.
// Licensed under the MIT License.
namespace Microsoft.PowerVirtualAgents.Samples.BotConnectorApp
{
/// <summary>
/// class for serialization/deserialization DirectLineToken
/// </summary>
public class DirectLineToken
{
/// <summary>
/// constructor
/// </summary>
/// <param name="token">Directline token string</param>
public DirectLineToken(string token)
{
Token = token;
}
public string Token { get; set; }
}
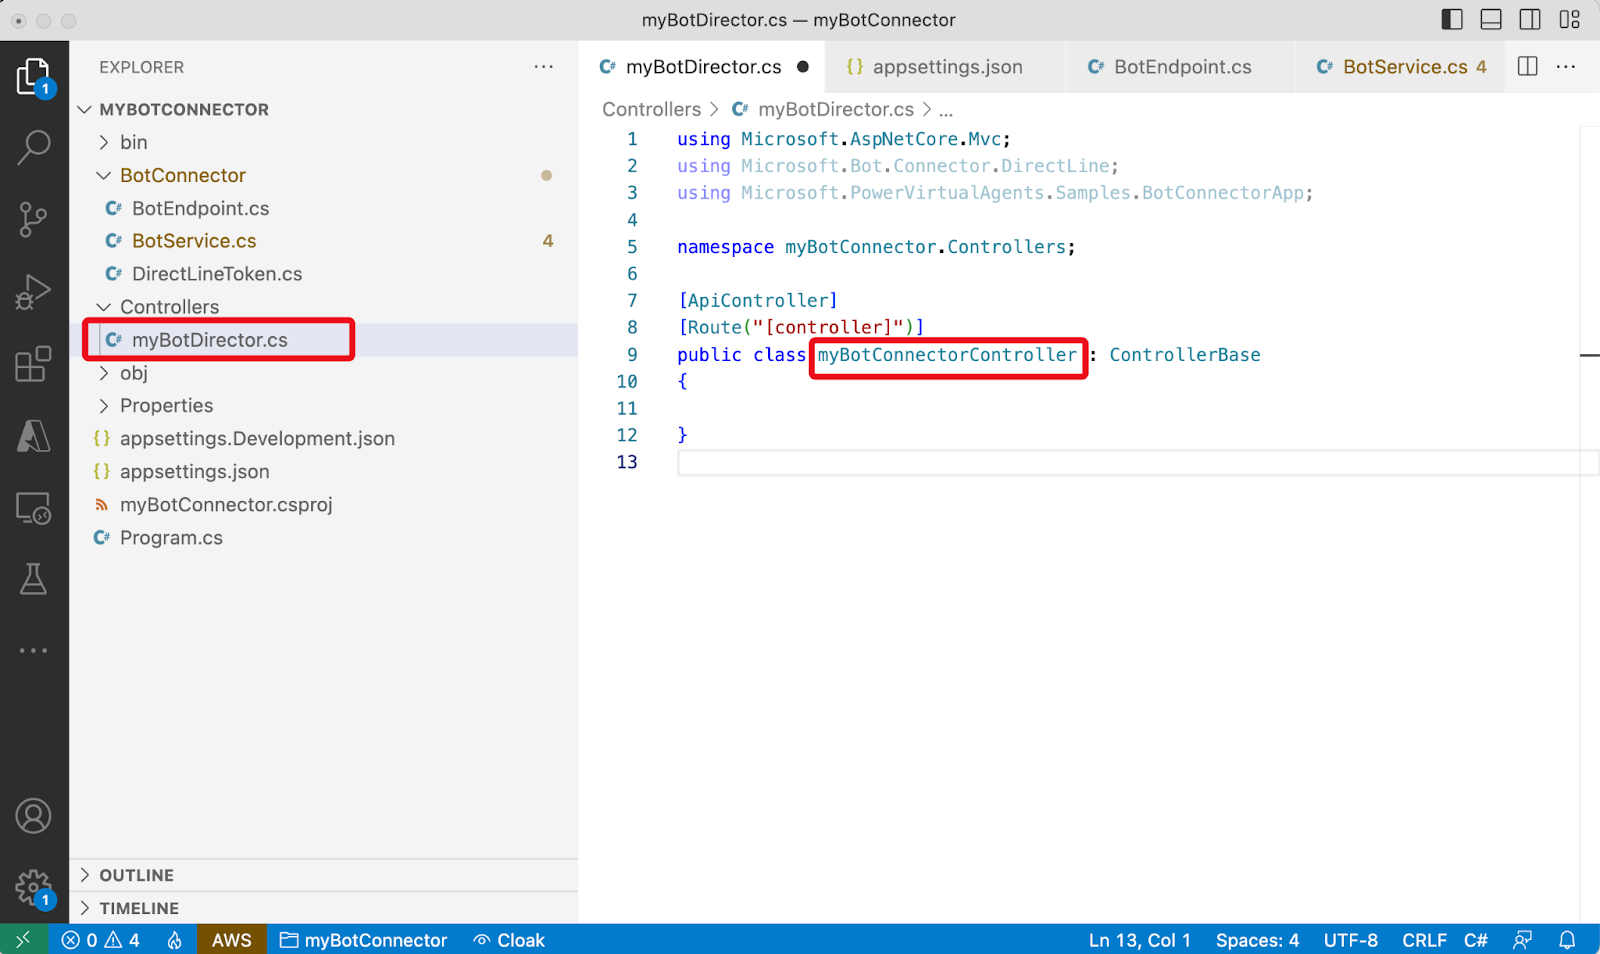
}The project folder should now look like the screenshot below.
Replace the content of myBotConnector.cs with the below code.C#
using Microsoft.AspNetCore.Mvc;
using Microsoft.Bot.Connector.DirectLine;
using Microsoft.PowerVirtualAgents.Samples.BotConnectorApp;

namespace myBotConnector.Controllers;

[ApiController]
[Route("[controller]")]
public class myBotConnectorController : ControllerBase
{
   private readonly IConfiguration _configuration;
   private static string? _watermark = null;
   private const int _botReplyWaitIntervalInMilSec = 3000;
   private const string _botDisplayName = "Bot";
   private const string _userDisplayName = "You";
   private static string? s_endConversationMessage;
   private static BotService? s_botService;
   public static IDictionary<string, string> s_tokens = new Dictionary<string, string>();
   public myBotConnectorController(IConfiguration configuration)
   {
       _configuration = configuration;
       var botId = _configuration.GetValue<string>("BotId") ?? string.Empty;
       var tenantId = _configuration.GetValue<string>("BotTenantId") ?? string.Empty;
       var botTokenEndpoint = _configuration.GetValue<string>("BotTokenEndpoint") ?? string.Empty;
       var botName = _configuration.GetValue<string>("BotName") ?? string.Empty;
       s_botService = new BotService()
       {
           BotName = botName,
           BotId = botId,
           TenantId = tenantId,
           TokenEndPoint = botTokenEndpoint,
       };
       s_endConversationMessage = _configuration.GetValue<string>("EndConversationMessage") ?? "quit";
       if (string.IsNullOrEmpty(botId) || string.IsNullOrEmpty(tenantId) || string.IsNullOrEmpty(botTokenEndpoint) || string.IsNullOrEmpty(botName))
       {
           Console.WriteLine("Update App.config and start again.");
           Console.WriteLine("Press any key to exit");
           Console.Read();
           Environment.Exit(0);
       }
   }

   [HttpPost]
   [Route("StartBot")]
   [Consumes("application/x-www-form-urlencoded")]
   //public async Task<ActionResult> StartBot(HttpContext req)
   public async Task<ActionResult> StartBot([FromForm] string From, [FromForm] string Body)
   {
       Console.WriteLine("From: " + From + ", " + Body);
       var token = await s_botService.GetTokenAsync();
       if (!s_tokens.ContainsKey(From)) {
           s_tokens.Add(From, token);
       }
       Console.WriteLine("s_tokens: " + s_tokens[From]);
       var response = await StartConversation(Body, s_tokens[From]);

       return Ok(response);
   }

   //private static async Task<string> StartConversation(string inputMsg)
   private async Task<string> StartConversation(string inputMsg, string token = "")
   {
       Console.WriteLine("token: " + token);
       using (var directLineClient = new DirectLineClient(token))
       {
           var conversation = await directLineClient.Conversations.StartConversationAsync();
           var conversationtId = conversation.ConversationId;
           //string inputMessage;

           Console.WriteLine(conversationtId + ": " + inputMsg);
           //while (!string.Equals(inputMessage = , s_endConversationMessage, StringComparison.OrdinalIgnoreCase))

           if (!string.IsNullOrEmpty(inputMsg) && !string.Equals(inputMsg, s_endConversationMessage))
           {
               // Send user message using directlineClient
               await directLineClient.Conversations.PostActivityAsync(conversationtId, new Activity()
               {
                   Type = ActivityTypes.Message,
                   From = new ChannelAccount { Id = "userId", Name = "userName" },
                   Text = inputMsg,
                   TextFormat = "plain",
                   Locale = "en-Us",
               });

               // Get bot response using directlinClient
               List<Activity> responses = await GetBotResponseActivitiesAsync(directLineClient, conversationtId);
               return BotReplyAsAPIResponse(responses);
           }

           return "Thank you.";
       }
   }

   private static string BotReplyAsAPIResponse(List<Activity> responses)
   {
       string responseStr = "";
       responses?.ForEach(responseActivity =>
       {
           // responseActivity is standard Microsoft.Bot.Connector.DirectLine.Activity
           // See https://github.com/Microsoft/botframework-sdk/blob/master/specs/botframework-activity/botframework-activity.md for reference
           // Showing examples of Text & SuggestedActions in response payload
           Console.WriteLine(responseActivity.Text);
           if (!string.IsNullOrEmpty(responseActivity.Text))
           {
               responseStr = responseStr + string.Join(Environment.NewLine, responseActivity.Text);
           }

           if (responseActivity.SuggestedActions != null && responseActivity.SuggestedActions.Actions != null)
           {
               var options = responseActivity.SuggestedActions?.Actions?.Select(a => a.Title).ToList();
               responseStr = responseStr + $"\t{string.Join(" | ", options)}";
           }
       });

       return responseStr;
   }

   /// <summary>
   /// Use directlineClient to get bot response
   /// </summary>
   /// <returns>List of DirectLine activities</returns>
   /// <param name="directLineClient">directline client</param>
   /// <param name="conversationtId">current conversation ID</param>
   /// <param name="botName">name of bot to connect to</param>
   private static async Task<List<Activity>> GetBotResponseActivitiesAsync(DirectLineClient directLineClient, string conversationtId)
   {
       ActivitySet response = null;
       List<Activity> result = new List<Activity>();

       do
       {
           response = await directLineClient.Conversations.GetActivitiesAsync(conversationtId, _watermark);
           if (response == null)
           {
               // response can be null if directLineClient token expires
               Console.WriteLine("Conversation expired. Press any key to exit.");
               Console.Read();
               directLineClient.Dispose();
               Environment.Exit(0);
           }

           _watermark = response?.Watermark;
           result = response?.Activities?.Where(x =>
               x.Type == ActivityTypes.Message &&
               string.Equals(x.From.Name, s_botService.BotName, StringComparison.Ordinal)).ToList();

           //Console.WriteLine(result);
           if (result != null && result.Any())

           {
               return result;
           }

           Thread.Sleep(1000);
       } while (response != null && response.Activities.Any());

       return new List<Activity>();
   }
}
Update the appsettings.json file with the required application settings as shown below.
The values for BotId, BotTenantId, BotName, and BotTokenEndpoint are values we have taken earlier from the Power Virtual Agents bot configuration.
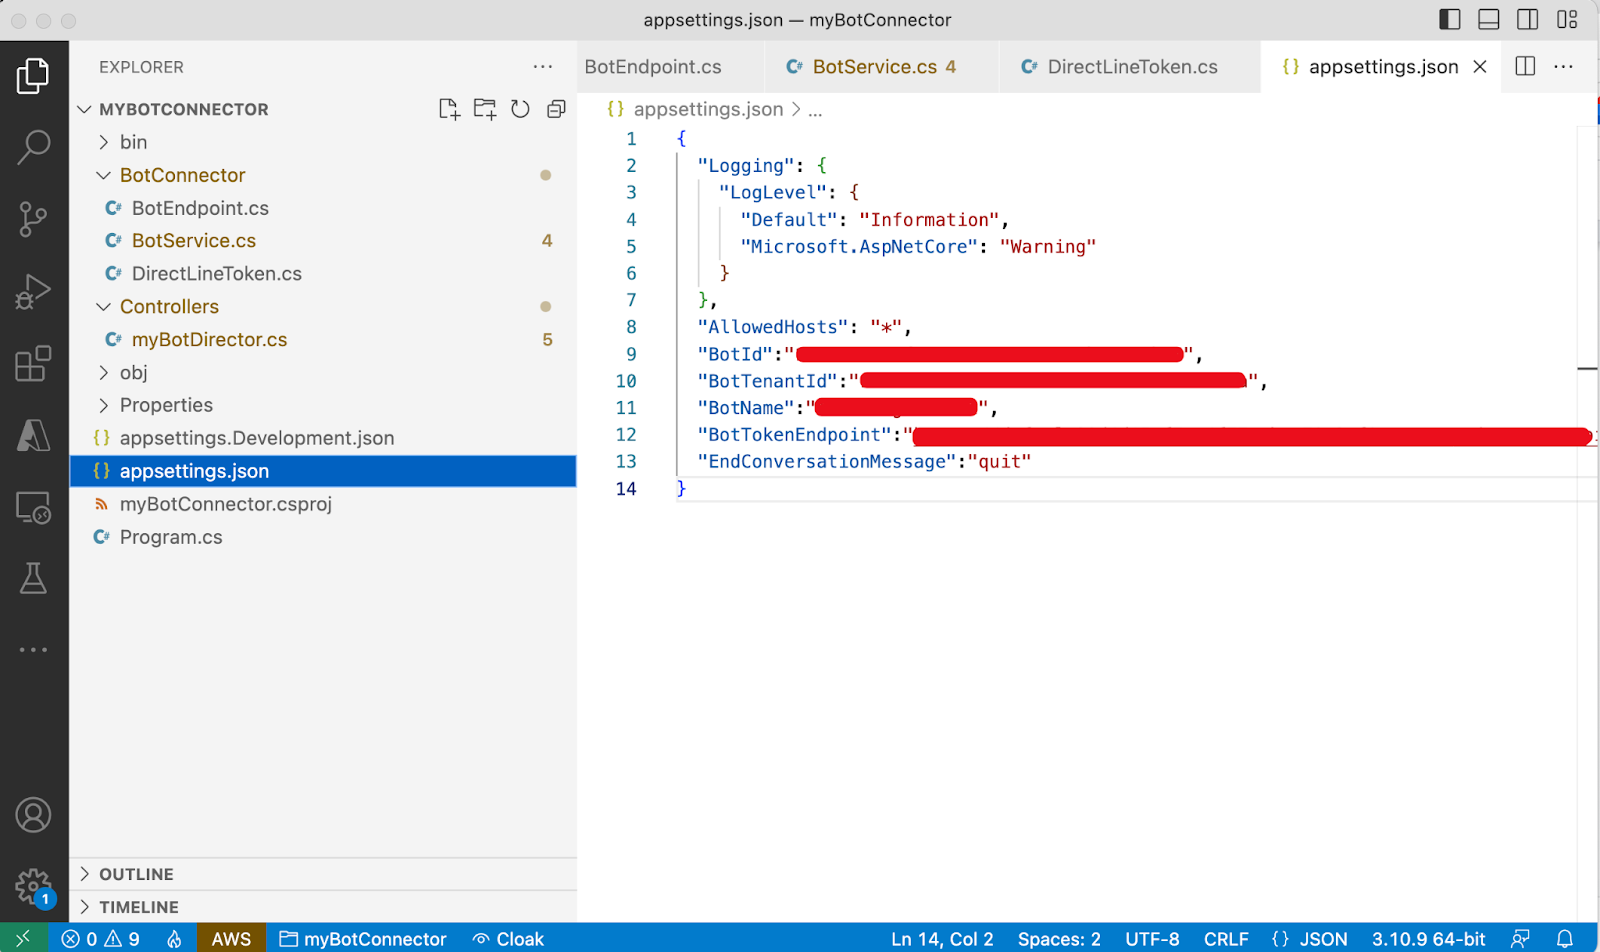
The BotConnector is now ready to relay messages between a front end client (WhatsApp in our case) and the Power Virtual Agents bot.
Run and test the Relay Bot
Before you run and test the Relay Bot, please make sure that you have updated the appsettings.json file with the values collected from the Power Virtual Agents bot. Please refer to the Collect required parameters from Power Virtual Agent section above for details.
Run the project with dotnet watch run from the project folder. The project documentation page should now look as follows.
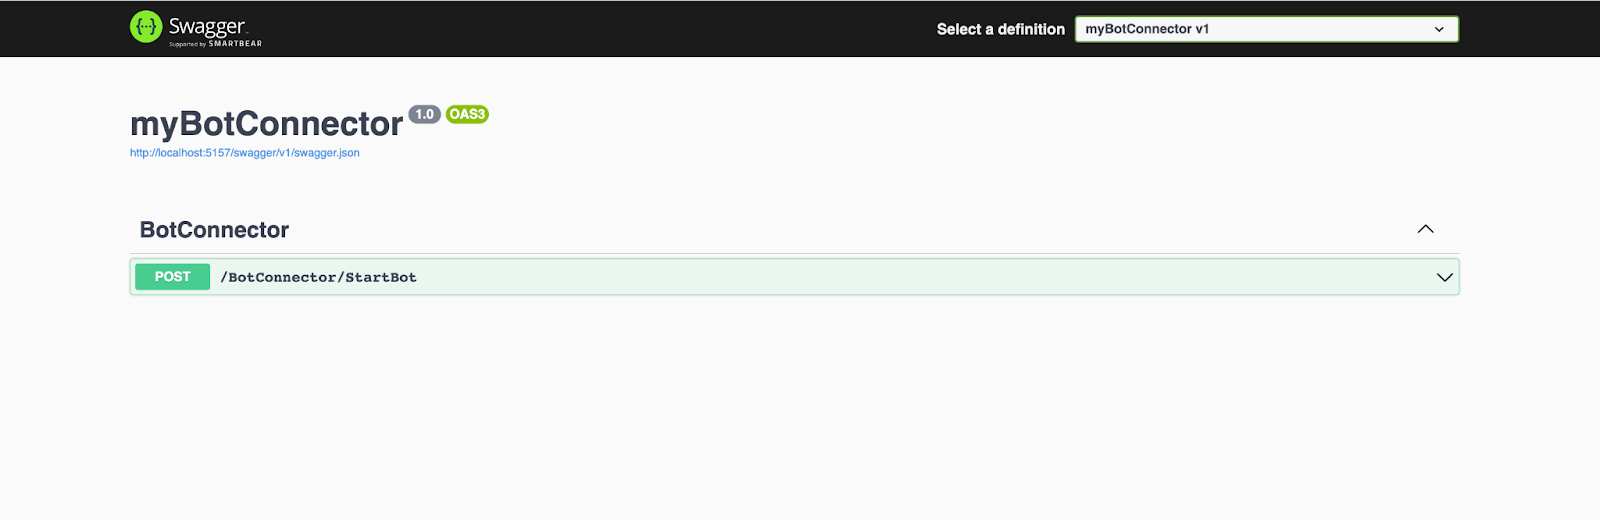
In this page, click on the only endpoint and proceed to test it by supplying the “From” and “Body” fields with any values as shown in the below screenshot.
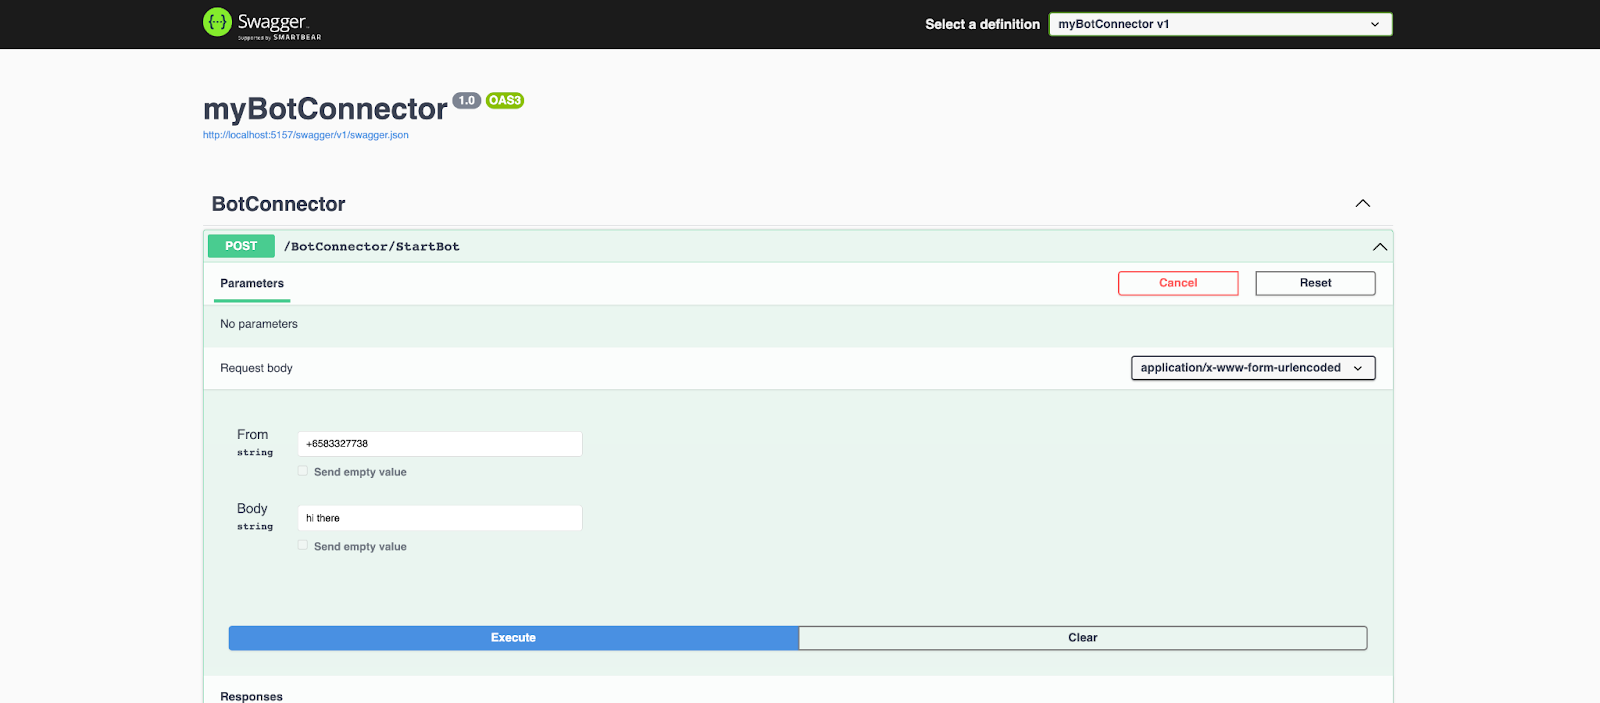
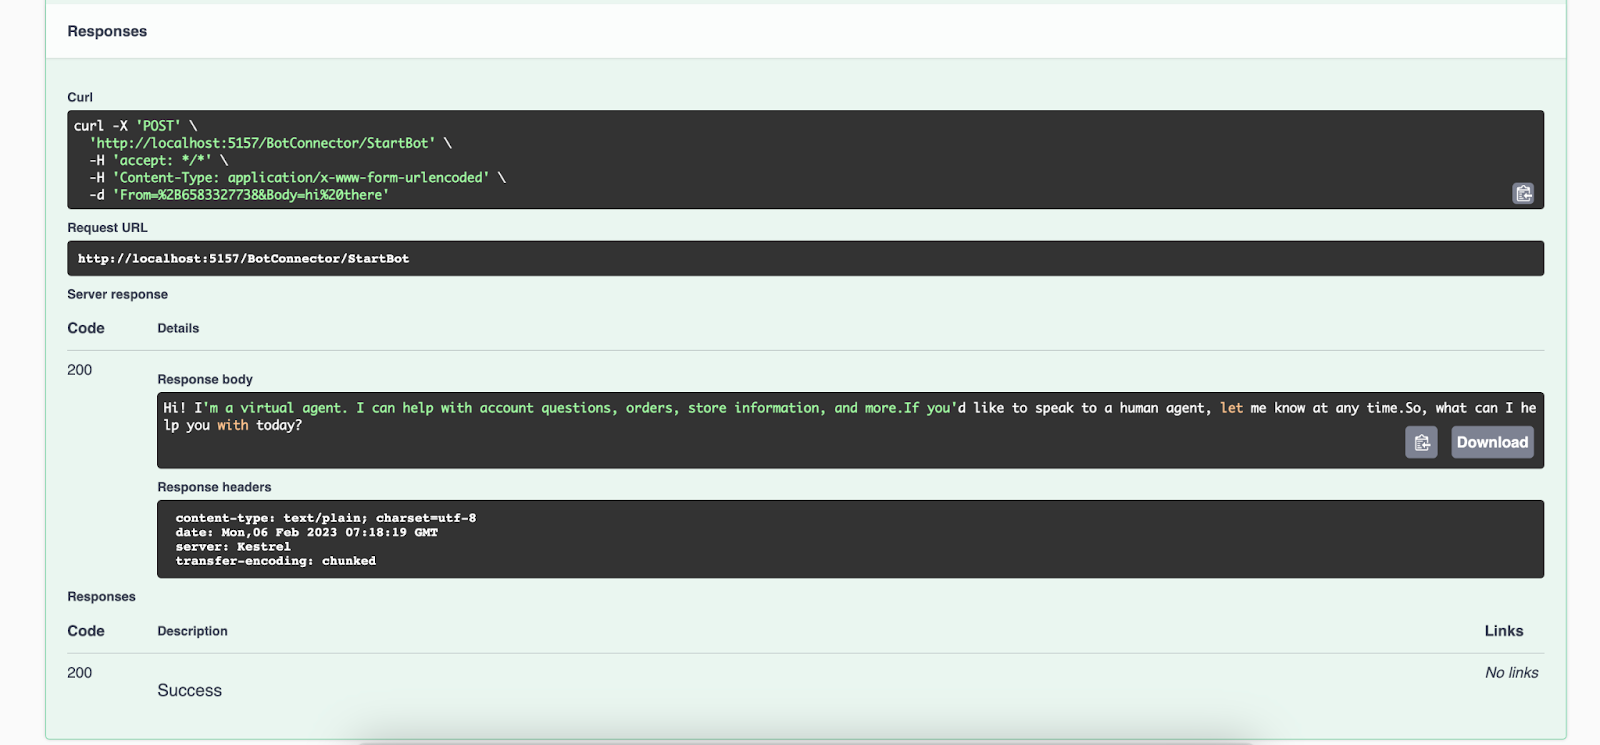
Hit the Execute button, and you should see the response from the API, as shown below.
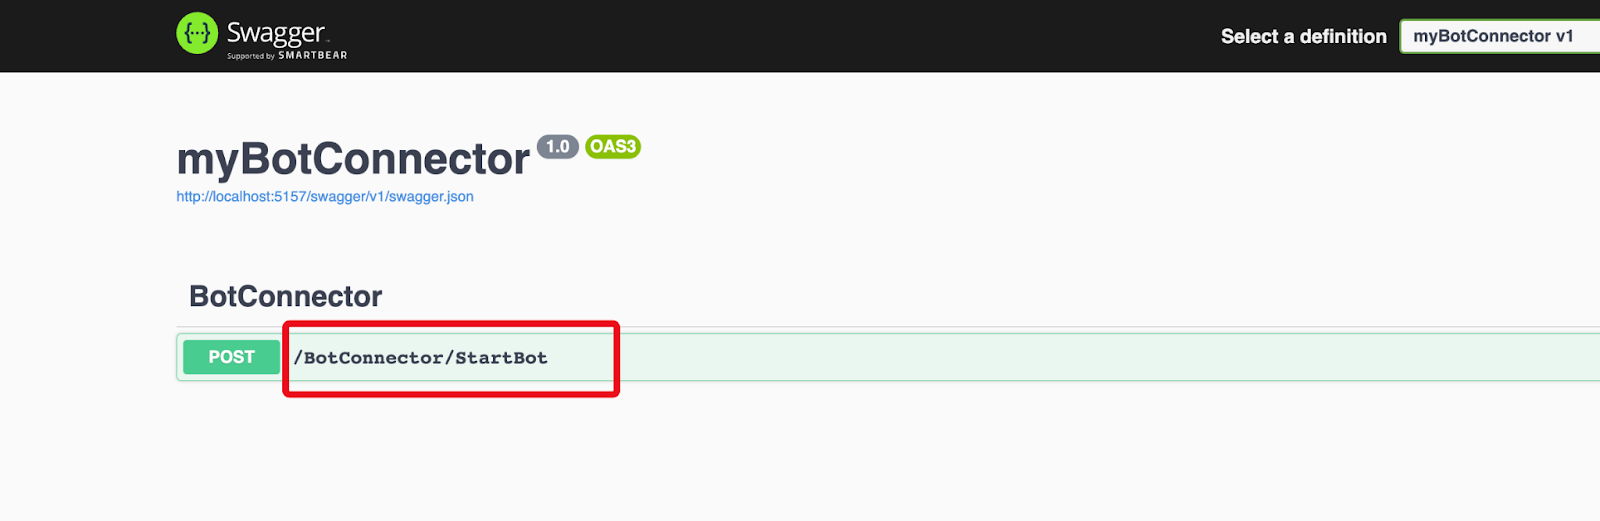
The Relay Bot is now ready for the Twilio messaging configuration. Take note of the endpoint path from the Relay Bot documentation page, highlighted in the screenshot below.
Configure the Twilio WhatsApp Sandbox with Relay Bot
Since our project is now running on localhost, we will use ngrok to set up a tunnel to expose it to the internet. To do so, start ngrok in a separate terminal session with the http port of the project, for example ngrok http 5157.
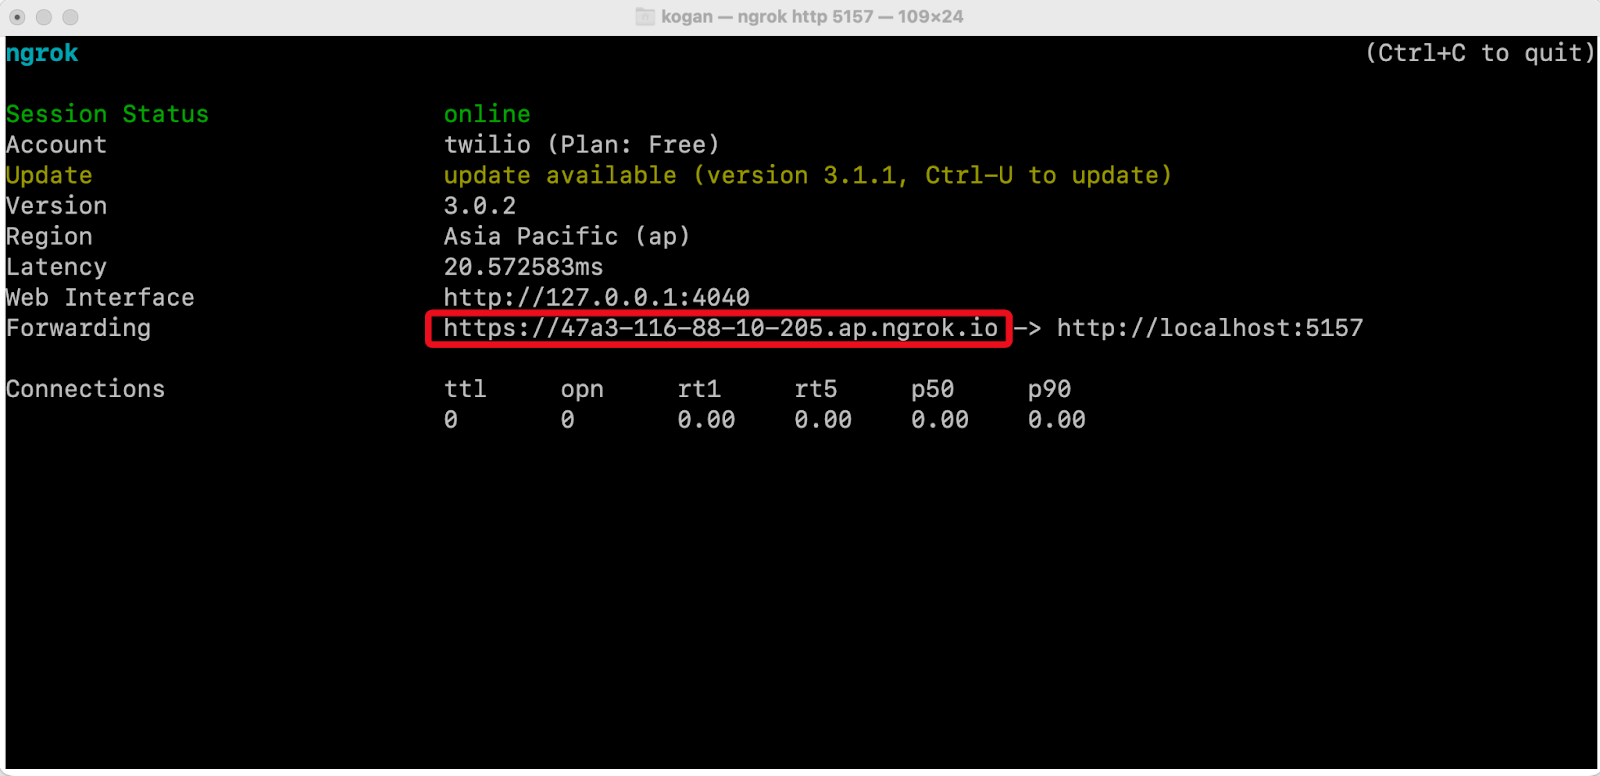
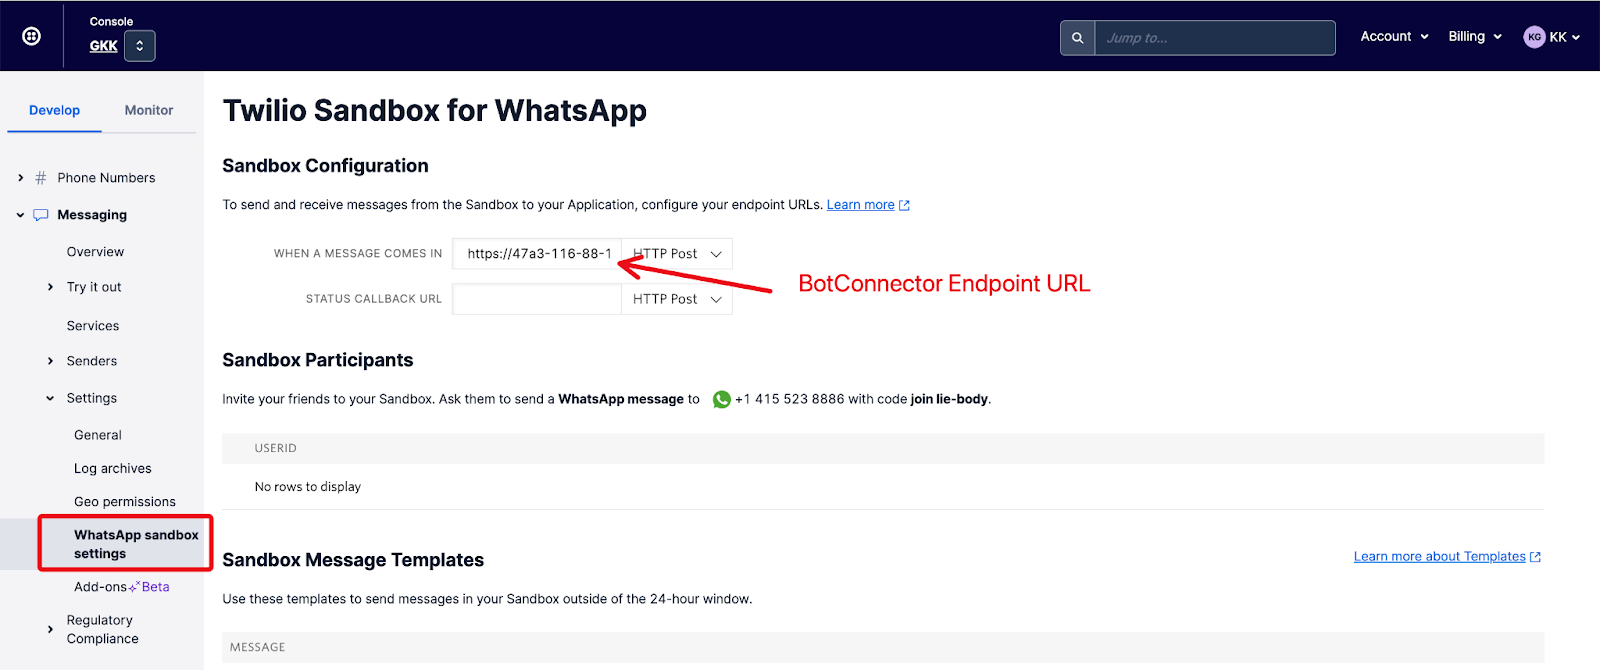
Open the Twilio console and navigate to the Messaging – Settings – WhatsApp Sandbox Settings. There, enter the full URL for the Relay Bot in the “When a message comes in” field. The URL is composed with the ngrok forwarding URL with the Relay Bot’s endpoint added at the end. An example URL should look like https://47a3-116-88-10-205.ap.ngrok.io/BotConnector/StartBot.
Save the WhatsApp Sandbox Settings. You can now chat with the Power Virtual Agents bot by initiating a WhatsApp message to your Twilio Sandbox for WhatsApp at the number shown in the Sandbox Participants section of the Twilio Sandbox for WhatsApp settings page. The below screenshot shows a sample interaction with the Power Virtual Agents bot over WhatsApp.

Congratulations! You’ve now created a Relay Bot, connecting a Power Virtual Agents bot and WhatsApp with Twilio. You can interact with the bot by texting to your WhatsApp enabled Twilio Phone Number. You may explore further on Formatting, location, and other features in WhatsApp messaging to further enhance your Power Virtual Agents bot in responding with advanced messaging features.

