Integrating NWC to Node JS example

Since my previous sharing on Why Should I integrate Nintex Workflow Cloud?, I’ve been thinking to invest more time in giving additional example(s) on how I have used NWC API to integrate the workflow into the project I have been helping out for a partner. As the project is still in stealth mode, I thought maybe I can still share pieces of concepts or works we have done bringing over the NWC tasks to a custom portal built on Node JS.

Nintex Workflow Cloud has been a great platform for us to automate business processes, due to it’s focus not as an end user portal to host business data. Integration scenarios always brought to attention on how to leverage the NWC workflows in a custom portal.

In this article, I am trying to share an actual example on one of the projects using Node JS. The portal’s events of adding or modifying it’s content triggering the NWC workflow to run, as all the users are with the custom portal instead of NWC portal, we have brought over the NWC task into the custom portal for users’ to action on their task(s). The outcome of this is the “Tasks List ” page showing a list of active/pending task of the user shown in the below capture.
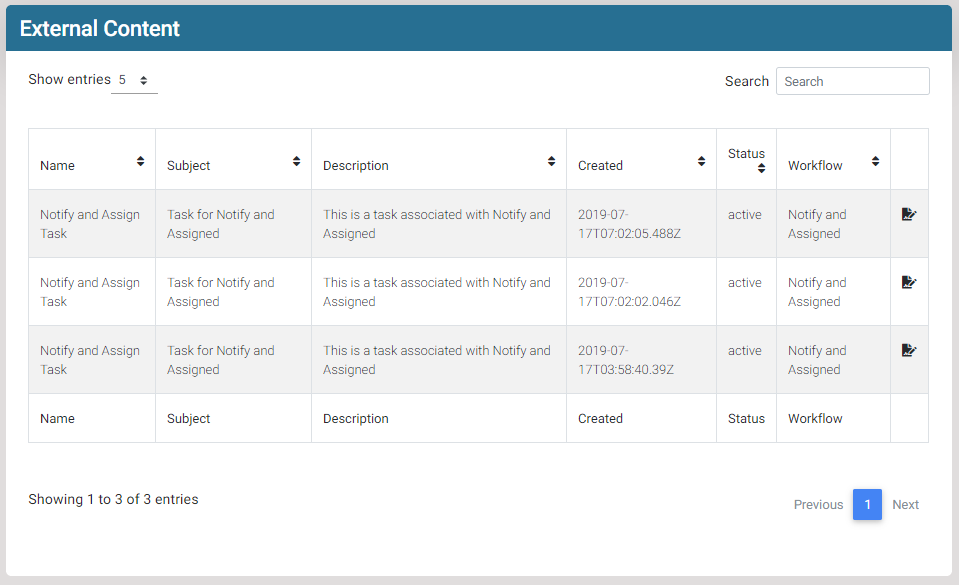
Task View Page

The task View Page is filtered with active Task(s) belonging to the current user. User can click on the action icon to show the task detail on a custom form, to either Approve or Reject a task, this is shown in below capture
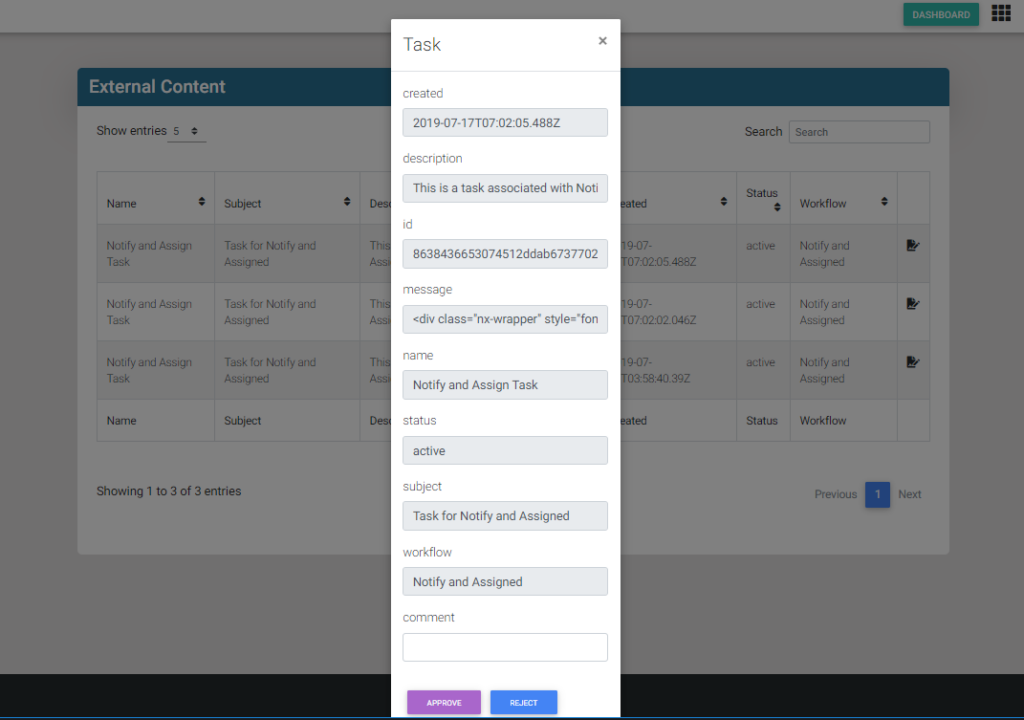
Task Approval

The above scenario is presented using React JS, which is supported by the two routes setup on the Node JS on the server side. I am not sharin the client side React JS modules, assumming if you are using Vue, Angular or other on the client side, the two routes we have setup on the Node’s routing will be the same on helping to get the list of tasks or updating of tasks to NWC. The routes are simple as to “get a list of task(s) filter by status, date, and user”, and “update of a single task” using the NWC provided end points.

const request = require('request')
const URL = require('url')

module.exports = (app) => {

  app.get('/api/external-content',authenticate(), (req, res) => {
    const authorization = {
      authorization: 'Bearer here-is-the-personal-access-token-u-can-get-from-nwc-settings'
    }

    request('https://us.nintex.io/workflows/v1/tasks?from=2018-11-01', { headers: authorization }, (error, response, body) => {
      if (error) console.error(error)
      if (response.statusCode === 200) {

        var res_data = JSON.parse(body)
        if(res_data && res_data.tasks.length!=0){
        res.send({ data: res_data})
      }
    })
  })

  app.patch('/api/external-content',authenticate(), (req, res) => {
    const url = URL.parse(req.url, true)
    const taskId = url.query.task_id
    const headers = {
      authorization: 'Bearer here-is-the-personal-access-token-u-can-get-from-nwc-settings'
    }

    const requestOptions = {
      method: 'PATCH',
      uri: `https://us.nintex.io/workflows/v1/tasks/${taskId}`,
      body: JSON.stringify(req.body),
      headers
    }

    request(requestOptions, (error, response, body) => {
        if (error) console.error(error)
        if (response.statusCode === 200) {
          let result
          try {
            result = JSON.parse(body)
          } catch (err) {
            if (err) result = body
          }

          res.send({ result })
        } else {
          res.send({ result: 'request is not valid'})
        }
      }
    )
  })
}

The above code was easy as NWC’s API documentation at get-tasks, and update-a-task have given us very good code samples not just for Node, but also cURL, C#, JavaScript, Ruby, and Python.

Filtering Tasks List To Show Current User’s Tasks

Well, this is just a quick sharing on how you could filter a Sharepoint list view to show only items or rows belong to the current user (i.e. user who login to the Sharepoint site). One of the usage especially in Office 365 Tasks list, anyone who has edit right to the Tasks list will be able to edit (i.e. approve or reject) any tasks in the Tasks list, including one that is not belonging to you.

In the screen capture below, we can see by default anyone who has access to the Tasks list sees every task in the Tasks list.

We are going to add the following JavaScript to the JS Link (i.e. Client Side Rendering) of the Tasks list to remove the tasks that are not belonging to the current user. Just take the below JavaScript code and save it to a file (i.e. in my case I have named it TaskList.js and uploaded it to the Site Asset library).

(function () {
 function renderListItemTemplate(renderCtx) {
 var userId = _spPageContextInfo.userId;
 if(renderCtx.CurrentItem.AssignedTo[0].id != userId)
 {
 return ''; //do not render row
 }
 return RenderItemTemplate(renderCtx);
 }


 function registerListRenderer()
 {
 var context = {};
 context.Templates = {};
 context.Templates.Item = renderListItemTemplate;

 SPClientTemplates.TemplateManager.RegisterTemplateOverrides(context);
 }
 ExecuteOrDelayUntilScriptLoaded(registerListRenderer, 'clienttemplates.js');

})();

Once that is done, just include the file to the JS Link property of the Task list page as shown below:

That’s all we need to filter a list to the current user. The capture below demonstrates the outcome after the JS Link is applied to the page (i.e. showing only Tasks belong to Richard Roe in my example below).

JavaScript to get List Items and User Profiles from Nintex Forms for Office 365

Sharing two pieces of JavaScript getting List Item(s) and User Profiles from Nintex Forms for Office 365. The two JavaScript was tested based on Nintex Forms for Office 365, App Version: NFO 1.2.3.0. Please take note that this code is tested only based on the above mentioned version of Nintex Forms, it might not be optimized in term of performance or simplicity.

Calling Sharepoint Online REST API to query host web’s custom list from within Nintex Forms for Office 365 (i.e. App web).

var pollSP;  
NWF.FormFiller.Events.RegisterAfterReady(function (){  
    pollSP = setInterval(checkSPLoad, 500);  
});  
      
function checkSPLoad(){  
    if (clientContext){  
        window.clearInterval(pollSP);  
          var hostweburl = decodeURIComponent(getQueryStringParameter("SPHostUrl"));
          var appweburl = decodeURIComponent(getQueryStringParameter("SPAppWebUrl"));  
          var layoutsPath = "/_layouts/15/";  
          var scriptbase = appweburl + layoutsPath;  
  
          NWF$.getScript(scriptbase + "SP.js",
               function () { 
                              NWF$.getScript(scriptbase+ "SP.RequestExecutor.js", execCrossDomainRequest); 
               }
          );
    }  
  
     function execCrossDomainRequest(){
          var deferred = NWF$.Deferred();
          var url = appweburl + "/_api/SP.AppContextSite(@target)/web/lists/GetByTitle('MyExpense')/Items?$select=ID,Title&@target='" + hostweburl + "'";
          var executor = new SP.RequestExecutor(appweburl);
          executor.executeAsync(
               {
                    url: url,
                    method: "GET",
                    headers: {"accept": "application/json;odata=verbose"},
                    success: function (data) {
                         var jsonobj = JSON.parse(data.body);
                         var results = jsonobj.d.results;
                         deferred.resolve(data);
                         var msg = "";
                         for (var i = 0; i < results.length; i++){
                              msg = msg + results[i].Title + ";";
                         }
                         alert(msg);
                    },
                    error: function (data) {
                         deferred.reject(data);
                         alert("data");
                    }
               }
          );
     }
}

Querying current user’s profile from Nintex Forms for Office 365. 

NWF.FormFiller.Events.RegisterAfterReady(function (){  
     var clientContext;
     var hostweburl = decodeURIComponent(getQueryStringParameter("SPHostUrl"));
     var appweburl = decodeURIComponent(getQueryStringParameter("SPAppWebUrl"));  
     var layoutsPath = "/_layouts/15/";  
     var scriptbase = appweburl + layoutsPath;  
  
     NWF$.getScript(scriptbase + "SP.js").then(function(){
          return NWF$.getScript(scriptbase + "SP.RequestExecutor.js");
     }).then(function(){
          return NWF$.getScript(scriptbase + "init.js");
     }).then(function(){
          return NWF$.getScript(scriptbase + "SP.UserProfiles.js");
     }).then(execCrossDomainRequest);
  
     function execCrossDomainRequest(){
          var deferred = NWF$.Deferred();
          
          var con = SP.ClientContext.get_current();
          clientContext = new SP.ClientContext(appweburl);
          var factory = new SP.ProxyWebRequestExecutorFactory(appweburl);
          clientContext.set_webRequestExecutorFactory(factory);
          
          var hostWeb = new SP.AppContextSite(clientContext, hostweburl).get_web();
          var appWeb = new SP.AppContextSite(clientContext, appweburl).get_web();
          
          var url = appweburl + "/_api/SP.UserProfiles.PeopleManager/GetMyProperties";
     
          var requestHeaders = {
               "Accept": "application/json;odata=verbose"
          };
            
          var executor = new SP.RequestExecutor(appweburl);
          executor.executeAsync(
               {
                    url: url,
                    contentType: "application/json;odata=verbose",
                    method: "GET",
                    headers: requestHeaders,
                    success: function (data) {
                         var msg = "";
                         var parsedData = JSON.parse(data.body);
                         var properties = parsedData.d.UserProfileProperties.results;
                         for (var i = 0; i < properties.length; i++){
                              var property = properties[i];
                              msg = msg + property.Key + ":" + property.Value + ",";
                         }
                         deferred.resolve(parsedData);
                         alert(msg);
                    },
                    error: function (data) {
                         deferred.reject(data);
                         alert("failed");
                    }
               }
          );
     }

});

Start a Nintex Workflow Cloud workflow from the Sharepoint ECB menu

ECB Menu in Sharepoint List or Document Library allows one to manually trigger an action, and this could be an action to start a workflow from Nintex Workflow Cloud. We would love to have the option to manually trigger a workflow to start.

Here is the story line, looking at a document library in Sharepoint, based on the use case we discussed in my previous blog post, a Marketing Coordinator uploads the Excel Attendant List to a Sharepoint folder in Marketing Site’s Document Library, in this case, not all the documents in the library are leads to be generated in Salesforce, only this particular excel file is, and we want to manually trigger a Nintex Workflow Cloud workflow to help collect and upload leads from this file to SalesForce. To do that, we can simply add a custom ECB Menu to the Document Library (i.e. same applies to Custom List in Sharepoint). Diagram below illustrates what you will get: 

Starts Nintex Workflow Cloud from Sharepoint ECB Menu

Before we get into how to add the ECB menu in Sharepoint Document Library, let us take a look at how to start a workflow in Nintex Workflow Cloud. We going to use the “Public web form” Start event option in this exercise, the configuration of a sample workflow Start Event is shown in the diagram below:

This configuration will give us a web form URL with the format of https://{your-tenant}.workflowcloud.com/forms/{workflow-id}. Using Fiddler to trace the form submission, you will find the form is being submitted with the following HTTP POST request.

POST https://{your-tenant}.workflowcloud.com/api/v1/anonymous-workflow/{workflow-id} HTTP/1.1

Host: {your-tenant}.workflowcloud.com

Connection: keep-alive

Content-Length: 165

Accept: application/json, text/plain, */*

Origin: https://{your-tenant}.workflowcloud.com

:

:

Content-Type: application/json;charset=UTF-8

:

:

{“se_file_name1″:”/NWC%20Test/event%20lead.xlsx”}

With the HTTP POST request details we learned, we will be able to include a HTTP POST request in our ECB menu action. Again, there are different ways to achieve that – Sharepoint-Hosted Add-ins, Provider-Hosted Add-ins, and simply the way we going to get that without the need to create an add-in using Visual Studio is the Display Template client side JavaScript.

1. Edit the Document Library page by selecting the Edit Page from the page menu as shown.

2. Insert a Content Editor web part to the page, 

3. With the cursor in the Content Editor’s content area, click Edit Source to edit the source of the content

4. Here is the JavaScript code to be included in the Content Editor’s source

<script language="”javascript”" type="text/javascript">

function Custom_AddDocLibMenuItems(m, ctx)
{
  var strDisplayText = 'Upload to SalesForce';
  var strImagePath = '';
  var strAction = 'send2NWC()';
  
  // Add our new menu item
  CAMOpt(m, strDisplayText, strAction, strImagePath);

  // add a separator to the menu
  CAMSep(m);

  // false means that the standard menu items should also be rendered
  return false;
}

function CAMOpt(p,wzText,wzAct,wzISrc,wzIAlt,wzISeq,wzDesc)
{
     var mo=CMOpt(wzText,wzAct,wzISrc,wzIAlt,wzISeq,wzDesc);
     if(!mo)return null;
     if(wzText != "Delete Item") AChld(p,mo);
     return mo;
}

function send2NWC()
{
    var url = "https://{your-tenant}.workflowcloud.com/api/v1/anonymous-workflow/{workflow-id}";
    var method = "POST";
    //depending on the value you passing to the workflow, I am using selected item's Url here
    var postData = '{"se_file_name1":"' + currentItemFileUrl + '"}';
    var async = true;

    var request = new XMLHttpRequest();

    request.onload = function () {

          var status = request.status; // HTTP response status, e.g., 200 for "200 OK"
          var data = request.responseText; // Returned data, e.g., an HTML document.
     }

     request.open(method, url, async);

     request.setRequestHeader("Content-Type", "application/json;charset=UTF-8");

     // Sends the request to the server.
     request.send(postData);
     alert('Leads uploaded');
}
</script>

Tip: Few quick references getting values from Sharepoint Display Template:

currentItemFileUrl (i.e. selected item’s URL)

currentItemID (i.e. selected item’s ID in the list)

_spPageContextInfo.listId (i.e. List Id)

_spPageContextInfo.siteId (i.e. Site ID)

ctx.listName (i.e. List ID)

ctx.ListData.Row[currentItemID-1].UniqueId (i.e. selected item’s GUID)

ctx.ListData.Row[currentItemID-1].{column name} (i.e. list column value)

Nintex Form – Runtime function as parameter to Javascript call for setting form controls’ value

The intention of this write up is to demonstrate how to pass runtime function – (in Nintex Form calculated value control) – to JavaScript for setting controls’ value. It also features the following techniques for extending NINTEX Form capabilities:

  • Capturing of “Change” event from multiple editable controls (i.e. single line of text control) to trigger JavaScript function call
  • Using JavaScript to set form controls’ value (i.e. based on data captured during the form filling)
  • Using userProfileLookup runtime function to retrieve Sharepoint User Profile attributes (i.e. Distinguished Name in this example)
  • Hide a calculated value control in form with CSS Style
  • Regular Expression to extract different occurrences of OU in Distinguished Name

The outcome of this exercise is shown in the diagram below, where changes made to either Title or Requester field in the form causes the calculated value (i.e. circled in RED in the diagram) to call a custom defined JavaScript function (i.e. setControlValue function in this case) and pass the form’s runtime function (i.e. userProfileLookup – returns Requester’s Distinguished Name) value as parameter of the JavaScript’s  function, setControlValue function is to set values of both OU1 and OU2 “single line of text” control as shown in the following diagram.

Here are the steps to reproduce the above described outcome:

1. Create a custom list (i.e. “Set Form Control Value” custom list in my example) with list columns as shown in following diagram

2. Using Nintex Form to customize the custom list’s form, Nintex Form designer drew the form as shown in the diagram below automatically based on the defined custom list’s columns.

3. As we are going to use JavaScript to set value for controls OU1 and OU2, with data from Title control and form runtime function, we will need to set the “Client ID javaScript Variable Name” for reference by JavaScript at the later stage. The following diagram shows how the Client ID JavaScript Variable Name is being set for “Title” control as “title” (i.e. case sensitive). We will need to repeat the same for the other two controls named – OU1 and OU2 with Client ID JavaScript Variable Name as “ou1” and “ou2” respectively.

4. Add a “Calculated Value” control to the bottom of the form as shown below

5. Edit the formula of the “Calculated Value” control – RequesterDN in my example with formula as shown in the diagram below. The runtime formula of userProfileLookup to lookup “SPS-DistinguishedName” from the Sharepoint’s User Profile of the “Requester“.

6. Define a custom JavaScript in the Form’s setting for setting values of OU1 and OU2 controls, with below JavaScript

function setControlValue(value){try {  var ou1array = value.match(/^(?:.*?OU=){0}[^,]*[,](.*?)(?=,|$)/i);  var ou2array = value.match(/^(?:.*?OU=){1}[^,]*[,](.*?)(?=,|$)/i);  NWF$('#'+ou1).val(ou1array[1]);  NWF$('#'+ou2).val(ou2array[1]);}catch(err){};return value;}

The custom JavaScript defined in the Form’s Setting window is show in the following diagram

7. As we have now defined the JavaScript function (i.e. setControlValue(value)), we’re going to make changes to the calculated value control (i.e. added in Step 4 above) to call the setControlValue and pass the userProfileLookup function as parameter to the JavaScript call. Here is how the modified Calculated Value control’s formula looks like. After that is done, you may proceed to publish the form for testing.

8. For the form testing purpose, I have to created different users with /or under different OU(s) as shown in my example in below diagram. I have created two users – “Sales Person 1” and “Sales Person 2” for testing purpose with respective Distinguished Name as below

CN=Sales Person 1,OU=Sales Office 1,OU=North Region,OU=Sales Organization,DC=crestan,DC=local

CN=Sales Person 2,OU=Sales Office 2,OU=North Region,OU=Sales Organization,DC=crestan,DC=local

9. With the form published, you may test the form by entering “Requester” field with the created user (i.e. Sales Person 1 in my example), the results are shown in following diagram with OU1 and OU2 set to the OU1 and OU2 of the Requester‘s Distinguished Name

10. Try making changes to both the Title and/or Requester field with different value, which will trigger the Calculated Value control to call the JavaScript function for resetting OU1 and OU2 value.

11. As we are using technique of Calculated Value to call get the Distinguished Name based on the Requester field value, and passed the runtime function lookup value to JavaScript function call, we would like to hide the Calculated Value control as it is not needed to the end users. One easy way of doing it is of course using the default control setting’s visible attribute to “No“, but you will then realized the control will also be totally hidden causing the desired functionality to fail. One work around is to use CSS to set the visibility to “hidden” but the control is actually available for the said purpose. In my example I have defined a CSS class as shown “.nf-form-footer

with that, we can then set the Calculated Value control’s CSS Class to defined CSS Class (i.e. .nf-form-footer in my example) as shown below. If you noticed, I have added the Title control reference in front of the formula, which causes the Calculated Value being triggered when changes made to the Title field, and causes the calling of JavaScript to set controls’ value again.

Once done, publish the form and you will get the below sample outcome when tested. (Noticed that the Calculated Value control is now hidden from users)