Most of us must have come across challenge where forms in Sharepoint Online is taking a much longer time than expected to load. This could be caused by different factors, and one of the factors is believed to be the custom list size, especially the number of columns you have in your list. Based on official document, the number of column limits can be up to 276 for the Single-line-of-text column, but when come to performance it might not be a good idea to have your custom list designed to have such a big number of columns.
Most of us must have come across challenge where forms in Sharepoint Online is taking a much longer time than expected to load. This could be caused by different factors, and one of the factors is believed to be the custom list size, especially the number of columns you have in your list. Based on official document, the number of column limits can be up to 276 for the Single-line-of-text coloumn, but when come to performance it might not be a good idea to have your custom list designed to have such a big number of columns.
Based on the experiences of one of my partners, by reducing the number of columns for one of the problematic forms from 100+ columns to below 50 columns, the performance has improved from around 20 seconds to below 10 seconds to load the form.
Reducing the number of fields for a form to below 50 is not viable most of the time, so how could be reduce the required number of columns for a list but still have as many form fields as required? well, the answer is not to link all form fields to the list columns.
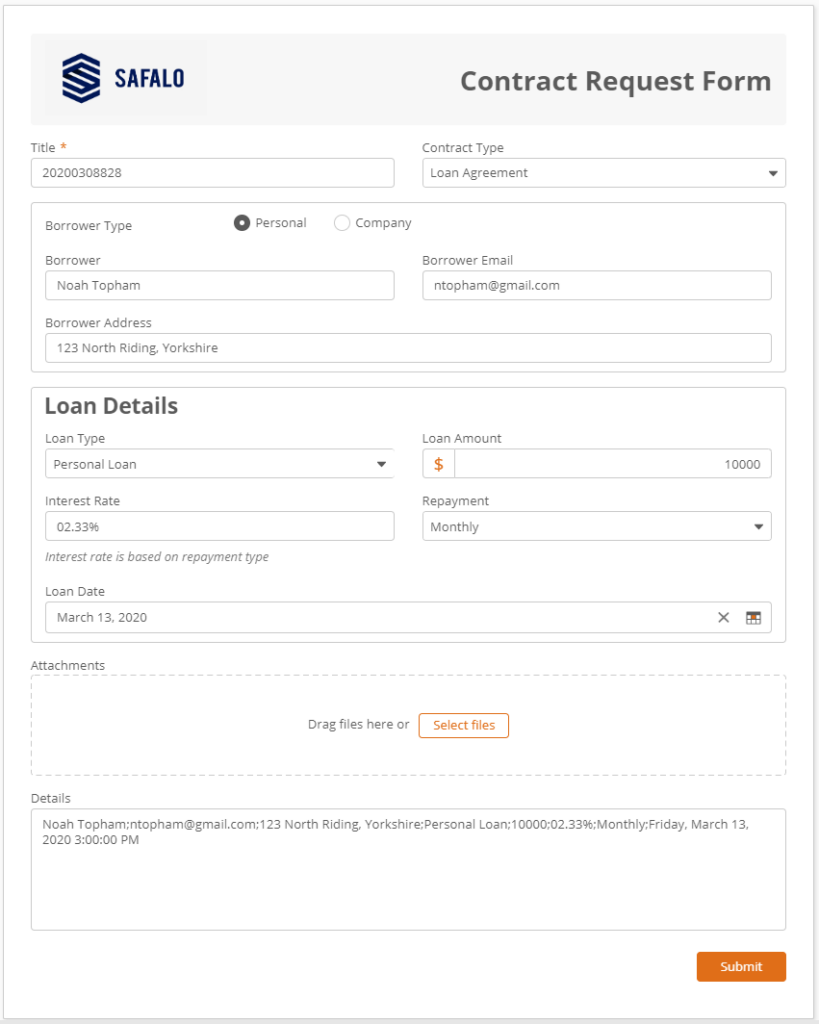
Here is the workaround for the above using New Responsive Form for Office 365. The below illustrates a “Contract Request Form” example, when user selected “Loan Agreement” as the “Contract Type”, all the fields in the “Loan Details” group to be captured.
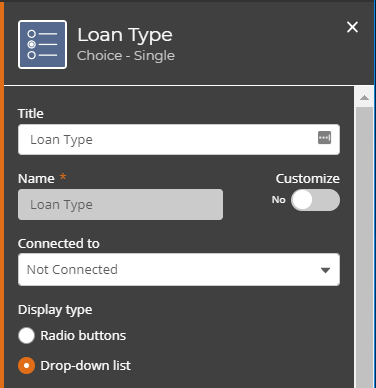
Instead of linking every single field (i.e. Form Control) in the “Load Details” group, we just leave the field without it connects to the customer list columns, here shows the properties of “Loan Type” field that is not connected to a list column.
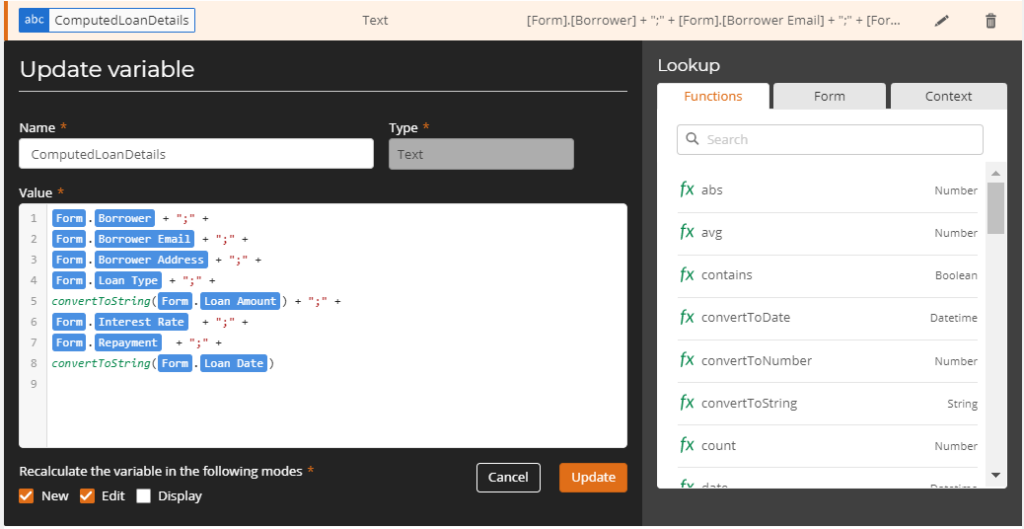
Instead, on the form I have purposely show the value of a computed field “details”, to which its value is set via a form valiable as shown below:
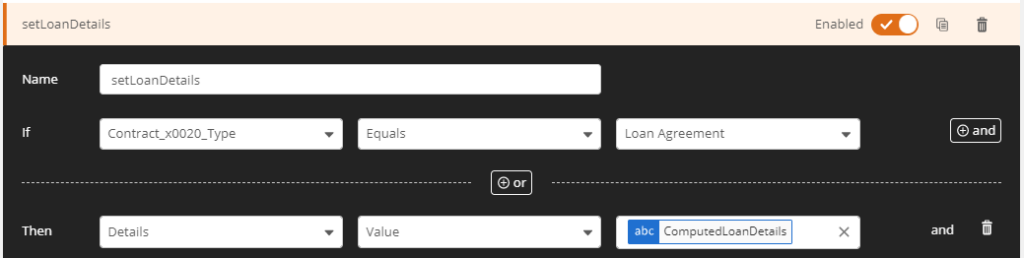
We can then using the Form rule to set the value for the “Details” field, here shows how it’s done in the form rules setting:
With this, instead of having to create each column in Sharepoint custom list to map/connect to the form fields, we reduced the number of required columns to just one column (i.e. details in our example) to keep/save all the details of the “Loan Details” group of fields. in Sharepoint listLabels
Stronger Together – Nintex Workflow Cloud and Nintex Workflow for Office 365. Many of us have been asking for feature such as scheduled workflow in Sharepoint for Office 365, that has not made available by Nintex Workflow for Office 365 today. Well, a scheduled workflow is pretty straight forward and easy to setup in Nintex Workflow Cloud, we can create a scheduled workflow in Nintex Workflow Cloud to trigger a workflow in Sharepoint for Office 365. That gives us the solution of scheduling a workflow in Sharepoint for Office 365.
To demonstrate how that works,
Nintex Workflow for Office 365 – Site Workflow
1. I have created a Site Workflow in Sharepoint for Office 365 environment. Here is how “MySiteWorkflow” looks like in Nintex workflow for Office 365 environment:
2. The “MySiteWorkflow” takes one Initiation Variable as defined below, when the workflow started manually, it will prompt users with the initiation form for users to provide input for the “listname” initiation variable.
3. I have made the Site Workflow as simple as possible, with only only one “Log to History List” action. When triggered, it will simply write the provided “listname” variable value to the workflow history.
Nintex Workflow Cloud
While waiting for the Sharepoint Connectors to be released in Nintex Workflow Cloud, I have workaround with Azure AD App for Nintex Workflow Cloud to access the Sharepoint for Office 365 environment via the OAuth 2.0 authentication. For those who have not followed my blog on that, here is the link you could refer to on Add Azure AD App from Azure Portal section of the blog post. (Please take note that, instead of using https%3A%2F%2Fgraph.microsoft.com%2F as the value for the resource parameter, I have this time to use <site_host>@<site_reaml instead, as such my example i was using resource=https%3A%2F%2Fntxte07.sharepoint.com@<site_rearm> instead.)
1. Instead of creating a Scheduled Workflow, let us try to call the Sharepoint site workflow from Nintex Workflow Cloud using a Public Web Form start event to start the workflow in Nintex Workflow Cloud, the start event is configured as below to capture the input to be used as “listname”.
2. Before we proceed to define other actions, lets look at the list of workflow variable we will need to create for the workflow to work.
3. Using “Set a variable value” action to assign the Access Token we obtained to the “accessToken” variable as shown below.
4. With the “accessToken” assigned, we going to add a “Branch by Stage” with two branches, one being the normal path to follow, the other to handle if the Access Token is expired, to renew the Access Token. I have named it as “Branch 1” and “Branch 2” as shown below
5. We set the branch to always start from “Branch 1” assuming the token is valid, by calling a “Call a web service” action to call Sharepoint online’s REST API. To start a workflow in Sharepoint online, we will need to, first, get the workflow’s subscription ID, followed by initiate the workflow to start. Define the “Call a web service” with the following values:
[Workflow Template ID] = e.g. {9CE443B7-3583-46C2-AA07-415F5E00C25B}, could be found from the site workflow start page’s workflow link as shown
6. Verify if the “Call a web service” is successful by using the “Branch by condition” to check the “resCode” equals to 401, if yes we will change the stage to “Branch 2” for getting new Access Token with the “Refresh Token” obtained during the steps setting up the “Azure AD App”. We will follow the “No” path if the resCode returns status code other than 401 (i.e. with the assumption the call to get the workflow subscription is successful).
7. The “Query JSON” followed by the “No” path is basically to get the returned the “_ObjectIdentity_” value with XPath search of “$.._ObjectIdentity_” from the resContent JSON object. The “_ObjectIdentity_” to be used in the following “Call a web service” action.
8. “Call a web service” with the following details to initiate the site workflow
My “Request content” example: (I would advise to use fiddler to capture a manual trigger of your site workflow in Sharepoint online, and capture the two HTTP POST to https://<your site host>/_vti_bin/client.svc/ProcessQuery for the XML request body to be used as your Request content here).<Request xmlns=”http://schemas.microsoft.com/sharepoint/clientquery/2009” SchemaVersion=”15.0.0.0″ LibraryVersion=”16.0.0.0″ ApplicationName=”Javascript Library”><Actions><Method Name=”GetExternalVariable” Id=”12″ ObjectPathId=”8″><Parameters><Parameter Type=”String”>listname</Parameter></Parameters></Method> <ObjectPath Id=”14″ ObjectPathId=”13″ /> <Method Name=”StartWorkflow” Id=”15″ ObjectPathId=”13″><Parameters><Parameter ObjectPathId=”8″ /> <Parameter Type=”Dictionary”><Property Name=”listname” Type=”String”>List Name</Property> <Property Name=”Microsoft.SharePoint.ExternalVariable.listname” Type=”String”>List Name</Property></Parameter></Parameters></Method></Actions> <ObjectPaths><Identity Id=”8″ Name=”subscriptionID” /> <Method Id=”13″ ParentId=”4″ Name=”GetWorkflowInstanceService” /> <Constructor Id=”4″ TypeId=”{4ccc7f0e-bf7e-4477-999c-6458a73d0039}”><Parameters><Parameter ObjectPathId=”2″ /></Parameters></Constructor> <Property Id=”2″ ParentId=”0″ Name=”Web” /> <StaticProperty Id=”0″ TypeId=”{3747adcd-a3c3-41b9-bfab-4a64dd2f1e0a}” Name=”Current” /></ObjectPaths></Request>
Response content
resContent
Response headers
resHeader
Response status code
resCode
That shows the second web service call to trigger the site workflow to start.
9. Continued from step 4 above branching to “Branch 2” is the same steps in my blog post on the “Azure AD App” setup on how to refresh the access token by calling the REST end point at “https://login.microsoftonline.com/common/oauth2/token” as shown below.
10. The “Query JSON” is to use XPath to search to the access token from the resContent returned from the above action call, and assign the new access token to the accessToken workflow variable.
The above steps demonstrate both the site workflow in Sharepoint for office 365 and the Nintex Workflow Cloud to manually trigger the site workflow in Office 365 to run. With that testing successful, we know we could now schedule a site workflow in Sharepoint for Office 365. To do that, we just need to schedule the Nintex Workflow Cloud using the Nintex connector with start Event of “Scheduled Start” as shown in the screen captured below as an example.
I am going to share configuration examples of Execute SQL and Web Request workflow actions for Office 365. The example I used is based on the previous post by Dan Stoll on Sign your name across my heart and my previous post on Extending Nintex Mobile Signature control to desktop/browser to demonstrate how the Nintex Signature Control example could be used for a Shipping or Delivery Order scenario of business process. I have simply modified the Title control to enable the barcode scanning feature, and renamed the label to Item ID as shown in the below setting of the Title (i.e. Single Line Textbox control).
The outcome of that is shown in the diagram below, which could be used as a Delivery Form to which a delivery man could use to scan the Bar code or QR Code of a parcel or item delivered, and get the consignee to sign the Delivery Form for confirming the parcel/items have been delivered.
Once the form data had been submitted and sync back to the Sharepoint on Office 365, a workflow will be triggered to send Delivery Tracking Status to inform delivery status over email and/or SMS. Two workflow actions will be used in this scenario to make the process complete:
Execute SQL action for querying the email and mobile number from SQL Server,
Web Request action for calling a web service provided by SMS Gateway service provide to send SMS message(s).
Here is how the Database table looks like, contains the Email and SMS registered for the Delivery Status Tracking purpose. The database in my example is in an on-premise environment, the Execute SQL will be querying from office 365 to the on-premise environment, you will need to make sure the SQL database server is reachable to your tenant from the cloud.
The “Send Delivery Tracking Status” workflow in my example starts with the Execute SQL action and its configuration as shown.
The Execute SQL asction required two mandatory parameters – Connection String and Query. For quick access to the returned results of the Query, you can specify a single column values you want to retrieve (i.e. specify in “Column to retrieve” parameter) from your Select statement, the values are saved to a collection variable (i.e. specified in “Retrieved column values” parameter – colEmail in my example). The parameter of “Results in XML” is used to store the returned results of the Query in array/collection of XML (i.e. I used colXML collection variable in my example to store the entire returned results from the SQL Statement).
The Web Request action in this example is necessary as we need to call a SMS Gateway function provided by third party to send SMS messages. The web service I used in my example is provided by Clickatell (i.e. www.clickatell.com) supports different Web API, one of them being SOAP API. As such I am using the Web Request action to call the SOAP web service for sending SMS message(s).
The WSDL Location provided by the service provider for accessing the web service is:
This is what we need for the URL value of the Web Request action, but without the ?wsdl at the end of the URL. That is only needed when getting the schema.
The Method we going to use will be SOAP 1.2 as this is a SOAP API with supports of SOAP 1.2 standard provided by the SMS service provider.
The following sample request body was given for sending SMS messages.
<?xml version="1.0" encoding="UTF-8"?> <SOAP-ENV:Envelope xmlns:SOAP-ENV="http://schemas.xmlsoap.org/soap/envelope/" xmlns:ns1="http://api.clickatell.com/soap/document_literal/webservice"> <SOAP-ENV:Body><ns1:sendmsg> <api_id>123456</api_id> <user>MyUserName</user> <password>MyPassword</password> <text>This is my message here!</text> <to>2799900001</to> <to>2799900002</to> </ns1:sendmsg> </SOAP-ENV:Body> </SOAP-ENV:Envelope>
What we need is just to replace the parameter values and use it as the Body of the Web Request configuration as shown in the diagram below.
The completed workflow of my example is shown in the below workflow diagram, which performs two branches of State Machine,
State 1 is to send an Email, followed by
State 2 to send SMS via the Web Request action.
“Get Item from Collection” ① is to retrieve the first Email value from the collection variable of colEmail (i.e. retrieved values in the Execute SQL action), here is how the action is being configured. The Email value is stored in variable txtEmail in my case.
“Get Item from Collection” ②is to retrieve the first XML content from the XML collection (i.e. colXML collection variable), the result is stored in txtXML text variable, here shows how the action is being configured.
The above action will give us below XML that is stored in txtXML workflow variable.
“Query XML” ③is being configured to retrieve the Mobile number from the above XML content, and stored the value in txtMobile workflow variable.
That’s all we need to build a Delivery Form and Delivery Status Tracking Notification process. Hope this example gives a good reference on how the Execute SQL and Web Request actions of Nintex Workflow for Office 365 can be configured.