Building the Future – Architecting a Web3 Solution

The internet is hurtling towards a decentralized, user-controlled future – Web3. Businesses must adapt alongside this constant technological evolution. By embracing curiosity and exploring innovative solutions, they can discover unbiased ways to tackle challenges. This diversity fuels groundbreaking ideas and superior outcomes. Building in this new landscape demands a fresh architectural perspective. This article dives into the essential components and considerations for designing a secure Web3 application. We’ll explore the design process through a case study – a hypothetical platform for trading and tracking aviation parts.

The Web3 dApp Development Journey

Before diving into the specifics of architecture design, it’s crucial to establish a holistic understanding of the Web3 development process. This journey starts with grasping the fundamentals of Web3 solutions and technologies, and culminates in architecting enterprise-grade Web3 solutions. The following diagram outlines the essential knowledge you’ll need on this path.

By revisiting the foundational Web3 development process, we can solidify our understanding of the key design components that will be crucial for optimizing your Web3 application’s architecture. Let’s delve into some essential terms and how they work together:

  • NFTs (Non-Fungible Tokens): Imagine unique digital certificates stored on a blockchain. These can represent ownership of digital assets like artwork, collectibles, even in-game items. Each NFT is one-of-a-kind and irreplaceable.
  • Custom Data Objects: Think of these as pieces of information created by smart contracts and stored directly on the blockchain. They can be simple text or numbers, or even complex data structures. Smart contracts have full control over creating and managing these data objects.
  • On-chain Data/Code: This forms the core of a blockchain. Data and code stored on-chain are permanent and publicly accessible on every computer (node) in the network. This guarantees transparency, security, and immutability (unchangeable nature) of the information.
  • Off-chain Data/Code: While not directly on the blockchain, off-chain data and code still play a vital role in blockchain applications. Unlike on-chain data, they’re not permanently stored on every node and aren’t entirely publicly accessible.

Relationships and Interactions:

These components work together to build a robust Web3 application. Here’s a glimpse of how they interact:

  • Smart Contracts: These are self-executing programs on blockchain. They can utilize on-chain data and code (like NFTs and custom data objects) to define rules and automate processes within your application.
  • Web3 Wallets: These act as digital vaults for users to store their cryptocurrency and interact with dApps (decentralized applications) built on blockchains. Users might need a Web3 wallet to interact with your application, perhaps to buy or trade NFTs.
  • Self-Sovereign Identity (SSI): This emerging concept empowers users to control their own digital identity data. Imagine a future where users can prove their identity to your application using an SSI solution, without relying on centralized authorities.

By understanding these core components and their relationships, you’ll be well-equipped to make informed decisions about on-chain vs. off-chain data storage, and ultimately design an optimized architecture for your Web3 application.

Aviation Parts Trading and Tracking Platform

Let’s delve into aviation parts trading and tracking use cases. We’ve identified key challenges and how blockchain addresses them. Here’s the data flow outlining the process:

Data Flow

  1. Seller lists a part: Uploads details like part number, condition, certifications, and asking price to the listing platform. This information is then reflected in the smart contract.
  2. Buyer finds a part: Searches the listing platform and identifies a desired part.
  3. Negotiation (optional): Buyer and seller may negotiate price and terms off-chain.
  4. Purchase agreement: Buyer interacts with the smart contract, locking in the agreed price (crypto or traditional currency converted at purchase).
  5. Regulatory Check (optional): For safety-critical parts, the system might interact with a regulatory compliance system to verify the part meets airworthiness standards.
  6. Payment Processing: The payment gateway facilitates the secure transfer of funds from buyer to seller.
  7. Ownership Transfer: Upon successful payment, the smart contract automatically updates ownership of the part in the blockchain ledger.
  8. Shipping and Logistics: The buyer and seller arrange physical delivery of the part outside the blockchain system.

Design Considerations for Aviation Parts Platform

To create an effective platform, we need to consider these key factors:

  • Target Audience: Identify the primary users (e.g., airlines, parts manufacturers, maintenance providers). Understanding their needs shapes platform functionalities.
  • User Journey: Consider how users will interact with the platform. This includes finding parts, listing/selling parts, and managing their accounts.
  • User Onboarding: Define how users will register and verify their identities on the platform, ensuring a secure and trustworthy environment.
  • Data Model: Identify the core data components needed to track and manage aviation parts effectively. This might include:
    • Parts/Assets: Information like part number, manufacturer, condition, service history, and current location.
    • Companies: Data on airlines, parts suppliers, maintenance providers involved in the ecosystem.
    • Transactions: Records of part purchases, ownership transfers, and service events.

Data Storage: Smart Contracts vs. NFTs

While both blockchain technologies have their merits, data objects created by smart contracts are better suited for aviation parts tracking compared to NFTs. Here’s why:

  • Data Integrity: Smart contract data objects can store detailed maintenance history, manufacturing data, and location information for each part, promoting transparency and informed decision-making.
  • Tracking Multiple Parts: Unlike NFTs, designed for unique ownership, data objects efficiently track multiple parts of the same type, which is typical for aviation parts.
  • Smart Contract Automation: Smart contracts can automate tasks based on defined rules. For example, they can trigger maintenance alerts when a part reaches its service life.

By focusing on these considerations and leveraging the strengths of smart contracts, we can design a platform that simplifies aviation parts management, enhances transparency within the supply chain, and improves overall operational efficiency.

Visualizing Architecture

Leveraging the design considerations, we can now visualize the platform’s architecture through a detailed diagram. This diagram illustrates the key components, their interactions, and data flow.

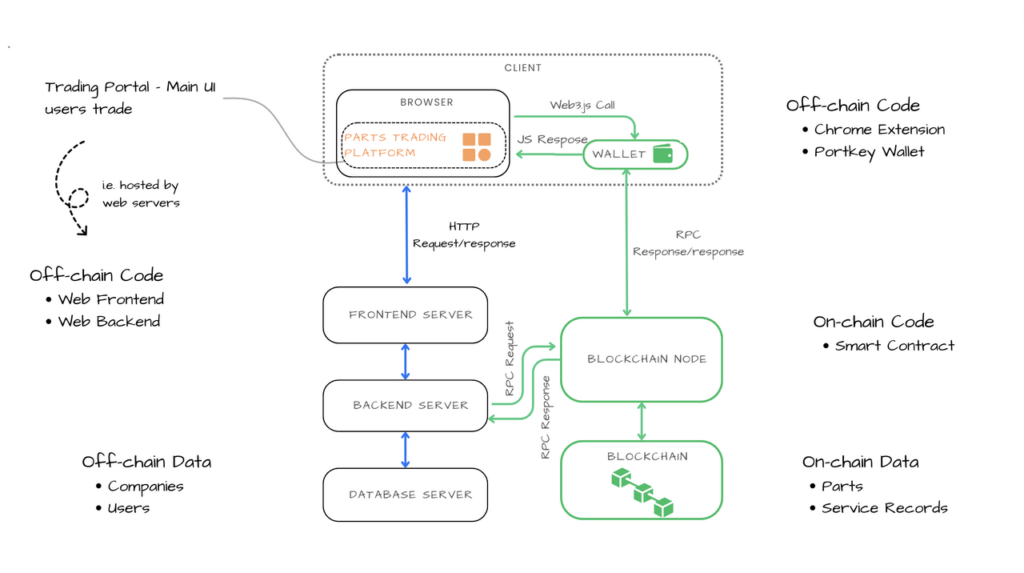
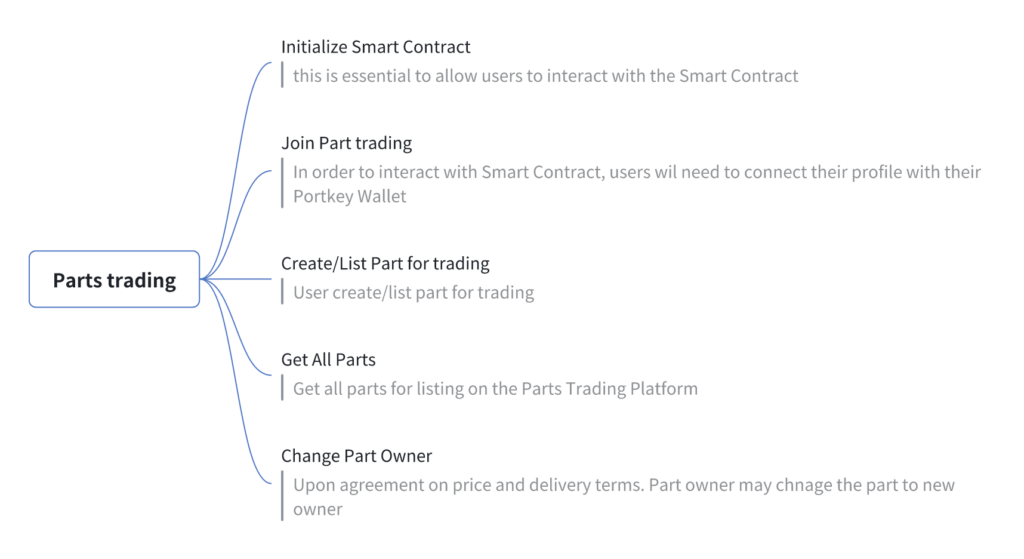
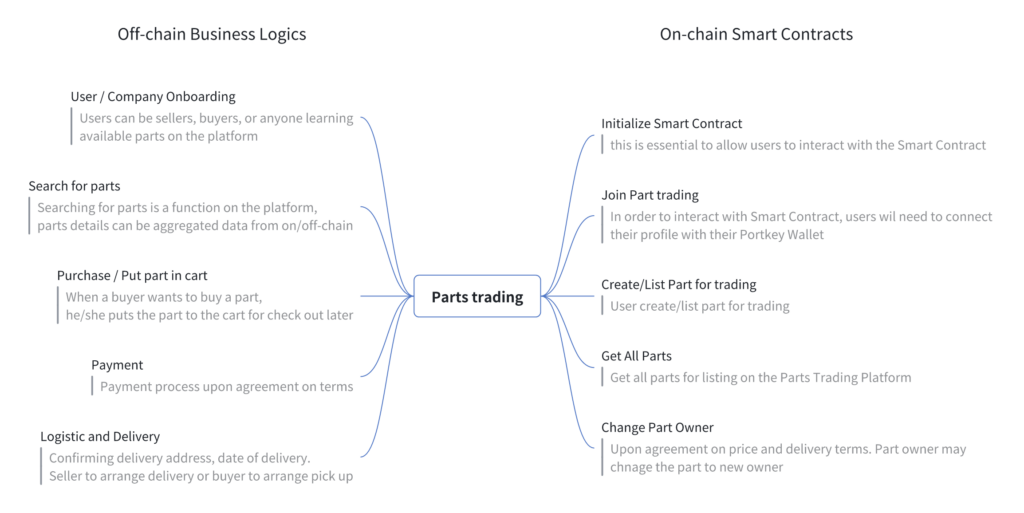
Smart Contract Functionality

Smart contracts will be the engine powering core functionalities and ensure secure and transparent transactions within the aviation parts ecosystem:

Off-Chain Considerations

While this document focuses on the core on-chain architecture, it’s important to acknowledge the crucial role of off-chain components in a complete solution. These components may include functionalities like:

  • User and company onboarding processes
  • Search for parts
  • Purchase part
  • Secure payment gateways
  • Logistics and delivery arrangements
  • User interfaces and applications

Integrating these off-chain elements seamlessly with the on-chain infrastructure is essential for delivering a user-friendly and comprehensive platform.

Next Steps: Building the Platform

With a clear design in place, the next steps involve:

  • Proof of Concept (PoC): Develop a basic version to validate the core functionalities and gather user feedback.
  • Prototype/MVP: Build a functional prototype or Minimum Viable Product (MVP) to further refine the platform based on user testing and real-world scenarios.

This structured approach ensures we move forward with a well-defined plan and a clear understanding of the development roadmap.

Conclusion

Web3 architecture is a new frontier, but with careful planning and the right approach, you can build secure, scalable, and future-proof applications. By understanding the core layers, designing for decentralization, prioritizing performance, and creating a smooth developer experience, you can be a part of shaping the next generation of the internet.

Adding WhatsApp Channel to your Power Virtual Agents Bot

With Microsoft Power Virtual Agents, you can create a bot without writing code. However, if you would like to add the bot to Azure Bot Service channels, you will need to create a Relay Bot that acts as a bridge, and this task requires extensive programming knowledge.

This article demonstrates how to create a Relay Bot in C# to connect a bot built with Power Virtual Agents to Twilio Messaging for SMS or WhatsApp. This exercise assumes that you already have a Power Virtual Agents bot created, and would like to bridge the bot with a WhatsApp channel.

There are four sections in this article:

  • Collect required parameters from Power Virtual Agent
  • Create a Relay Bot with ASP.NET Core Web API
  • Run and test the Relay Bot
  • Configure Twilio Whatsapp Sandbox with Relay Bot

Prerequisites

To complete this tutorial, you’ll need an account with Twilio, a Power Virtual Agents subscription, a Power Virtual Agents bot created, and Ngrok installed and authenticated. If you have not done so already:

Collect required parameters from Power Virtual Agents

Log in to your Power Virtual Agents dashboard.

Select the Power Virtual Agents bot you would like to add a WhatsApp channel to.

Power Virtual Agents dashboard

Select Details from the Settings menu of the selected bot. Then, copy the Tenant ID and Bot app ID from the bot details page as highlighted in the screenshot below. Save the values for later use.

PVA Details settings

Go to the Channels section of the bot’s settings and select Twilio, as shown below.

PVA Channels settings

Copy and save the Token Endpoint value shown for the Twilio channel for later use.

PVA Token Endpoint

Create a Relay Bot with ASP.NET Core Web API

This section will guide you through creating a Relay Bot with ASP.NET Core in C#. The following prerequisites are needed:

The project and code that we are going to create in the following steps can be found in the BotConnectorAPI GitHub repository.

If you do not want to create the project from scratch, you can clone the repository, set the required bot parameters that you collected from the previous section in the project’s appsettings.json file, and run the project directly.

If you choose to clone the project, you may skip this section and jump straight to the next section to Run and test a Relay Bot project.

If you prefer to create the project from scratch, the following instructions will guide you step by step on how to do so.

It is important to ensure that you have the right version of .NET. Verify the .NET SDK and version with the dotnet –list-sdks and dotnet –version commands. The sample output from these commands is shown below.Bash

(base) kogan@WV4F9DM7Q0 azure % dotnet --list-sdks                             
2.1.818 [/usr/local/share/dotnet/sdk]
6.0.400 [/usr/local/share/dotnet/sdk]
6.0.402 [/usr/local/share/dotnet/sdk]
7.0.102 [/usr/local/share/dotnet/sdk]
(base) kogan@WV4F9DM7Q0 azure %
(base) kogan@WV4F9DM7Q0 azure % dotnet --version
7.0.102

Use the command dotnet new webapi -o myBotConnector to create a new .NET Core Web API project.Bash

(base) kogan@WV4F9DM7Q0 azure % dotnet new webapi -o myBotConnector
The template "ASP.NET Core Web API" was created successfully.

Processing post-creation actions...
Restoring /Users/kogan/git/azure/myBotConnector/myBotConnector.csproj:
  Determining projects to restore...
  Restored /Users/kogan/git/azure/myBotConnector/myBotConnector.csproj (in 145 ms).
Restore succeeded.

Once completed, change into the project folder and open the folder with Visual Studio Code.Bash

(base) kogan@WV4F9DM7Q0 azure % cd myBot*
(base) kogan@WV4F9DM7Q0 myBotConnector % code .

Visual Studio Code will open the project with the folder where the code . command was executed. The screenshot below shows how the project folder structure will look.

Project Folder structure

Open the myBotConnector.csproj file , and you will notice that two packages have been installed by default:XML

 <ItemGroup>
   <PackageReference Include="Microsoft.AspNetCore.OpenApi" Version="7.0.2" />
   <PackageReference Include="Swashbuckle.AspNetCore" Version="6.4.0" />
 </ItemGroup>

We now need to install the Microsoft.Rest.ClientRuntime and Microsoft.Bot.Connector.DirectLine packages manually. Run the dotnet commands below from your terminal to install these packages:Bash

dotnet add package Microsoft.Rest.ClientRuntime –version 2.3.24
dotnet add package Microsoft.Bot.Connector.DirectLine

You can verify that the packages were added to our project file as shown below.

C-Sharp project file

The dotnet new webapi -o myBotConnector command created our project with default WeatherForecast.cs and Controllers\WeatherForecastController.cs files.

I would recommend we delete the unwanted WeatherForecast.cs file, clean up the unwanted code inside the WeatherForecastController.cs and rename the WeatherForecastController.cs to myBotConnector.cs as shown below.

Rename and Remove Unwanted Files and Code

Your project folder should look like the below screenshot.

Cleaned Project Folder

Run the project with the dotnet watch run command. The documentation page should open, stating that “No operations defined in spec!”, as shown below.

Documentation page without any endpoints

Back on Visual Studio Code, click the Explorer pane and select “New Folder” to create a new folder. Call the folder BotConnector.

Add BotConnector Folder

Add the following three files for the classes under the new BotConnector folder:

1. BotEndpoint.csC#

// Copyright (c) Microsoft Corporation. All rights reserved.
// Licensed under the MIT License.

using System;

namespace Microsoft.PowerVirtualAgents.Samples.BotConnectorApp
{
   /// <summary>
   /// class with bot info
   /// </summary>
   public class BotEndpoint
   {
       /// <summary>
       /// constructor
       /// </summary>
       /// <param name="botId">Bot Id GUID</param>
       /// <param name="tenantId">Bot tenant GUID</param>
       /// <param name="tokenEndPoint">REST API endpoint to retreive directline token</param>
       public BotEndpoint(string botId, string tenantId, string tokenEndPoint)
       {
           BotId = botId;
           TenantId = tenantId;
           UriBuilder uriBuilder = new UriBuilder(tokenEndPoint);
           uriBuilder.Query = $"botId={BotId}&tenantId={TenantId}";
           TokenUrl = uriBuilder.Uri;
       }

       public string BotId { get; }

       public string TenantId { get; }

       public Uri TokenUrl { get; }
   }
}

2. BotService.csC#

// Copyright (c) Microsoft Corporation. All rights reserved.
// Licensed under the MIT License.

using Microsoft.Rest.Serialization;
using System;
using System.Net.Http;
using System.Threading.Tasks;

namespace Microsoft.PowerVirtualAgents.Samples.BotConnectorApp
{
   /// <summary>
   /// Bot Service class to interact with bot
   /// </summary>
   public class BotService
   {
       private static readonly HttpClient s_httpClient = new HttpClient();

       public string BotName { get; set; }

       public string BotId { get; set; }

       public string TenantId { get; set; }

       public string TokenEndPoint { get; set; }

       /// <summary>
       /// Get directline token for connecting bot
       /// </summary>
       /// <returns>directline token as string</returns>
       public async Task<string> GetTokenAsync()
       {
           string token;
           using (var httpRequest = new HttpRequestMessage())
           {
               httpRequest.Method = HttpMethod.Get;
               UriBuilder uriBuilder = new UriBuilder(TokenEndPoint);
               uriBuilder.Query = $"api-version=2022-03-01-preview&botId={BotId}&tenantId={TenantId}";
               httpRequest.RequestUri = uriBuilder.Uri;
               using (var response = await s_httpClient.SendAsync(httpRequest))
               {
                   var responseString = await response.Content.ReadAsStringAsync();
                   token = SafeJsonConvert.DeserializeObject<DirectLineToken>(responseString).Token;
               }
           }

           return token;
       }
   }
}

3. DirectLineToken.csC#

// Copyright (c) Microsoft Corporation. All rights reserved.
// Licensed under the MIT License.

namespace Microsoft.PowerVirtualAgents.Samples.BotConnectorApp
{
   /// <summary>
   /// class for serialization/deserialization DirectLineToken
   /// </summary>
   public class DirectLineToken
   {
       /// <summary>
       /// constructor
       /// </summary>
       /// <param name="token">Directline token string</param>
       public DirectLineToken(string token)
       {
           Token = token;
       }

       public string Token { get; set; }
   }
}

The project folder should now look like the screenshot below.

BotConnector folder and class files added

Replace the content of myBotConnector.cs with the below code.C#

using Microsoft.AspNetCore.Mvc;
using Microsoft.Bot.Connector.DirectLine;
using Microsoft.PowerVirtualAgents.Samples.BotConnectorApp;

namespace myBotConnector.Controllers;

[ApiController]
[Route("[controller]")]
public class myBotConnectorController : ControllerBase
{
   private readonly IConfiguration _configuration;
   private static string? _watermark = null;
   private const int _botReplyWaitIntervalInMilSec = 3000;
   private const string _botDisplayName = "Bot";
   private const string _userDisplayName = "You";
   private static string? s_endConversationMessage;
   private static BotService? s_botService;
   public static IDictionary<string, string> s_tokens = new Dictionary<string, string>();
   public myBotConnectorController(IConfiguration configuration)
   {
       _configuration = configuration;
       var botId = _configuration.GetValue<string>("BotId") ?? string.Empty;
       var tenantId = _configuration.GetValue<string>("BotTenantId") ?? string.Empty;
       var botTokenEndpoint = _configuration.GetValue<string>("BotTokenEndpoint") ?? string.Empty;
       var botName = _configuration.GetValue<string>("BotName") ?? string.Empty;
       s_botService = new BotService()
       {
           BotName = botName,
           BotId = botId,
           TenantId = tenantId,
           TokenEndPoint = botTokenEndpoint,
       };
       s_endConversationMessage = _configuration.GetValue<string>("EndConversationMessage") ?? "quit";
       if (string.IsNullOrEmpty(botId) || string.IsNullOrEmpty(tenantId) || string.IsNullOrEmpty(botTokenEndpoint) || string.IsNullOrEmpty(botName))
       {
           Console.WriteLine("Update App.config and start again.");
           Console.WriteLine("Press any key to exit");
           Console.Read();
           Environment.Exit(0);
       }
   }
  
   [HttpPost]
   [Route("StartBot")]
   [Consumes("application/x-www-form-urlencoded")]
   //public async Task<ActionResult> StartBot(HttpContext req)
   public async Task<ActionResult> StartBot([FromForm] string From, [FromForm] string Body)
   {
       Console.WriteLine("From: " + From + ", " + Body);
       var token = await s_botService.GetTokenAsync();
       if (!s_tokens.ContainsKey(From)) {
           s_tokens.Add(From, token);
       }
       Console.WriteLine("s_tokens: " + s_tokens[From]);
       var response = await StartConversation(Body, s_tokens[From]);
      
       return Ok(response);
   }

   //private static async Task<string> StartConversation(string inputMsg)
   private async Task<string> StartConversation(string inputMsg, string token = "")
   {
       Console.WriteLine("token: " + token);
       using (var directLineClient = new DirectLineClient(token))
       {
           var conversation = await directLineClient.Conversations.StartConversationAsync();
           var conversationtId = conversation.ConversationId;
           //string inputMessage;

           Console.WriteLine(conversationtId + ": " + inputMsg);
           //while (!string.Equals(inputMessage = , s_endConversationMessage, StringComparison.OrdinalIgnoreCase))
          
           if (!string.IsNullOrEmpty(inputMsg) && !string.Equals(inputMsg, s_endConversationMessage))
           {
               // Send user message using directlineClient
               await directLineClient.Conversations.PostActivityAsync(conversationtId, new Activity()
               {
                   Type = ActivityTypes.Message,
                   From = new ChannelAccount { Id = "userId", Name = "userName" },
                   Text = inputMsg,
                   TextFormat = "plain",
                   Locale = "en-Us",
               });

               // Get bot response using directlinClient
               List<Activity> responses = await GetBotResponseActivitiesAsync(directLineClient, conversationtId);
               return BotReplyAsAPIResponse(responses);
           }

           return "Thank you.";
       }
   }

   private static string BotReplyAsAPIResponse(List<Activity> responses)
   {
       string responseStr = "";
       responses?.ForEach(responseActivity =>
       {
           // responseActivity is standard Microsoft.Bot.Connector.DirectLine.Activity
           // See https://github.com/Microsoft/botframework-sdk/blob/master/specs/botframework-activity/botframework-activity.md for reference
           // Showing examples of Text & SuggestedActions in response payload
           Console.WriteLine(responseActivity.Text);
           if (!string.IsNullOrEmpty(responseActivity.Text))
           {
               responseStr = responseStr + string.Join(Environment.NewLine, responseActivity.Text);
           }

           if (responseActivity.SuggestedActions != null && responseActivity.SuggestedActions.Actions != null)
           {
               var options = responseActivity.SuggestedActions?.Actions?.Select(a => a.Title).ToList();
               responseStr = responseStr + $"\t{string.Join(" | ", options)}";
           }
       });

       return responseStr;
   }

   /// <summary>
   /// Use directlineClient to get bot response
   /// </summary>
   /// <returns>List of DirectLine activities</returns>
   /// <param name="directLineClient">directline client</param>
   /// <param name="conversationtId">current conversation ID</param>
   /// <param name="botName">name of bot to connect to</param>
   private static async Task<List<Activity>> GetBotResponseActivitiesAsync(DirectLineClient directLineClient, string conversationtId)
   {
       ActivitySet response = null;
       List<Activity> result = new List<Activity>();

       do
       {
           response = await directLineClient.Conversations.GetActivitiesAsync(conversationtId, _watermark);
           if (response == null)
           {
               // response can be null if directLineClient token expires
               Console.WriteLine("Conversation expired. Press any key to exit.");
               Console.Read();
               directLineClient.Dispose();
               Environment.Exit(0);
           }

           _watermark = response?.Watermark;
           result = response?.Activities?.Where(x =>
               x.Type == ActivityTypes.Message &&
               string.Equals(x.From.Name, s_botService.BotName, StringComparison.Ordinal)).ToList();

           //Console.WriteLine(result);
           if (result != null && result.Any())

           {
               return result;
           }

           Thread.Sleep(1000);
       } while (response != null && response.Activities.Any());

       return new List<Activity>();
   }
}

Update the appsettings.json file with the required application settings as shown below.

The values for BotIdBotTenantIdBotName, and BotTokenEndpoint are values we have taken earlier from the Power Virtual Agents bot configuration.

appsettings.json file

The BotConnector is now ready to relay messages between a front end client (WhatsApp in our case) and the Power Virtual Agents bot.

Run and test the Relay Bot

Before you run and test the Relay Bot, please make sure that you have updated the appsettings.json file with the values collected from the Power Virtual Agents bot. Please refer to the Collect required parameters from Power Virtual Agent section above for details.

Run the project with dotnet watch run from the project folder. The project documentation page should now look as follows.

Project documentation page

In this page, click on the only endpoint and proceed to test it by supplying the “From” and “Body” fields with any values as shown in the below screenshot.

Test the endpoint

Hit the Execute button, and you should see the response from the API, as shown below.

Test response screen

The Relay Bot is now ready for the Twilio messaging configuration. Take note of the endpoint path from the Relay Bot documentation  page, highlighted in the screenshot below.

Endpoint path

Configure the Twilio WhatsApp Sandbox with Relay Bot

Since our project is now running on localhost, we will use ngrok to set up a tunnel to expose it to the internet. To do so, start ngrok in a separate terminal session with the http port of the project, for example ngrok http 5157.

ngrok console

Open the Twilio console and navigate to the Messaging – Settings – WhatsApp Sandbox Settings. There, enter the full URL for the Relay Bot in the “When a message comes in” field. The URL is composed with the ngrok forwarding URL with the Relay Bot’s endpoint added at the end. An example URL should look like https://47a3-116-88-10-205.ap.ngrok.io/BotConnector/StartBot.

Twilio Console - WhatsApp sandbox settings

Save the WhatsApp Sandbox Settings. You can now chat with the Power Virtual Agents bot by initiating a WhatsApp message to your Twilio Sandbox for WhatsApp at the number shown in the Sandbox Participants section of the Twilio Sandbox for WhatsApp settings page. The below screenshot shows a sample interaction with the Power Virtual Agents bot over WhatsApp.

WhatsApp conversation on Mobile

Congratulations! You’ve now created a Relay Bot, connecting a Power Virtual Agents bot and WhatsApp with Twilio. You can interact with the bot by texting to your WhatsApp enabled Twilio Phone Number. You may explore further on Formatting, location, and other features in WhatsApp messaging to further enhance your Power Virtual Agents bot in responding with advanced messaging features.

SendGrid Send Mail with external templates

In this short video, I demonstrate how we can create email templates to be used to send email with Send Grid Send Mail API. This demonstration is done in Betty Blocks environment, where we manage the entire list of email templates within Betty Blocks application.

The setup allows business users to create or maintain a list of email templates within the portal environment provided, without the need navigating away from the portal environment they use for working on the application functionalities such as managing users, assets, services, and so on.

Here are the steps on how I setup the template for sending email:

1. Template Model

These are some of the important fields of database table schema for the template. Content column is used to store the HTML content, I have my page designed to which I use the CKEditor to allow editing the content in WYSIWYG mode (i.e. or you may switch to investigate the content in HTML source).

NameLabelType
nameNameText (single line)
descriptionDescriptionText (single line)
subjectSubjectText (single line)
contentContentText (multi line)
typeTypeText (single line)
2. Web Servic Definition (i.e. the SendGrid V3 Send Mail API)

Here is the cURL i used to for the SendGrid Send Mail API call, you will need to replace the data-raw with the proper JSON format (i.e. can be found in the SendGrid documentation at https://docs.sendgrid.com/api-reference/mail-send/mail-send)

curl –location –request POST ‘https://api.sendgrid.com/v3/mail/send’ \
–header ‘Authorization: Bearer xxxxxxxxxxxxxxxxxxxxxxxxxxxxxxxx’ \
–header ‘Content-Type: application/json’ \
–data-raw ‘{ “personalizations”: [      {  {% if to_list != null %}        “to”: [    {% for send_to in to_list %}            {            “email”:”{{send_to.email}}”,            “name”:”{{send_to.name}}”},    {% endfor %}        ]  {% else %}            “to”: [          {            “email”: “{{email_to}}”          }        ]  {% endif %}      }} …’

3. Email Body

In Betty Block, the liquid templating engine is used to supply and parse the JSON content to allow inserting/replacement of content from the values we supply via the variables we have configured.

Here is the sample content with liquid tags, this content will be parsed and supply as the body content of the SendGrid API.

{
    "personalizations": [
      {
  {% if to_list != null %}
		"to": [
	{% for send_to in to_list %}
			{
			"email":"{{send_to.email}}",
			"name":"{{send_to.name}}"},
	{% endfor %}
		]
  {% else %}	
        "to": [
          {
            "email": "{{email_to}}"
          }
        ]
  {% endif %}
      }
  {% if email_cc != null and email_cc != "" %}
      ,{
        "cc": [
          {
            "email": "{{email_cc}}"
          }
        ]
      }
  {% endif %}
  {% if email_bcc != null and email_bcc != "" %}
      ,{
        "bcc": [
          {
            "email": "{{email_bcc}}"
          }
        ]
      }
  {% endif %}
    ],
    "from": {
      "email": "{{email_from}}"
    },
    "subject": "{{email_subject}}",
    "content": [
      {
        "type": "{{content_type}}",
        "value": "{{content_value}}"
      }
    ]
}
4. Configure the HTTP Request to send email using the SendGrid endpoint.

The HTTP Request is an ‘action‘ you may use to call a predefined Web Service (i.e. external endpoint) in Betty Blocks. We may call this ‘web service’ in Betty Blocks ‘endpoint‘ or/and ‘actions‘ for example. Some of the important variables we will need are defined as below:

NameTypeDescription
tempalteObjectThe template object (i.e. the template document as described previously for storing the email template content). This is the object we will be retriving for the defined email content template.
content_valueText ExpressionThe email template content of the “template” document/object.
content_typeTextvalue of “text/html”

Other fields that we will need are: email_to, email_cc, email_bcc, email_subject, email_from, etc. depending on the setting we would like to provide to the SendGrid API’s body payload.

Consuming Azure Cognitive Services API from Betty Blocks

In this article, I am going to share how to consume or connect to a remote or external web services from Betty Blocks. We are going to create a Webservice in Betty Blocks to consume Microsoft Azure Cognitive Services for getting Tags of an image, this is via the Tag Image API (i.e. one of the Azure Cognitive Services – Computer Vision APIs).

Prerequisites

Steps

  1. From your Betty Blocks application’s SideBar, select Tools – Webservices
Tools menu from the application SideBar

2. Click the “New” button on the Webservices page to add a new Webservice, and fill in the required details.

Create a new Webservice

Host and Header’s values can be grabbed from the “keys and endpoints” of your Azure Cognitive Services resource page. This is shared in the screen below.

Microsoft Azure Cognitive Services

I have specified the Request Content Type as “JSON” (i.e. this is one of the supported request content types as required by the Image Tagging API)

3. Add a new Endpoint for the Webservice

From the Webservice page, add a new Endpoint we would like to consume, screen capture below is the sample of my endpoint configuration. I have named my endpoint as “Get Tags”, and specified all other values according to the Azure Cognitive Services API documentation. (i.e. Tag Image API ).

As the Request Content Type for the Webservice was specified earlier at the Webservice level, we can leave the Request Content-type field as it is (i.e. inherit). Take note of the request payload, in our case since we specified JSON as the content-type, we will just add the body parameter of “url” as requested by the Tag Image API documentation.

Endpoint configuration

4. Test the endpoint

Once configured, you may save and test the endpoint by clicking on the “Run test” button. You may be prompted to provide the input parameter or accept the default value that you have set for testing purpose.

The response will then be returned from the test as shown in the image below.

Sample test result

That’s all we need to do to create a simple Webservice and endpoints in Betty Blocks for comsuming web services. I hope this example helps..

The Image Tag API of Azure Cognitive Service is one of Computer Vision APIs, it gives a quick and easy way to analyze (i.e. tag) any photo or images. You may have realized the Tags returned could be at high matching rate or the other, in the event if the Image Tag API does not give us the accuracy we expected, there will be a need for us to look at the Custom Vision Service of the Azure Cognitive Services. Unlike Computer Vision Service, the Custom Vision Service allows us to specify the labels and train custom models to detect them. It allows us to build, deploy, and improve our own image identifiers for the purpose.

Boost your Sharepoint Online form with New Responsive Form

Most of us must have come across challenge where forms in Sharepoint Online is taking a much longer time than expected to load. This could be caused by different factors, and one of the factors is believed to be the custom list size, especially the number of columns you have in your list. Based on official document, the number of column limits can be up to 276 for the Single-line-of-text column, but when come to performance it might not be a good idea to have your custom list designed to have such a big number of columns.

Most of us must have come across challenge where forms in Sharepoint Online is taking a much longer time than expected to load. This could be caused by different factors, and one of the factors is believed to be the custom list size, especially the number of columns you have in your list. Based on official document, the number of column limits can be up to 276 for the Single-line-of-text coloumn, but when come to performance it might not be a good idea to have your custom list designed to have such a big number of columns. 

Based on the experiences of one of my partners, by reducing the number of columns for one of the problematic forms from 100+ columns to below 50 columns, the performance has improved from around 20 seconds to below 10 seconds to load the form.

Reducing the number of fields for a form to below 50 is not viable most of the time, so how could be reduce the required number of columns for a list but still have as many form fields as required? well, the answer is not to link all form fields to the list columns.

Here is the workaround for the above using New Responsive Form for Office 365. The below illustrates a “Contract Request Form” example, when user selected “Loan Agreement” as the “Contract Type”, all the fields in the “Loan Details” group to be captured. 

Instead of linking every single field (i.e. Form Control) in the “Load Details” group, we just leave the field without it connects to the customer list columns, here shows the properties of “Loan Type” field that is not connected to a list column.

Instead, on the form I have purposely show the value of a computed field “details”, to which its value is set via a form valiable as shown below:

We can then using the Form rule to set the value for the “Details” field, here shows how it’s done in the form rules setting:

With this, instead of having to create each column in Sharepoint custom list to map/connect to the form fields, we reduced the number of required columns to just one column (i.e. details in our example) to keep/save all the details of the “Loan Details” group of fields. in Sharepoint listLabels

RPA Claim Processing – Part 3: OCR Google Cloud Vision API

In my previous blog post (i.e. RPA Claim Processing – Part 2: Simple OCR), we have learn how to use the built-in Simple OCR to read printed text from a PDF form. This helps us to process all inbox pdf and categorize the documents to different claim categories. Let us take a step further, instead of OCR the printed form title, if we use the same technique to OCR a PDF that is filled with handwritting, we will come to realize the Simple OCR is having difficulty to get the right recognition of handwritting for us. The results of the Simple OCR i have tested are shown in the below captures (i.e. using PDF, Image, and Cropped Image). Take note of the Preview results, the result is somehow unpredictable and unexpected.

In my previous blog post (i.e. RPA Claim Processing – Part 2: Simple OCR), we have learn how to use the built-in Simple OCR to read printed text from a PDF form. This helps us to process all inbox pdf and categorize the documents to different claim categories. Let us take a step further, instead of OCR the printed form title, if we use the same technique to OCR a PDF that is filled with handwritting, we will come to realize the Simple OCR is having difficulty to get the right recognition of handwritting for us.  The results of the Simple OCR i have tested are shown in the below captures (i.e. using PDF, Image, and Cropped Image). Take note of the Preview results, the result is somehow unpredictable and unexpected. 

Figure 1: Simple OCR with PDF

Figure 2: Simple OCR with JPG Image

Figure 3: Simple OCR with Cropped JPG ImageGoogle Vision APIGoogle Vision API can detect and transcribe text from PDF and TIFF files stored in Google Cloud Storage (i.e. Google Cloud Vision API ). Unfortunately, as our users concern about having to save the entire PDF files in Google Cloud Storage, we are going to convert the PDF to Image file, and take each of the “input field” of the document to be sent to Google Vision API. Google Cloud Vision API takes base64 image for OCR purpose, there is no need for us to save the Image/PDF to the Cloud Storage. By OCR input field by field, it minimizes the effort to parse data that is for the entire document. While testing on Google Vision API, I come to realize Mathias Balslow @mbalslow  of Foxtrot Alliance has already shared a great post on How-To Use Google Cloud Vision API (OCR & Image Analysis), without reinventing the wheel, we can simply follow what was shared by Mathias on how to setup and use Google Vision API. I will be attaching my script on my testing in this article later, but without the iteration part. Below are the steps of my script:

  1. Create a list of “Input Fields” to be OCR
  2. Open the Image file and saved it to duplicate the file as current <fieldname.jpg>.
  3. Open the <fieldname.jpg>
  4. Crop the image to the area representing the input field
  5. use the REST action to send the <fieldname.jpg> to Google Cloud Vision API endpoint.

Here is the cropped image of my Fullname field:

 The Google Cloud Vision API returns the result that is very promissing to me, the returned result includes the blurry/noised field label in my case (i.e. Insured Member (Emplyee)), and the handwritten full name. The result in json format as summarized below:

{ 
   "responses":[ 
      { 
         "textAnnotations":[ 
            { 
               "locale":"en",
               "description":"Insured Member (Employee)\nGAN KOK KOON\n",
               "boundingPoly":{...}
            },
            { 
               "description":"Insured",
               "boundingPoly":{...}
            },
            { 
               "description":"Member",
               "boundingPoly":{...}
            },
            { 
               "description":"(Employee)",
               "boundingPoly":{...}
            },
            { 
               "description":"GAN",
               "boundingPoly":{...}
            },
            { 
               "description":"KOK",
               "boundingPoly":{...}
            },
            { 
               "description":"KOON",
               "boundingPoly":{...}
            }
         ],
         "fullTextAnnotation":{ 
            "pages":[...],
            "text":"Insured Member (Employee)\nGAN KOK KOON\n"
         }
      }
   ]
}

With the returned result above, it makes the parsing much easier compared to if the result consists of data of the entire document. Up to the current stage, you might be wondering do I have to get every single machine with the capability to convert the PDF to image, or if every bots we have, to categorize the documents for processing, I will be sharing and discussing on bots deployment options for the Claim Process. After that I am also planning to revisit our python code to further explore how we can overcome the challenges on parsing the return result of Google Vision API.

RPA Claim Processing – Part 2: Nintex Foxtrot Simple OCR

In a perfect world, we will have anything we need in the way we want it, but the world we living in is not perfect, so we will need to go around to get things done. If we have a local OCR system which could take any format of documents for OCR, we can simply get our scanned PDF/tiff document OCR.

In my next blog post (i.e. part 3), I am planning to send our document(s) to be OCR using google Vision API. Google Vision API only takes/supports PDF file that is stored in the cloud drive. When come to store important documents in the cloud, it concerns the banking and finance institutions users.

Before we get into Google Vision API, let us examine the built-in Simple OCR of Foxtrot. I am demonstrating the two ways I know on how to use the Simple OCR action:

Creating OCR Action with Selector (e.g. OCR an openned PDF file)

1. Open the PDF that we wanted to OCR.

Before we could use the Selector to create an OCR action, we need to have our PDF file opened. To do that, the first step is to record an “Open App” action to open the PDF file. First, open the PDF file manually, with the PDF file opened, drag and drop the Selector positioning at the window title of the PDF file to create an “Open App” action  (i.e. screen captured below), make sure we supplied the file path in the Options field. This action once executed will open the PDF as we specified in the Options field. 

2. With the PDF document openned, we can now create an OCR action using the Selector on the opened PDF window. Drag and drop the Selector to the Acrobat Reader window, make sure the entire PDF window is now selected as shown in the below capture (i.e. boxed around the window)

3. Once we released the Seletor, we will get the “Target Preview” as shown in the below capture, select “OCR” from the Target Preview as shown in the captured below

4. The above step will give us the OCR Action Builder to which we can draw a box on the PDF area we wanted to OCR.

5. As we received different type of claim forms for processing, I am using the Simple OCR to identify the Claim type by recognizing the form title. This helps me categorizes Claims into different categories. 

I am so far happy with what the Simple OCR action can do for me. As shown in the captured above, I have highlighted the form title “Group Medical Insurance Claim Form” for the OCR. Simple OCR action provides the Preview capability, it shows the recognition with perfect match to the actual form title.

The same technique is used and applied to form reference number in the real scenario, where each of the forms we have will have a form reference number that we can use for categorizing the documents.

Use the OCR action from the Actions panel

1. Create OCR action from Actions Panel.

We may create OCR action directly by selecting the OCR action from the Actiona Panel. To do so, select “Images group” from the Action panel followed by OCR action from the images group of actions. This step gives us the OCR action builder as shown below

This tells us using the OCR action directly, it only allows us with “Image Editor” or “Image file”. We will not be able to OCR a PDF file this way.

2. With the Image File, we can use the image file we converted in my previous blog post (i.e. RPA Claim Processing – Part 1: PDF to image conversion with Python). As shown in the OCR action builder in the below capture, the SImple OCR is promissing with perfect recognition for the Form Title of “Group Medical Issurence Claim Form”.

With this exercise, hope we are now more familiar with the built-in Simple OCR action and equiped ourselves with the knowledge on how to use it.

I will be showing how we can use Google Vision API to perform tasks I have challenge getting it done using the Simple OCR action. More importantly, how we address the concerns on sending and store the entire document on the cloud for the OCR purpose.

For more details on the PDF to Image conversion, you may visit my previous blog post RPA Claim Processing – Part 1: PDF to Image Conversion with Python 

RPA Claim Processing – Part 1: PDF to Image conversion using Python

In receiving hundreds of Insurance Claims per day, we going to look into how RPA solution can help insurance companies save efforts and money hiring tens of people to do the capturing of claims, from scanned documents to claim processes.

In this blog post, I am going to share how I convert a PDF file to an image for the OCR purpose. Converting PDF to image is not a mandatory step, but in the RPA Claim Processing exercise, it is a step I will need to overcome challenges that we going to discuss later.

We will need some basic setup for the PDF to Image Conversion purpose, this is shared in the following paragraphs.

Environment and Steps Setup:

1. Python 3.7.4 

2. ImageMagick 6.9.10 Q8 (64-bit) 

3. Project speicific Python Virtual Environment 

4. Python Wand library package install to the virtual environment

5. creating a Python action in Foxtrot RPA

1. Install Python 3.7.4

I am using Python 3.7.4 version on windows 10 for this exercise, I am making assumption if you are looking at running a python action in Foxtrot, it means you should have knowledge and with python installed in your environment. In case you don’t, you may download and install python from python.org/downloads/windows/ for the purpose of this exercise.

Below is the capture of where I’ve got the intallation for python

2. ImageMagick 6.9.10 Q8 (64-bit) 

ImageMagick is a popular open source image conversion library which has different extension or wrapper library in different programming languages. The installation can be found from the ImageMagick site at imagemagick.org. I have selected what I needed for my exercise as captured below, you will not need the ImageMagick OLE Control for VBScript, Visual Basic, and WSH if you are not going to use the library for the respective languages.

3. Project speicific Python Virtual Environment 

Following the best practice of Python development, we avoid installing packages into a global intergreter environment. We going to create a project-specifi virtual environment for our exercise. To do that simply create a virtual environment under your project folder:

py -3 -m venv .venv

4. Python Wand library package install to the virtual environment

Now, we can activate the virtual environment using the below command and to install required package for our project

.venv\scripts\activate

and install the Wand package

python -m pip install Wand

6. Create and test the Python action

Now you may add a Python action in your Foxtrot project to convert PDF file into an image file. I have below code for the testing purpose:

from wand.image import Image as Img 

with Img(filename='C:\\Users\\gank\\py\\ninocr\\file_name.pdf', resolution=300) as img:
    img.compression_quality = 99
    img.save(filename='C:\\Users\\gank\\py\\ninocr\\image_name.jpg')

Here is the screen capture of my Python action:

With the above steps, we have successfully achieving what we need – converting any scanned PDF into a image file. This is the first part of the exercise where in the later blog post(s), we are going to OCR the image file. 

Note: Converting PDF to Image is not a mandatory steps for OCR a document, but in our scenario, I am going to use image file for the purpose, will explain further the objective behind.

Before I further explain how we going to use the converted image for the OCR purpose, let us take a look and learn about how we can use the Nintex Foxtrot RPA’s Simple OCR action, I have it covered in RPA Claim Processing – Part 2: Nintex Foxtrot Simple OCRLabels

Foxtrot RPA deployment with RabbitMQ

I am sharing one of the possible ways to Trigger Foxtrot RPA from Nintex Workflow Cloud. Before we get into the scripts on how to do that, maybe it’s a good idea to explain a bit further in the following paragrah, on how from the architecture perspective this is done.

Architecture

Assuming you have a troop of robot soldiers (i.e. FoxBot) lead by a commander (i.e. FoxHub), ignoring the number of soldiers you need to have to form a troop, in our scenario it could be as little as 1 or 2. Since the army is deployed to the battlefield, the location of the army is changing (i.e. without a fixed IP), we are not able to reach out to the Commanders to send orders.

Since we are not suppose to enter the military zone, central general office can only use special communication where messages are being broadcasted over the encrypted radio frequency, and the army should have worker on duty to pick up and decrypt the message(s). As such we deployed a messenger/worker to each Commander (i.e. which is our Foxhub), the worker’s duty is to listen to Broadcast Messages from the central control room and pass the message to the Commander. The commander is then based on the received message to assign duty/job to its soldiers on what to do.

This architecture is depicted in the diagram below. In our scenario, Nintex Workflow Cloud is the engine for “Publishing” message over the RabbitMQ Message Queue system. We are not reaching to Foxhub to pass the messages, instead the Worker that is attached to FoxHub is Subscribed/listening to the Message Queue and pick up any message(s) that is for them to action on. This is safe and we do not need to worry on how to expose our FoxHub to the internet. Message Queue is super fast without us to worry if the FoxHub will be able to take the load of requests as they are queued. In our scenario you will notice the FoxHub will be triggered immediately whenever there is a message published.

This is exactly how we going to do:

  1. Setting Up Message Queue (i.e. RabbitMQ in our exercise)
  2. Create the Worker Application
  3. Create NWC workflow to publish message to the Message Queue
  4. Testing: Worker picks up the message(s) and talks to FoxHub to assign new job(s)

Setting Up Message Queue 

In our scenario, we going to use RabbitMQ for the purpose, as the focus of this exercise is not about RabbitMQ, we are goin to leverage one of the cloud RabbitMQ provider solution to avoid having the need to install RabbitMQ ourselves. In my example, I am using the CloudAMQP.com (i.e. one of the RabbitMQ as a Service provider, the link will direct you to the available plans). For testing or development purpose, you may pick the free “Little Lemur – For Development” to start.

Once you have signed up, a instance will be provisioned. I provide my plan (i.e. I am using Tough Tiger plan here) details in the below capture as am example on what you will get, (please take note on the Red Arrowed highlighted details you will need in the connection later).

Create the Worker application

Worker can be a Windows console app or windows services. For this exercise we going to create it as a Windows Console Application so we can easily monitor the console logs and interact with the application over the console screen. In the event if this is created as a Windows service, we can also setup dependencies for it to auto start every time we start the Foxhub application.

Worker Application is a worker process (i.e. consumer/receiver/subscriber in Message Queue term). It subscribes to Message Queue, being notified whenever there is a new message published to the Queue by publisher. Upon notified and receiving a new message, the Worker is going to use Foxhub API to talk to Foxhub setting up jobs and assigning jobs to Foxbots/Foxtrots. FoxhubAPI.dll is provided in every FoxHub installation that comes with FoxTrot Suite installation.

We going to create a Windows Console Application using Visual Studio (i.e. I am using VS2017 for the purpose, but using .Net Framework 4.7.2), I realized when i compile my application, since FoxHubAPI.DLL is a 32-bit assembly compiled with the latest .Net Framework 4.7.2, I am forced to set the Target CPU to 32-bit and using .NET Framework 4.7.2 is required).

In the Visual Studio, create a new project and select C# Console App as shown in the capture below, give the project a name (i.e. Worker in my below example).

In order for our Worker Application to subscribe and listen to RabbitMQ, we going to install the RabbitMQ.Client API for .NET into our project. We can do this with Tools – NuGet Package Manager – Manage NuGet Package for Solution… from the Visual Studio menu. Search for RabbitMQ from the “Browse” tab as shown below, to find the RabbitMQ Client to install.

Besides communication to the RabbitMQ, the Worker application will also interact with FoxHub using the FoxHubAPI.dll assembly. Add the FoxHubAPI.dll by right click on the Worker solution to browse and add FoxHubAPI.DLL in the Solution Explorer. You should get something similar for the Solution Explorer to the screen capture below once done.

For the exercise purpose, the codes I shared below for the Worker.cs is hard-coded with RabbitMQ connection and FoxHub job queue details. My advice is you can consider to make these settings configurable at the later stage. The following code provide a basic testing I have done so far to prove a working listening and getting message from RabbitMQ and triggering FoxHub to add and get FoxBot to work on the newly added Job. You will need to change the connection values in the following code accordingly to your RabbitMQ setup, same to the RPA file i hardcoded for FoxHub to take.

using RabbitMQ.Client;
using RabbitMQ.Client.Events;
using System;
using System.Collections.Generic;
using System.Linq;
using System.Text;

namespace Worker
{
    class Worker
    {
        private static void Main()
        {
            string strHubPCName = Environment.MachineName; 
            string strAppPCName = Environment.MachineName;

            //Create the CFoxHub object:
            FoxHubAPI.CFoxHub objFoxHub = new FoxHubAPI.CFoxHub(strHubPCName, strAppPCName);

            //Initialize communication with FoxHub:
            if (objFoxHub.Init() == false)
            {
                //Communication with FoxHub failed!
                return;   //Abort and do nothing.
            };

            Console.WriteLine("Connected to Hub");
            //Log into FoxHub:
            //objFoxHub.Login("", "worker", "password");

            //Create a Dictionary object to hold the list of bots:
            Dictionary<int, string> objBotDict;

            //Get the list of bots:
            objBotDict = objFoxHub.GetBots();

            //Used to capture the Queue Item ID returned by calling QueueJob():
            int intQueueItemID;

            ConnectionFactory factory = new ConnectionFactory
            {
                UserName = "coqwpbee",
                Password = "mxhSRj04O4be85cOsXaCrOrSomethingElse",
                VirtualHost = "coqwpbee",
                HostName = "mustang.rmq.cloudamqp.com"
            };

            using (var connection = factory.CreateConnection())
            using (var channel = connection.CreateModel())
            {
                channel.QueueDeclare(queue: "hello", durable: false, exclusive: false, autoDelete: false, arguments: null);

                var consumer = new EventingBasicConsumer(channel);
                consumer.Received += (model, ea) =>
                {
                    var body = ea.Body;
                    var message = Encoding.UTF8.GetString(body);
                    Console.WriteLine(" [x] Received {0}", message);

                    //Add the job to the queue. Assign all bots to the job:
                    //You may get the RPA file variable from your message instead
                    //to replace with what I have hard coded here..
                    intQueueItemID = objFoxHub.QueueSoloJob(DateTime.Now.ToString("F"),
                                                            "C:\\Users\\gank\\CallVBS.rpa",
                                                            objBotDict.Keys.ToList());

                    //Run the job:
                    objFoxHub.RunJob(intQueueItemID);

                    int intStatus;
                    //Retrieve the job's status:
                    intStatus = objFoxHub.GetJobStatus(intQueueItemID);
                };
                channel.BasicConsume(queue: "hello", autoAck: true, consumer: consumer);

                Console.WriteLine(" Press [enter] to exit.");
                Console.ReadLine();
            }

            //Clean up objects:
            objBotDict = null;
            objFoxHub = null;

        }
    }
}

Once compiled, we may execute the worker.exe, the console will be running waiting and listening to new message(s) from the RabbitMQ.

What is missing here as of now, is a publisher to publish message to the queue. For this, in our scenario, we are going to use Nintex Workflow Cloud to as a publisher to publish a message triggering the FoxHub to assign and get job done by FoxTrot/Bot. This is simple, as CloudAMQP provides Rest API Endpoint for the purpose. We are just going to add a “Call Http Web Service” action to send/publish a message to the RabbitMQ.

Nintex Workflow Cloud to publish message to RabbitMQ

CloudAMQP.com provides http end point for publishing message, what we need to do for Nintex Workflow Cloud is simply add the “Call a web service” action to send message via the CloudAMQP API. You may follow my example below for configuring the “Call a web service” action.

URL: https://<user>:<password>@<host>/api/exchanges/<virtual-host>/amq.default/publish

Request type: HTTP Post

Request content: 

{“vhost”:”<vhost>”,”name”:”amq.default”,”properties”:{“delivery_mode”:1,”headers”:{}},”routing_key”:”<queue-name>”,”delivery_mode”:”1″,”payload”:”<message>”,”headers”:{},”props”:{},”payload_encoding”:”string”}

Additional Note:

  1. Since our Worker example I hard coded for the Worker to subscribe and listen to “hello” queue, the above <queue-name> value will have to set to “hello” in our example, but you may change it to a better queue name. 
  2. I have my message in the format of “RPA;C:\path\to\rpa\file.rpa”, which i can have the Worker to pick up the message and locate the RPA project file to be assigned to the job queue in FoxHub.

Testing the Setup

To test the setup, simply do the following steps:

  1. Run the FoxHub (note: make sure you have at least one bot registered to the FoxHub)
  2. Run the Worker.exe (note: we never have any error handler in our code, as we need to connect to the FoxHub, we need to make sure the FoxHub is running before we run the Worker.exe). This should bring us the console with message of “Connected to Hub” and “Press [Enter] to exit. as shown below

3. The above console shows the Worker is now active and listening to the RabbitMQ for new messages

4. We can now trigger our Nintex Workflow Cloud workflow to run, which it will publish new message to the Message Queue.

5. The Worker will immediately picks up the message and trigger FoxHob to add and assign job to FoxTrot/Bot to run.

    Important Note:

    1. I am using Visual Studio 2017 with .NET Framework 4.7.2

    2. The FoxHubAPI.DLL is a 32-bit assembly, you will need to set your project target to run on x86

    3. You can get the help content of FoxHubAPI from the Help menu of the FoxHub Application

    4. There is no verification code to handle checking if FoxHub is running, as such you will need to start the FoxHub application before you run Worker.exe

    VBScript action with external function from pre-compiled DLL

    If you wanted an action to do something that is not original provided by Foxtrot actions, what will you do? Well, I came across this challenge shared by a partner questioning if Foxtrot can call an external function provided by a dynamic link library file. The answer to me is obviously yes as you may use the advance actions such as C#, VB.NET, VBScript, etc. This is what i am going to share providing a step by step instruction on how I did that using the VBScript action of Foxtrot.

    First thing first, I don’t think you should take any DLL and include it in your project without knowing the source, that would be too risky to do that. So we going to start building a simple dll for the testing purpose, and later to include this dll in our VBScript action call.

    1. Create a C# Class Library project with your Visual Studio. I named my project FoxFunctions as captured in the screen below

    2. For the exercise, we going to simple create a Class Library with just one public method “factorial”. This would be the function we going to call from our VBScript later to return factorial of a supplied number. The C# code that I have in my example as below using a recursion function to calculate the factorial of a number.

    using System;
    using System.Runtime.InteropServices;
    
    namespace FoxFunctions
    {
        [ComVisible(true)]
        public class Operations
        {
            [ComVisible(true)]
            public double factorial(int number)
            {
                if (number == 1)
                    return 1;
                else
                    return number * factorial(number - 1);
            }
        }
    }

    This is what it looks like in my Visual Studio project

    3. Build the project, which gives us the FoxFunctions.dll and we will need to register the dll for the testing purpose, in my scenario i have the FoxFunctions.dll in my c:\ directory.

    4. Create a new Botflow in Foxtrot to test the dll. We going to add the VBScript action as shown in the below capture.

    5. Include the code below to include the FoxFunctions dll and test the factorial function.

    6. With the “Run” option turned on, it should immediate run the action when we clicked “OK”. The MsgBox function will show the result of the myObj.factorial(4) as shown below.

    7.  Here comes the question – “How can we get the exchange data between the VBScript code and Foxtrot?”. We going to add a variable for the exchange of data purpose.

    8. We can leverage the FoxTrot Programming Action Functions – RPAEngine.SetVar to assign the returned value of the factorial function to the variableA that we created in the step earlier.

    9. You should have noticed I have remarked the MsgBox in the above captured screen. When the action being executed, we will get the “Success” message, and the variableA value will be set to the result of myObj.factorial(4), which is 24 in this case as shown below.

    With that, I hope you find my sharing helps or triggers more toughts when come to the need for adding additional functionalities you may need in your foxtroc botflow projects.