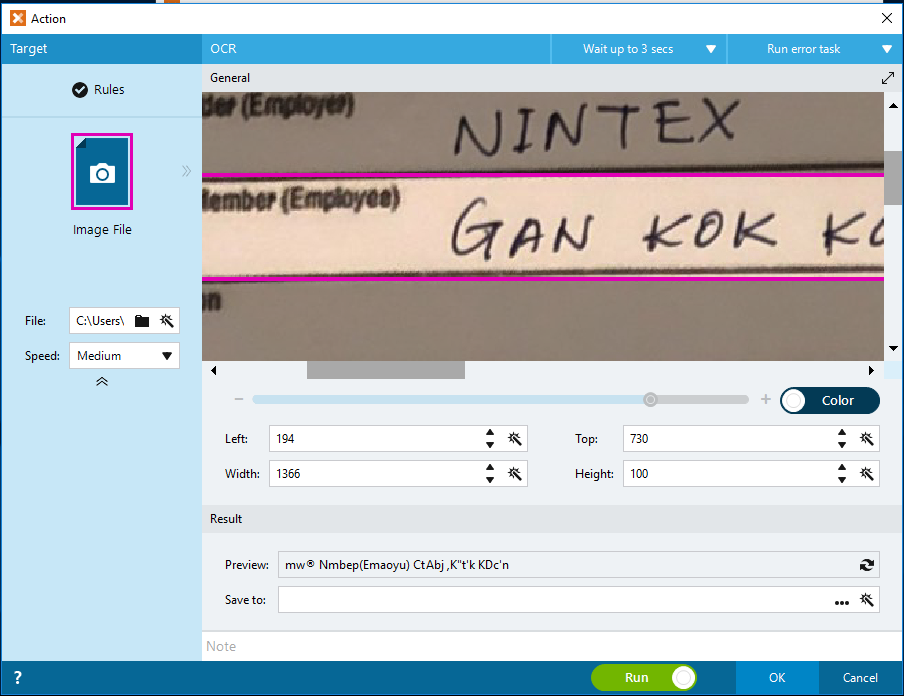
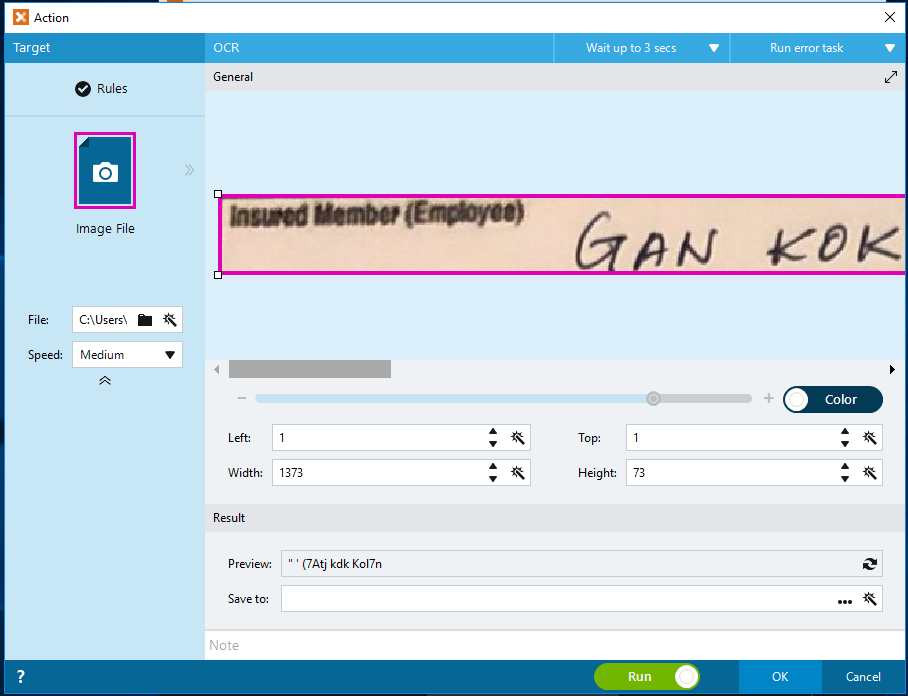
In my previous blog post (i.e. RPA Claim Processing – Part 2: Simple OCR), we have learn how to use the built-in Simple OCR to read printed text from a PDF form. This helps us to process all inbox pdf and categorize the documents to different claim categories. Let us take a step further, instead of OCR the printed form title, if we use the same technique to OCR a PDF that is filled with handwritting, we will come to realize the Simple OCR is having difficulty to get the right recognition of handwritting for us. The results of the Simple OCR i have tested are shown in the below captures (i.e. using PDF, Image, and Cropped Image). Take note of the Preview results, the result is somehow unpredictable and unexpected.
In my previous blog post (i.e. RPA Claim Processing – Part 2: Simple OCR), we have learn how to use the built-in Simple OCR to read printed text from a PDF form. This helps us to process all inbox pdf and categorize the documents to different claim categories. Let us take a step further, instead of OCR the printed form title, if we use the same technique to OCR a PDF that is filled with handwritting, we will come to realize the Simple OCR is having difficulty to get the right recognition of handwritting for us. The results of the Simple OCR i have tested are shown in the below captures (i.e. using PDF, Image, and Cropped Image). Take note of the Preview results, the result is somehow unpredictable and unexpected.
Figure 1: Simple OCR with PDF
Figure 2: Simple OCR with JPG Image
Figure 3: Simple OCR with Cropped JPG ImageGoogle Vision APIGoogle Vision API can detect and transcribe text from PDF and TIFF files stored in Google Cloud Storage (i.e. Google Cloud Vision API ). Unfortunately, as our users concern about having to save the entire PDF files in Google Cloud Storage, we are going to convert the PDF to Image file, and take each of the “input field” of the document to be sent to Google Vision API. Google Cloud Vision API takes base64 image for OCR purpose, there is no need for us to save the Image/PDF to the Cloud Storage. By OCR input field by field, it minimizes the effort to parse data that is for the entire document. While testing on Google Vision API, I come to realize Mathias Balslow @mbalslow of Foxtrot Alliance has already shared a great post on How-To Use Google Cloud Vision API (OCR & Image Analysis), without reinventing the wheel, we can simply follow what was shared by Mathias on how to setup and use Google Vision API. I will be attaching my script on my testing in this article later, but without the iteration part. Below are the steps of my script:
Create a list of “Input Fields” to be OCR
Open the Image file and saved it to duplicate the file as current <fieldname.jpg>.
Open the <fieldname.jpg>
Crop the image to the area representing the input field
use the REST action to send the <fieldname.jpg> to Google Cloud Vision API endpoint.
Here is the cropped image of my Fullname field:
The Google Cloud Vision API returns the result that is very promissing to me, the returned result includes the blurry/noised field label in my case (i.e. Insured Member (Emplyee)), and the handwritten full name. The result in json format as summarized below:
With the returned result above, it makes the parsing much easier compared to if the result consists of data of the entire document. Up to the current stage, you might be wondering do I have to get every single machine with the capability to convert the PDF to image, or if every bots we have, to categorize the documents for processing, I will be sharing and discussing on bots deployment options for the Claim Process. After that I am also planning to revisit our python code to further explore how we can overcome the challenges on parsing the return result of Google Vision API.
In a perfect world, we will have anything we need in the way we want it, but the world we living in is not perfect, so we will need to go around to get things done. If we have a local OCR system which could take any format of documents for OCR, we can simply get our scanned PDF/tiff document OCR.
In my next blog post (i.e. part 3), I am planning to send our document(s) to be OCR using google Vision API. Google Vision API only takes/supports PDF file that is stored in the cloud drive. When come to store important documents in the cloud, it concerns the banking and finance institutions users.
Before we get into Google Vision API, let us examine the built-in Simple OCR of Foxtrot. I am demonstrating the two ways I know on how to use the Simple OCR action:
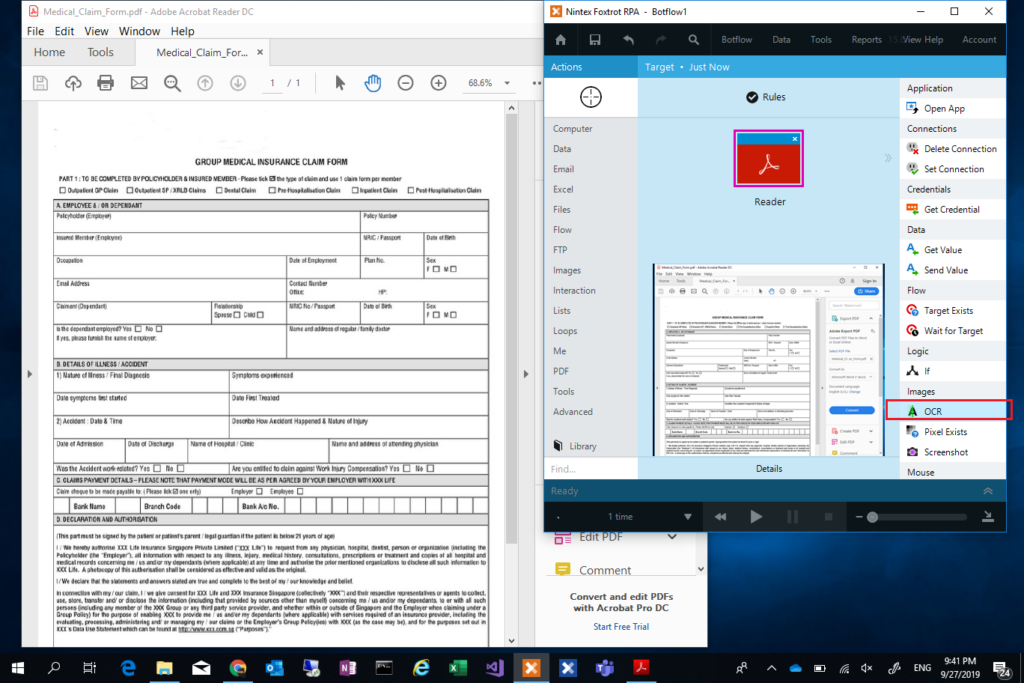
Creating OCR Action with Selector (e.g. OCR an openned PDF file)
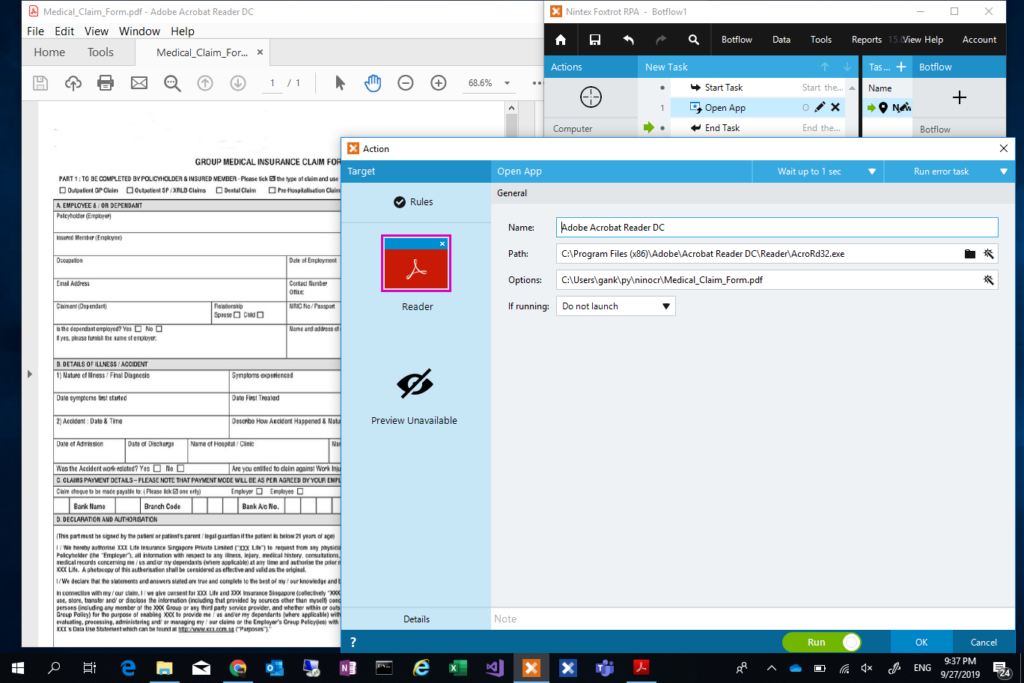
1. Open the PDF that we wanted to OCR.
Before we could use the Selector to create an OCR action, we need to have our PDF file opened. To do that, the first step is to record an “Open App” action to open the PDF file. First, open the PDF file manually, with the PDF file opened, drag and drop the Selector positioning at the window title of the PDF file to create an “Open App” action (i.e. screen captured below), make sure we supplied the file path in the Options field. This action once executed will open the PDF as we specified in the Options field.
2. With the PDF document openned, we can now create an OCR action using the Selector on the opened PDF window. Drag and drop the Selector to the Acrobat Reader window, make sure the entire PDF window is now selected as shown in the below capture (i.e. boxed around the window)
3. Once we released the Seletor, we will get the “Target Preview” as shown in the below capture, select “OCR” from the Target Preview as shown in the captured below
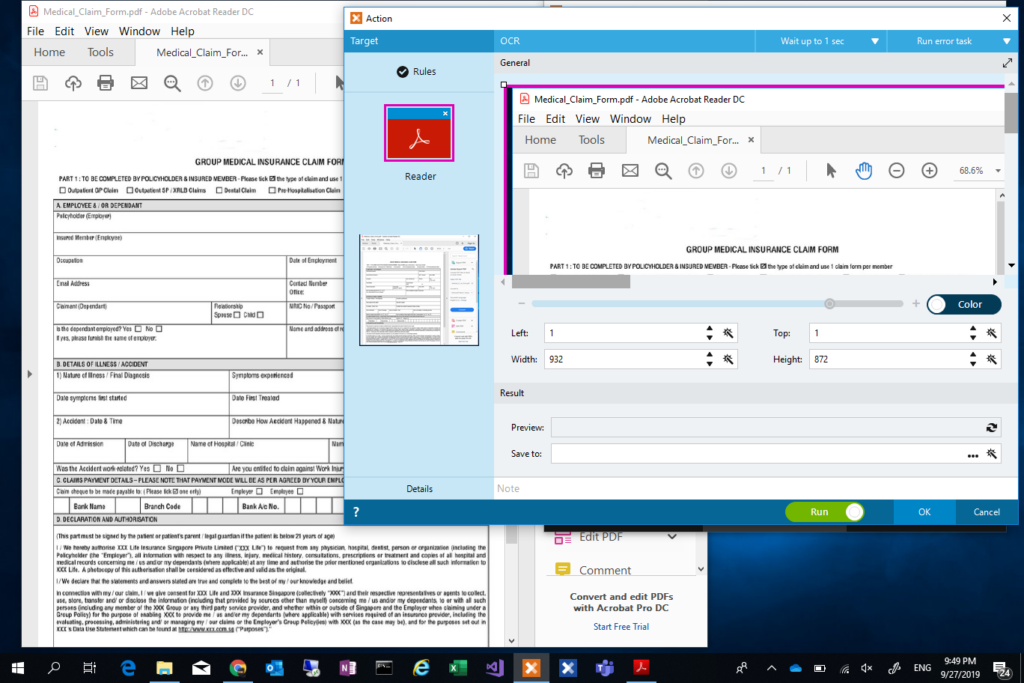
4. The above step will give us the OCR Action Builder to which we can draw a box on the PDF area we wanted to OCR.
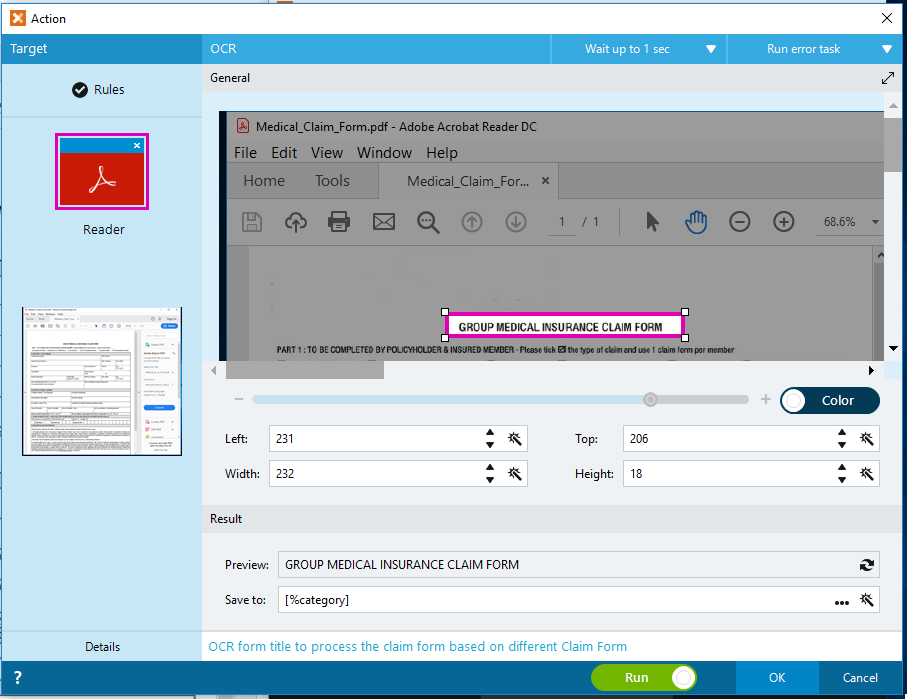
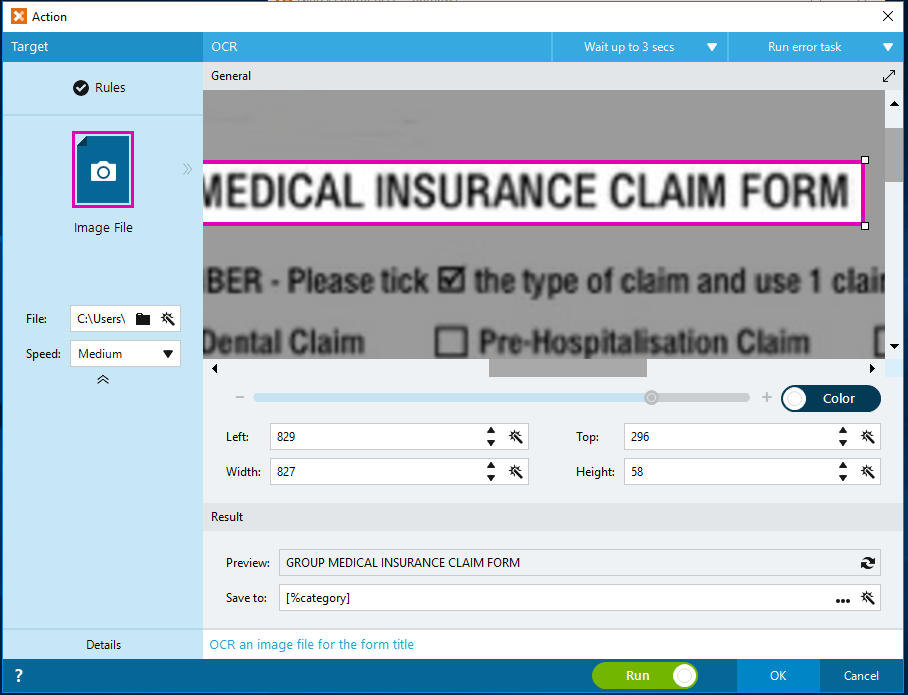
5. As we received different type of claim forms for processing, I am using the Simple OCR to identify the Claim type by recognizing the form title. This helps me categorizes Claims into different categories.
I am so far happy with what the Simple OCR action can do for me. As shown in the captured above, I have highlighted the form title “Group Medical Insurance Claim Form” for the OCR. Simple OCR action provides the Preview capability, it shows the recognition with perfect match to the actual form title.
The same technique is used and applied to form reference number in the real scenario, where each of the forms we have will have a form reference number that we can use for categorizing the documents.
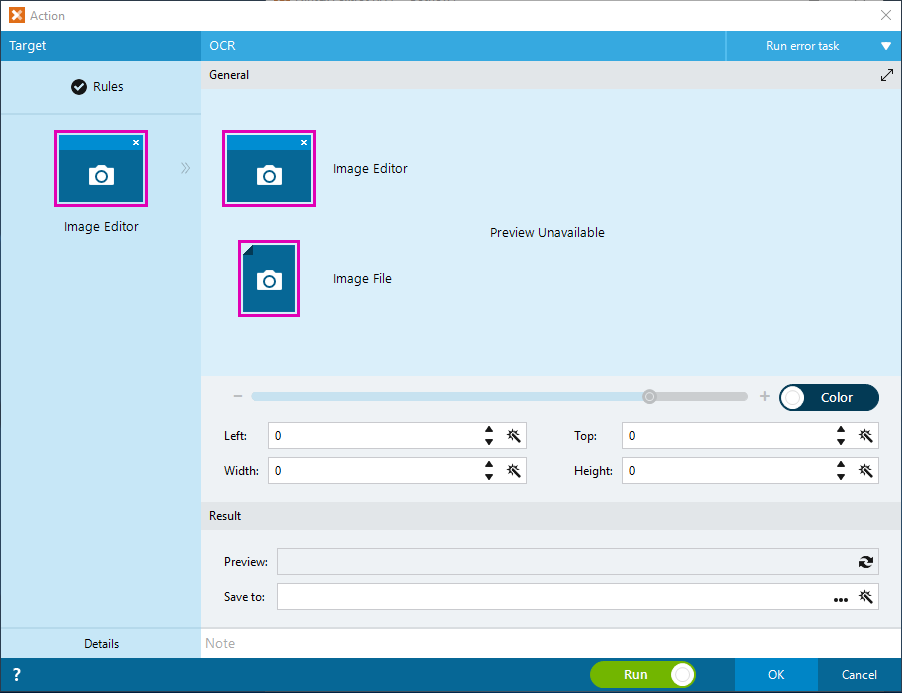
Use the OCR action from the Actions panel
1. Create OCR action from Actions Panel.
We may create OCR action directly by selecting the OCR action from the Actiona Panel. To do so, select “Images group” from the Action panel followed by OCR action from the images group of actions. This step gives us the OCR action builder as shown below
This tells us using the OCR action directly, it only allows us with “Image Editor” or “Image file”. We will not be able to OCR a PDF file this way.
2. With the Image File, we can use the image file we converted in my previous blog post (i.e. RPA Claim Processing – Part 1: PDF to image conversion with Python). As shown in the OCR action builder in the below capture, the SImple OCR is promissing with perfect recognition for the Form Title of “Group Medical Issurence Claim Form”.
With this exercise, hope we are now more familiar with the built-in Simple OCR action and equiped ourselves with the knowledge on how to use it.
I will be showing how we can use Google Vision API to perform tasks I have challenge getting it done using the Simple OCR action. More importantly, how we address the concerns on sending and store the entire document on the cloud for the OCR purpose.
In receiving hundreds of Insurance Claims per day, we going to look into how RPA solution can help insurance companies save efforts and money hiring tens of people to do the capturing of claims, from scanned documents to claim processes.
In this blog post, I am going to share how I convert a PDF file to an image for the OCR purpose. Converting PDF to image is not a mandatory step, but in the RPA Claim Processing exercise, it is a step I will need to overcome challenges that we going to discuss later.
We will need some basic setup for the PDF to Image Conversion purpose, this is shared in the following paragraphs.
Environment and Steps Setup:
1. Python 3.7.4
2. ImageMagick 6.9.10 Q8 (64-bit)
3. Project speicific Python Virtual Environment
4. Python Wand library package install to the virtual environment
5. creating a Python action in Foxtrot RPA
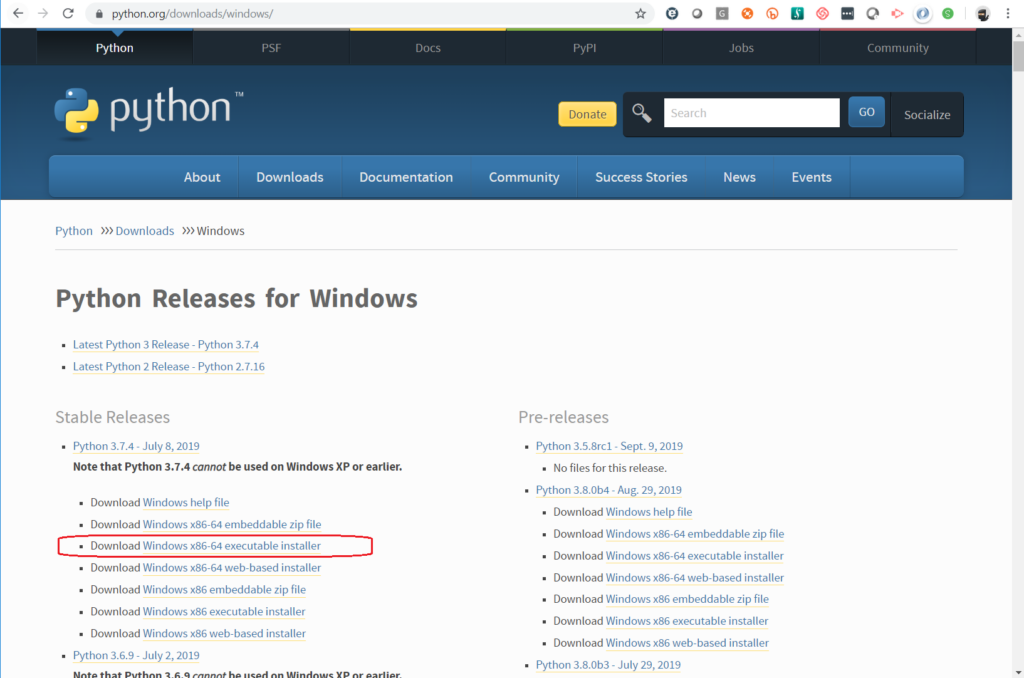
1. Install Python 3.7.4
I am using Python 3.7.4 version on windows 10 for this exercise, I am making assumption if you are looking at running a python action in Foxtrot, it means you should have knowledge and with python installed in your environment. In case you don’t, you may download and install python from python.org/downloads/windows/ for the purpose of this exercise.
Below is the capture of where I’ve got the intallation for python
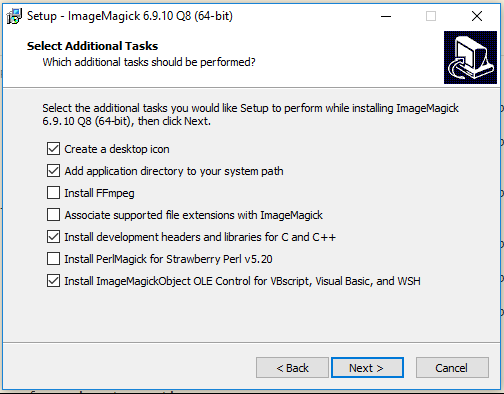
2. ImageMagick 6.9.10 Q8 (64-bit)
ImageMagick is a popular open source image conversion library which has different extension or wrapper library in different programming languages. The installation can be found from the ImageMagick site at imagemagick.org. I have selected what I needed for my exercise as captured below, you will not need the ImageMagick OLE Control for VBScript, Visual Basic, and WSH if you are not going to use the library for the respective languages.
3. Project speicific Python Virtual Environment
Following the best practice of Python development, we avoid installing packages into a global intergreter environment. We going to create a project-specifi virtual environment for our exercise. To do that simply create a virtual environment under your project folder:
py -3 -m venv .venv
4. Python Wand library package install to the virtual environment
Now, we can activate the virtual environment using the below command and to install required package for our project
.venv\scripts\activate
and install the Wand package
python -m pip install Wand
6. Create and test the Python action
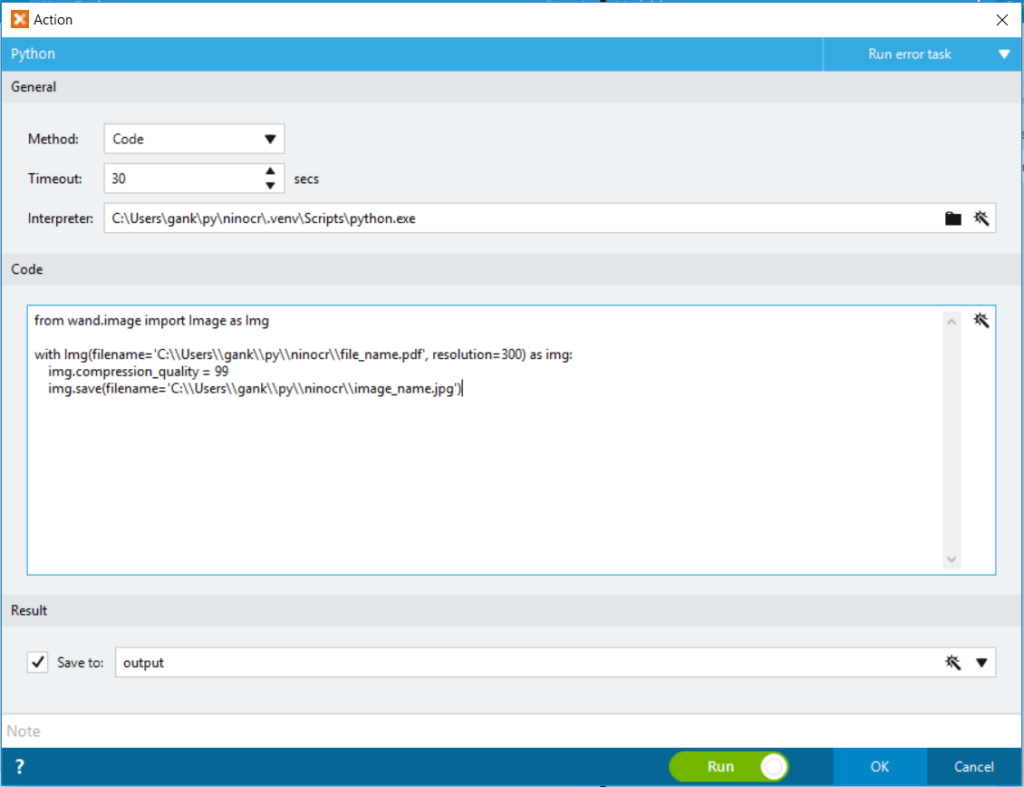
Now you may add a Python action in your Foxtrot project to convert PDF file into an image file. I have below code for the testing purpose:
from wand.image import Image as Img

with Img(filename='C:\\Users\\gank\\py\\ninocr\\file_name.pdf', resolution=300) as img:
    img.compression_quality = 99
    img.save(filename='C:\\Users\\gank\\py\\ninocr\\image_name.jpg')
Here is the screen capture of my Python action:
With the above steps, we have successfully achieving what we need – converting any scanned PDF into a image file. This is the first part of the exercise where in the later blog post(s), we are going to OCR the image file.
Note: Converting PDF to Image is not a mandatory steps for OCR a document, but in our scenario, I am going to use image file for the purpose, will explain further the objective behind.
Before I further explain how we going to use the converted image for the OCR purpose, let us take a look and learn about how we can use the Nintex Foxtrot RPA’s Simple OCR action, I have it covered in RPA Claim Processing – Part 2: Nintex Foxtrot Simple OCRLabels
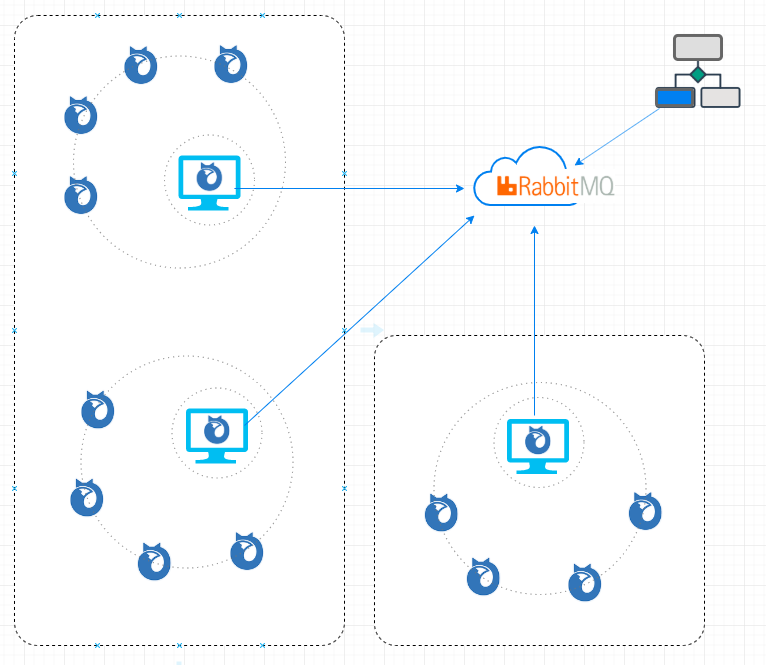
I am sharing one of the possible ways to Trigger Foxtrot RPA from Nintex Workflow Cloud. Before we get into the scripts on how to do that, maybe it’s a good idea to explain a bit further in the following paragrah, on how from the architecture perspective this is done.
Architecture
Assuming you have a troop of robot soldiers (i.e. FoxBot) lead by a commander (i.e. FoxHub), ignoring the number of soldiers you need to have to form a troop, in our scenario it could be as little as 1 or 2. Since the army is deployed to the battlefield, the location of the army is changing (i.e. without a fixed IP), we are not able to reach out to the Commanders to send orders.
Since we are not suppose to enter the military zone, central general office can only use special communication where messages are being broadcasted over the encrypted radio frequency, and the army should have worker on duty to pick up and decrypt the message(s). As such we deployed a messenger/worker to each Commander (i.e. which is our Foxhub), the worker’s duty is to listen to Broadcast Messages from the central control room and pass the message to the Commander. The commander is then based on the received message to assign duty/job to its soldiers on what to do.
This architecture is depicted in the diagram below. In our scenario, Nintex Workflow Cloud is the engine for “Publishing” message over the RabbitMQ Message Queue system. We are not reaching to Foxhub to pass the messages, instead the Worker that is attached to FoxHub is Subscribed/listening to the Message Queue and pick up any message(s) that is for them to action on. This is safe and we do not need to worry on how to expose our FoxHub to the internet. Message Queue is super fast without us to worry if the FoxHub will be able to take the load of requests as they are queued. In our scenario you will notice the FoxHub will be triggered immediately whenever there is a message published.
This is exactly how we going to do:
Setting Up Message Queue (i.e. RabbitMQ in our exercise)
Create the Worker Application
Create NWC workflow to publish message to the Message Queue
Testing: Worker picks up the message(s) and talks to FoxHub to assign new job(s)
Setting Up Message Queue
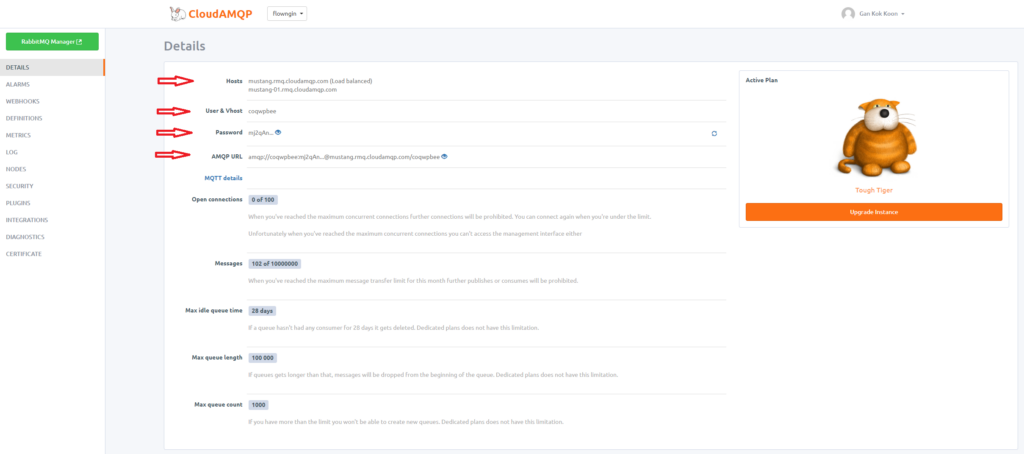
In our scenario, we going to use RabbitMQ for the purpose, as the focus of this exercise is not about RabbitMQ, we are goin to leverage one of the cloud RabbitMQ provider solution to avoid having the need to install RabbitMQ ourselves. In my example, I am using the CloudAMQP.com (i.e. one of the RabbitMQ as a Service provider, the link will direct you to the available plans). For testing or development purpose, you may pick the free “Little Lemur – For Development” to start.
Once you have signed up, a instance will be provisioned. I provide my plan (i.e. I am using Tough Tiger plan here) details in the below capture as am example on what you will get, (please take note on the Red Arrowed highlighted details you will need in the connection later).
Create the Worker application
Worker can be a Windows console app or windows services. For this exercise we going to create it as a Windows Console Application so we can easily monitor the console logs and interact with the application over the console screen. In the event if this is created as a Windows service, we can also setup dependencies for it to auto start every time we start the Foxhub application.
Worker Application is a worker process (i.e. consumer/receiver/subscriber in Message Queue term). It subscribes to Message Queue, being notified whenever there is a new message published to the Queue by publisher. Upon notified and receiving a new message, the Worker is going to use Foxhub API to talk to Foxhub setting up jobs and assigning jobs to Foxbots/Foxtrots. FoxhubAPI.dll is provided in every FoxHub installation that comes with FoxTrot Suite installation.
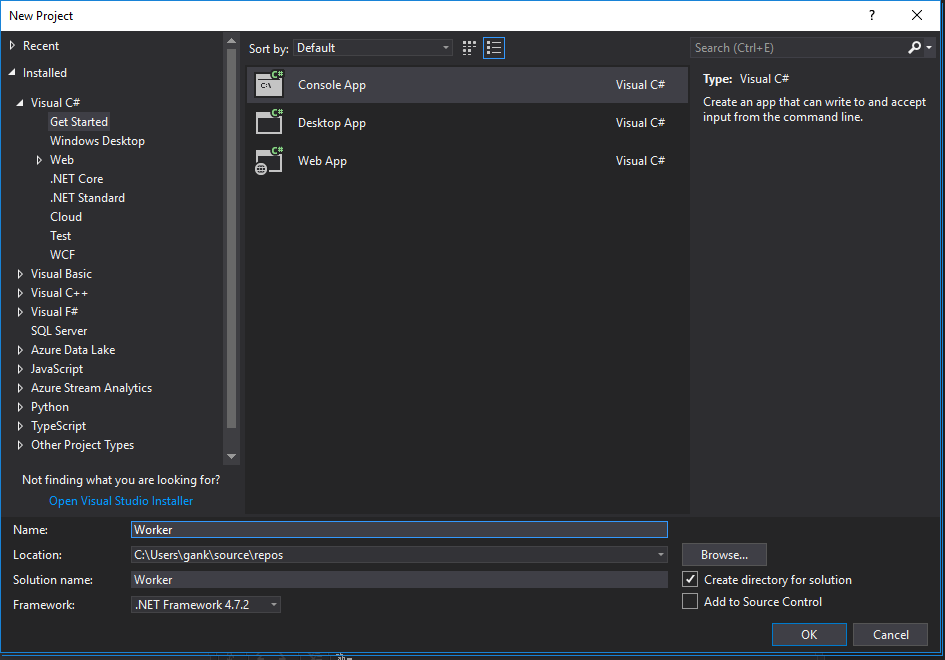
We going to create a Windows Console Application using Visual Studio (i.e. I am using VS2017 for the purpose, but using .Net Framework 4.7.2), I realized when i compile my application, since FoxHubAPI.DLL is a 32-bit assembly compiled with the latest .Net Framework 4.7.2, I am forced to set the Target CPU to 32-bit and using .NET Framework 4.7.2 is required).
In the Visual Studio, create a new project and select C# Console App as shown in the capture below, give the project a name (i.e. Worker in my below example).
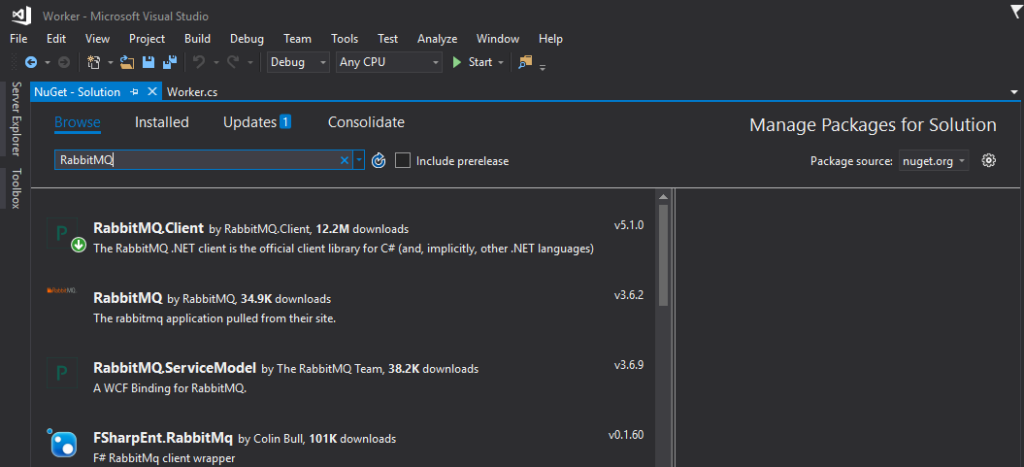
In order for our Worker Application to subscribe and listen to RabbitMQ, we going to install the RabbitMQ.Client API for .NET into our project. We can do this with Tools – NuGet Package Manager – Manage NuGet Package for Solution… from the Visual Studio menu. Search for RabbitMQ from the “Browse” tab as shown below, to find the RabbitMQ Client to install.
Besides communication to the RabbitMQ, the Worker application will also interact with FoxHub using the FoxHubAPI.dll assembly. Add the FoxHubAPI.dll by right click on the Worker solution to browse and add FoxHubAPI.DLL in the Solution Explorer. You should get something similar for the Solution Explorer to the screen capture below once done.
For the exercise purpose, the codes I shared below for the Worker.cs is hard-coded with RabbitMQ connection and FoxHub job queue details. My advice is you can consider to make these settings configurable at the later stage. The following code provide a basic testing I have done so far to prove a working listening and getting message from RabbitMQ and triggering FoxHub to add and get FoxBot to work on the newly added Job. You will need to change the connection values in the following code accordingly to your RabbitMQ setup, same to the RPA file i hardcoded for FoxHub to take.
using RabbitMQ.Client;
using RabbitMQ.Client.Events;
using System;
using System.Collections.Generic;
using System.Linq;
using System.Text;

namespace Worker
{
    class Worker
    {
        private static void Main()
        {
            string strHubPCName = Environment.MachineName;
            string strAppPCName = Environment.MachineName;

            //Create the CFoxHub object:
            FoxHubAPI.CFoxHub objFoxHub = new FoxHubAPI.CFoxHub(strHubPCName, strAppPCName);

            //Initialize communication with FoxHub:
            if (objFoxHub.Init() == false)
            {
                //Communication with FoxHub failed!
                return;   //Abort and do nothing.
            };

            Console.WriteLine("Connected to Hub");
            //Log into FoxHub:
            //objFoxHub.Login("", "worker", "password");

            //Create a Dictionary object to hold the list of bots:
            Dictionary<int, string> objBotDict;

            //Get the list of bots:
            objBotDict = objFoxHub.GetBots();

            //Used to capture the Queue Item ID returned by calling QueueJob():
            int intQueueItemID;

            ConnectionFactory factory = new ConnectionFactory
            {
                UserName = "coqwpbee",
                Password = "mxhSRj04O4be85cOsXaCrOrSomethingElse",
                VirtualHost = "coqwpbee",
                HostName = "mustang.rmq.cloudamqp.com"
            };

            using (var connection = factory.CreateConnection())
            using (var channel = connection.CreateModel())
            {
                channel.QueueDeclare(queue: "hello", durable: false, exclusive: false, autoDelete: false, arguments: null);

                var consumer = new EventingBasicConsumer(channel);
                consumer.Received += (model, ea) =>
                {
                    var body = ea.Body;
                    var message = Encoding.UTF8.GetString(body);
                    Console.WriteLine(" [x] Received {0}", message);

                    //Add the job to the queue. Assign all bots to the job:
                    //You may get the RPA file variable from your message instead
                    //to replace with what I have hard coded here..
                    intQueueItemID = objFoxHub.QueueSoloJob(DateTime.Now.ToString("F"),
                                                            "C:\\Users\\gank\\CallVBS.rpa",
                                                            objBotDict.Keys.ToList());

                    //Run the job:
                    objFoxHub.RunJob(intQueueItemID);

                    int intStatus;
                    //Retrieve the job's status:
                    intStatus = objFoxHub.GetJobStatus(intQueueItemID);
                };
                channel.BasicConsume(queue: "hello", autoAck: true, consumer: consumer);

                Console.WriteLine(" Press [enter] to exit.");
                Console.ReadLine();
            }

            //Clean up objects:
            objBotDict = null;
            objFoxHub = null;

        }
    }
}
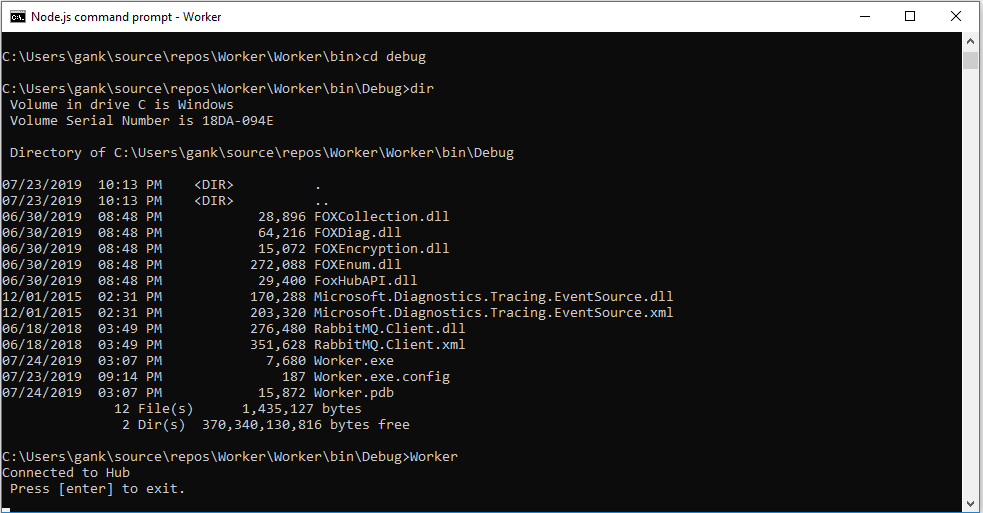
Once compiled, we may execute the worker.exe, the console will be running waiting and listening to new message(s) from the RabbitMQ.
What is missing here as of now, is a publisher to publish message to the queue. For this, in our scenario, we are going to use Nintex Workflow Cloud to as a publisher to publish a message triggering the FoxHub to assign and get job done by FoxTrot/Bot. This is simple, as CloudAMQP provides Rest API Endpoint for the purpose. We are just going to add a “Call Http Web Service” action to send/publish a message to the RabbitMQ.
Nintex Workflow Cloud to publish message to RabbitMQ
CloudAMQP.com provides http end point for publishing message, what we need to do for Nintex Workflow Cloud is simply add the “Call a web service” action to send message via the CloudAMQP API. You may follow my example below for configuring the “Call a web service” action.
Since our Worker example I hard coded for the Worker to subscribe and listen to “hello” queue, the above <queue-name> value will have to set to “hello” in our example, but you may change it to a better queue name.
I have my message in the format of “RPA;C:\path\to\rpa\file.rpa”, which i can have the Worker to pick up the message and locate the RPA project file to be assigned to the job queue in FoxHub.
Testing the Setup
To test the setup, simply do the following steps:
Run the FoxHub (note: make sure you have at least one bot registered to the FoxHub)
Run the Worker.exe (note: we never have any error handler in our code, as we need to connect to the FoxHub, we need to make sure the FoxHub is running before we run the Worker.exe). This should bring us the console with message of “Connected to Hub” and “Press [Enter] to exit. as shown below
3. The above console shows the Worker is now active and listening to the RabbitMQ for new messages
4. We can now trigger our Nintex Workflow Cloud workflow to run, which it will publish new message to the Message Queue.
5. The Worker will immediately picks up the message and trigger FoxHob to add and assign job to FoxTrot/Bot to run.
Important Note:
1. I am using Visual Studio 2017 with .NET Framework 4.7.2
2. The FoxHubAPI.DLL is a 32-bit assembly, you will need to set your project target to run on x86
3. You can get the help content of FoxHubAPI from the Help menu of the FoxHub Application
4. There is no verification code to handle checking if FoxHub is running, as such you will need to start the FoxHub application before you run Worker.exe
If you wanted an action to do something that is not original provided by Foxtrot actions, what will you do? Well, I came across this challenge shared by a partner questioning if Foxtrot can call an external function provided by a dynamic link library file. The answer to me is obviously yes as you may use the advance actions such as C#, VB.NET, VBScript, etc. This is what i am going to share providing a step by step instruction on how I did that using the VBScript action of Foxtrot.
First thing first, I don’t think you should take any DLL and include it in your project without knowing the source, that would be too risky to do that. So we going to start building a simple dll for the testing purpose, and later to include this dll in our VBScript action call.
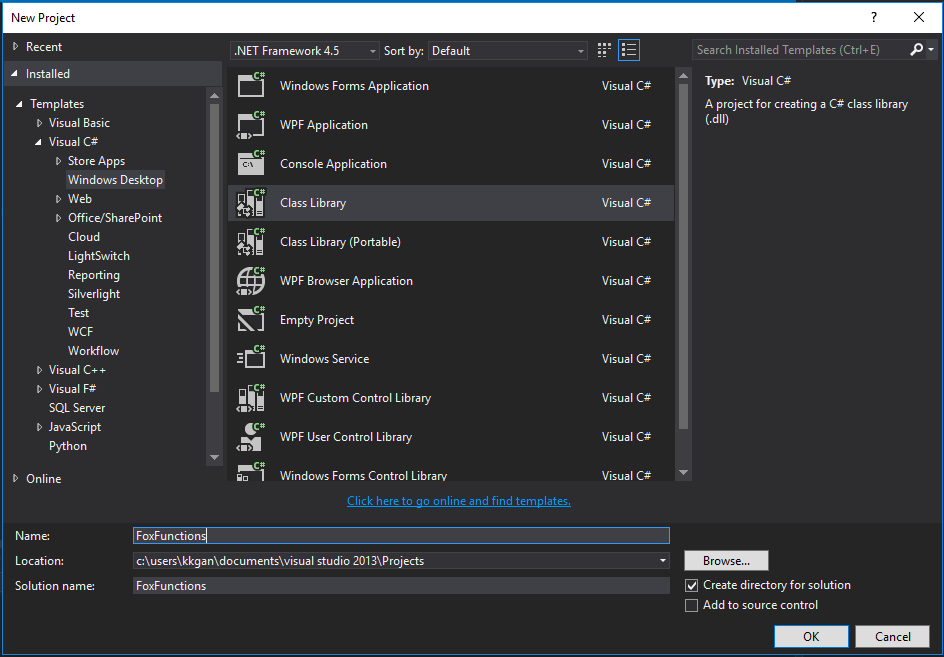
1. Create a C# Class Library project with your Visual Studio. I named my project FoxFunctions as captured in the screen below
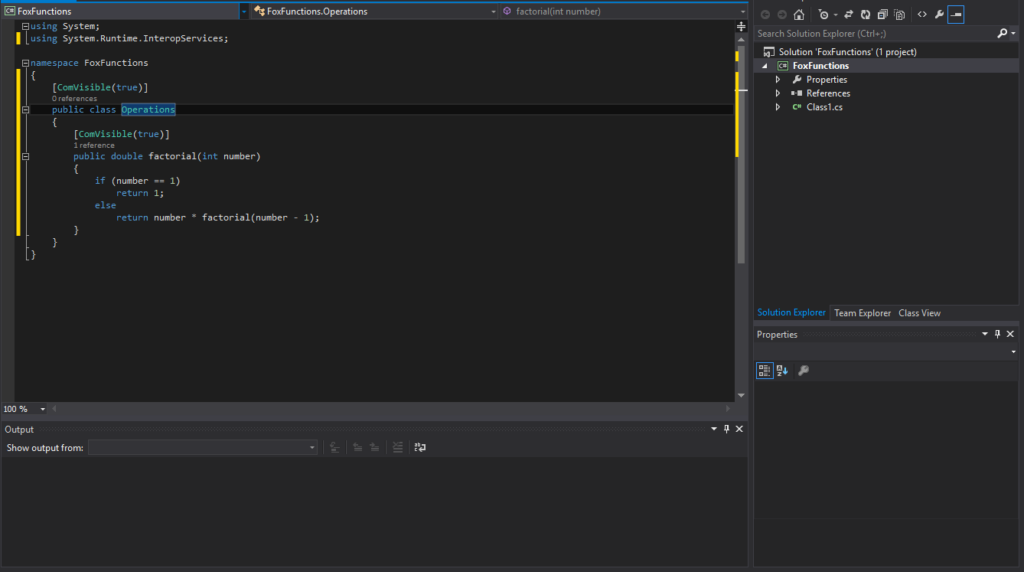
2. For the exercise, we going to simple create a Class Library with just one public method “factorial”. This would be the function we going to call from our VBScript later to return factorial of a supplied number. The C# code that I have in my example as below using a recursion function to calculate the factorial of a number.
using System;
using System.Runtime.InteropServices;

namespace FoxFunctions
{
    [ComVisible(true)]
    public class Operations
    {
        [ComVisible(true)]
        public double factorial(int number)
        {
            if (number == 1)
                return 1;
            else
                return number * factorial(number - 1);
        }
    }
}
This is what it looks like in my Visual Studio project
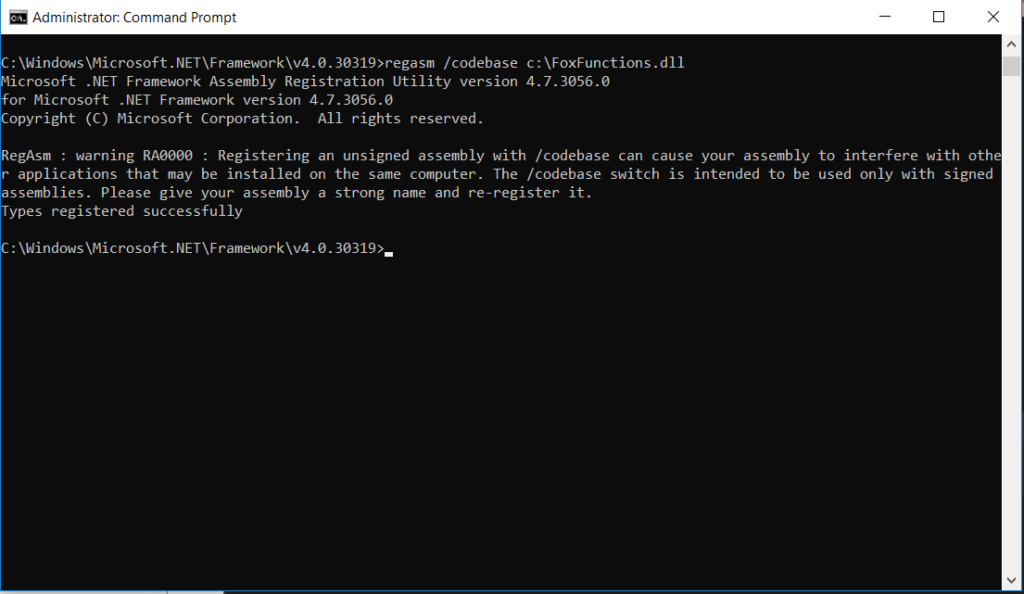
3. Build the project, which gives us the FoxFunctions.dll and we will need to register the dll for the testing purpose, in my scenario i have the FoxFunctions.dll in my c:\ directory.
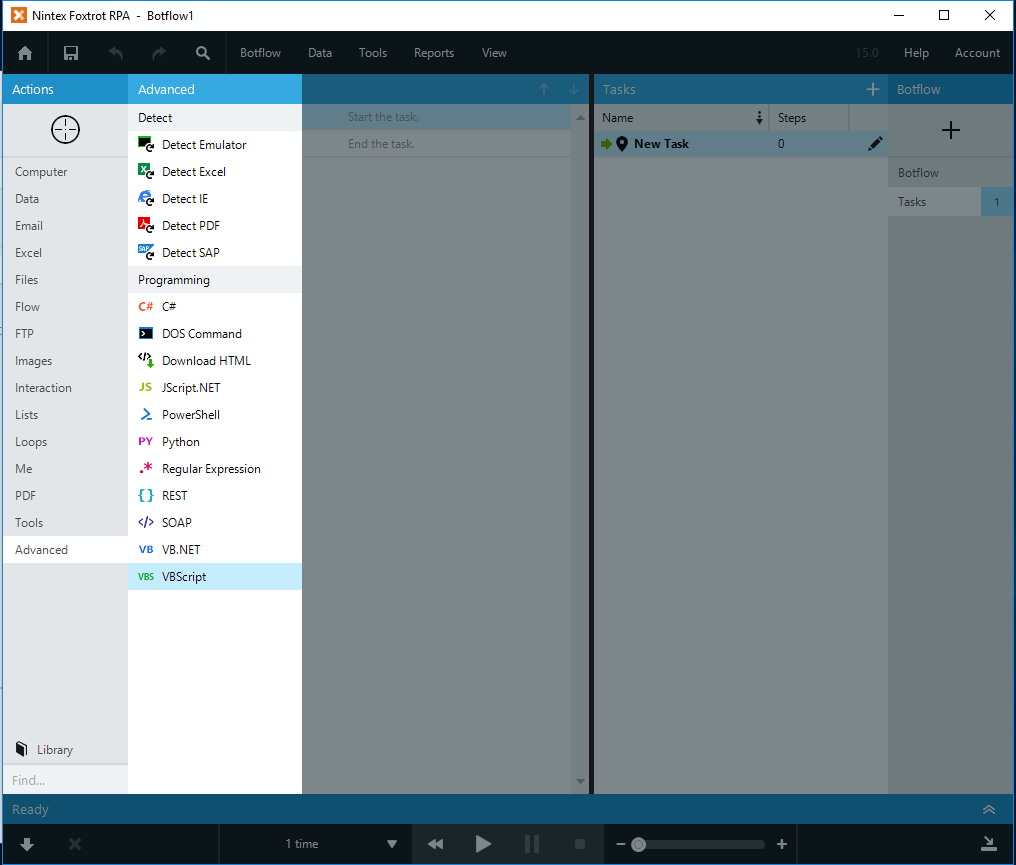
4. Create a new Botflow in Foxtrot to test the dll. We going to add the VBScript action as shown in the below capture.
5. Include the code below to include the FoxFunctions dll and test the factorial function.
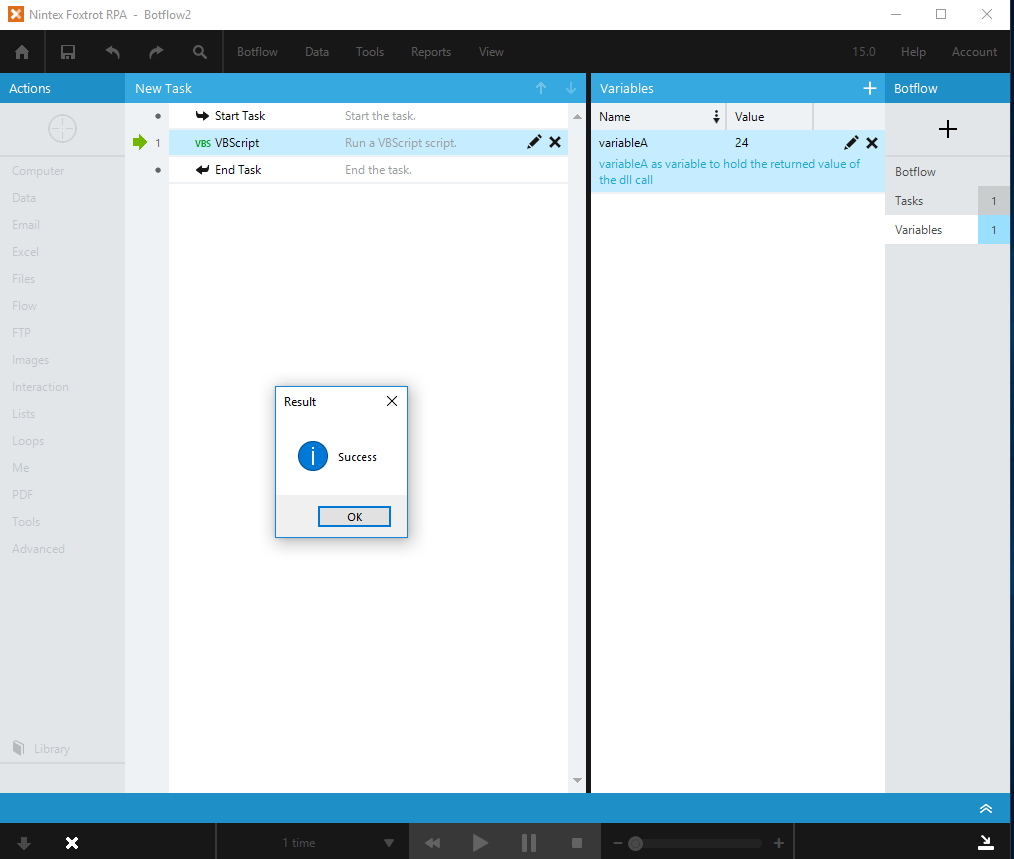
6. With the “Run” option turned on, it should immediate run the action when we clicked “OK”. The MsgBox function will show the result of the myObj.factorial(4) as shown below.
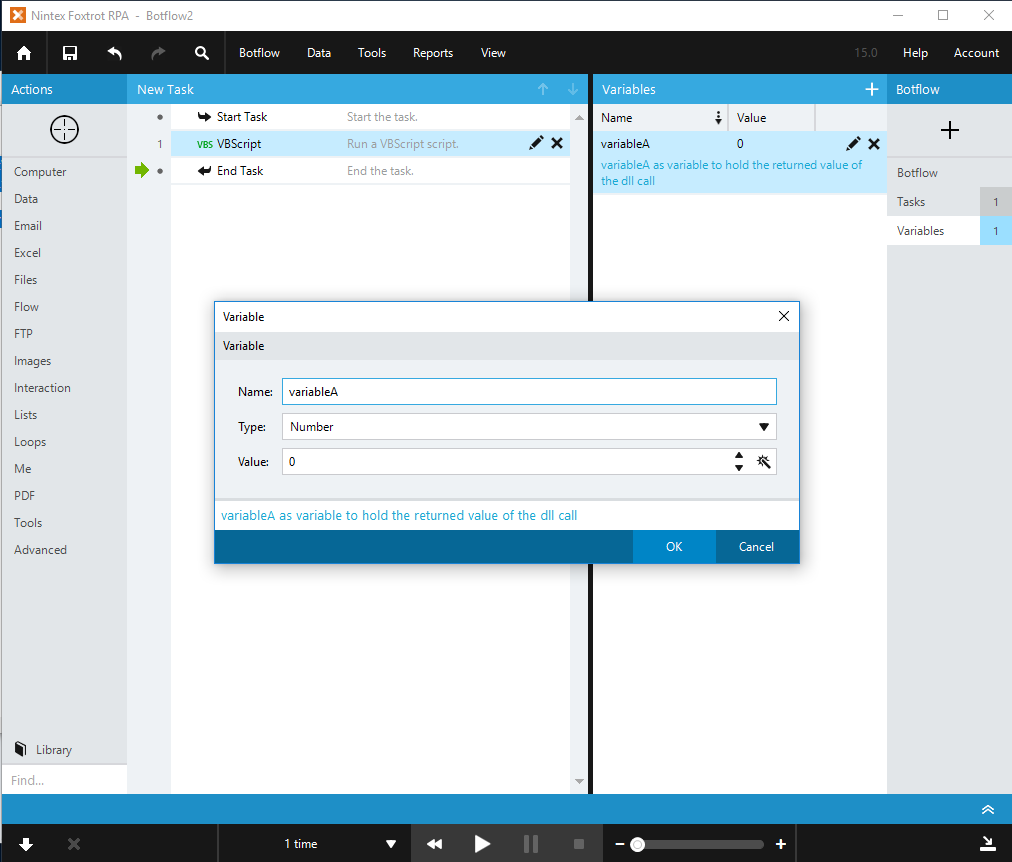
7. Here comes the question – “How can we get the exchange data between the VBScript code and Foxtrot?”. We going to add a variable for the exchange of data purpose.
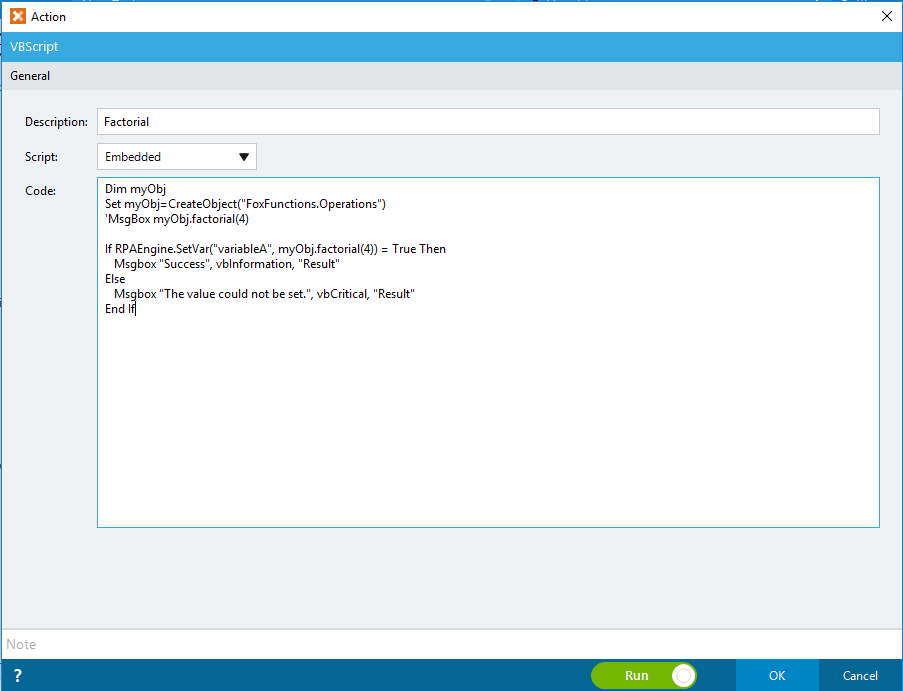
8. We can leverage the FoxTrot Programming Action Functions – RPAEngine.SetVar to assign the returned value of the factorial function to the variableA that we created in the step earlier.
9. You should have noticed I have remarked the MsgBox in the above captured screen. When the action being executed, we will get the “Success” message, and the variableA value will be set to the result of myObj.factorial(4), which is 24 in this case as shown below.
With that, I hope you find my sharing helps or triggers more toughts when come to the need for adding additional functionalities you may need in your foxtroc botflow projects.